Vestamatic 01580162 Скачать руководство пользователя страница 9

Subject to modifications.

© Vestamatic GmbH

9/15

G

Art.-Nr.: 

3055 001 GB 

2619 A03

  •  Vestamatic GmbH  •  Dohrweg 27  •  D-41066 Mönchengladbach 

 •  www.vestamatic.com

VHA-Smart Controller
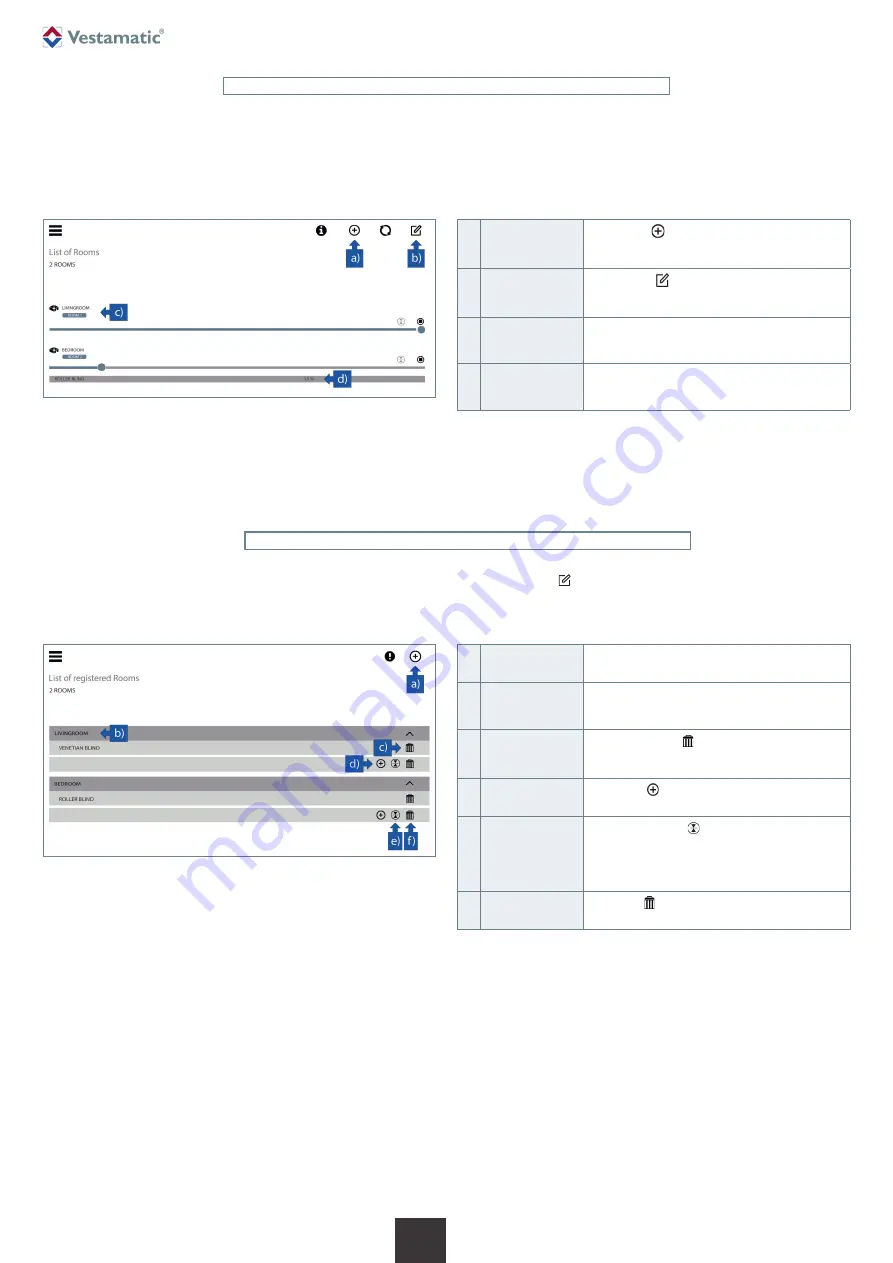
a) Add 

Room / Group

Click on the   symbol to add a new room / group.

After the name selection you will be redirected to 

the editing.

b) Edit 

Room / Group

Click on the   symbol, you will be taken to the 

“List of registered rooms / groups” view.

See also “9.12 “List of registered rooms / groups”. 

c) Room /   

Group name

Display of the name. Clicking on the name opens 

the room / group and displays the individual par-

ticipants. A new click closes the expand.

d) Motor 

informations

For the participants various information can be 

displayed, for example: Missing limit positions, 

position value and battery status.

9.11  List of rooms and groups

To get to this view, go to: 


„

Menu 

 Rooms 

or

 Groups

The following is an explanation of the room functionality, which applies equally to the 

group functionality. They do not differ in terms of usage.
A group can also contain rooms, whereas rooms consist exclusively of individual 

devices.

Figure 13

9.12  List of registered rooms and groups

To get to this view, go to:


„

Menu 

  Rooms or Groups 


The following is an explanation of the extended room functionality, which applies 

equally to the group functionality. They do not differ in terms of usage.

a) Add 

Room / Group

Adds a new room / group.

b) Room /   

Group name

Display of the name. By clicking on the name, the 

room / group can be renamed.

Open by the small arrow on the right edge.

c) Remove motor

By clicking here   you can remove individual 

 devices from the rooms / groups.

For groups, rooms can be removed accordingly.

d) Add motor

Click here   to add more motors to the room / 

group. For groups, rooms are also available.

e) Set intermedi-

ate position for 

room/group

By clicking on the    symbol you can set an in-

termediate position for the room or group. This 

intermediate position can then be used for other 

commands. The position can be changed at any 

time.

f)

Delete 

Room / Group

Click here   to delete the entire room / group.

Figure 14

Содержание 01580162

Страница 1: ...ered rooms and groups 9 13 Scenes 9 14 Timer 9 15 Settings 9 16 Service 10 Troubleshooting 11 Contact 2 Legend Menu Opens the menu Refresh When activated the motor data is newly requested and updated Lasts longer the more motors are paired Wizard Clicking on this button activates the wizard It explains functions buttons or processes that are displayed in the app Add Click here to add new devices S...

Страница 2: ...r and plug the other end into a free socket on your WiFi router Then connect the VHA Smart Controller to the supplied power adapter and plug it into the power outlet The VHA Smart Controller starts up automatically and is ready for use after approx 2 minutes Step 1 Step 2 Step 3 NOTE We recommend an Ethernet connection but if you want to con nect the controller wirelessly to your network ignore St...

Страница 3: ...he To Homescreen button and enter an individual name if necessary The link will be created automatically To enable faster access in the future you can save the application as a shortcut on the start screen Below is a brief description for the Google Chrome and Safari browsers 8 1 Steps for Google Chrome 8 2 Steps for Safari 7 Connect to the App Connection via Ethernet cable After connecting the co...

Страница 4: ...ctly control all paired devices c Groups rooms Room or group wise control Participants are displayed by clicking on the name The group All devices is predefined and controls all paired motors d Motors All paired motors are shown here Controllable via the slider If the motor has no limit positions the slider is locked represented by a lock e Wizard Opens the wizard to explain the app interface Can ...

Страница 5: ...vices List of devices To get to this view go to Menu Devices All paired motors are shown here a Listing of devices Displays the number of paired devices b Add Click on the symbol starts the Automatic Scan for devices More detailed explanation in point 9 6 Devices Add new devices c Refresh By clicking on symbol the device information are requested and updated manually d Device settings Click on sym...

Страница 6: ...ming button on the motor head once The green LED flashes for 60 seconds The motor will be listed as soon as it is found Fig 6 Figure 6 When all devices have been found stop the scan to perform further actions Preferably the programming mode of the motor should be stopped Clicking on the name makes it possible to rename the motor Fig 7 By pressing the motor can be identified By pressing on the symb...

Страница 7: ...This view is for the individual control of motors Figure 9 NOTE If the slider is at the top 0 the motor is in its upper limit po sition If the slider is on the bottom 100 the motor is in its lower limit position i a Save slat angle If the angular position is saved the motor re sumes the set angle after each change of position instead of keeping the slats in running direction b Control of motor pos...

Страница 8: ...ure 11 9 10 Devices Motor settings To get to this view go to Menu Devices a Motor speed Set the speed Switch between available speeds e g lownoise standard and fast Motor and App will confirm change b Motor Reset Reset the motor Two options Limit positions only or Limit positions and group room assignments c Deadman UP fast By holding down the button the motor moves fast endlessly up or down Short...

Страница 9: ... group functionality They do not differ in terms of usage A group can also contain rooms whereas rooms consist exclusively of individual devices Figure 13 9 12 List of registered rooms and groups To get to this view go to Menu Rooms or Groups The following is an explanation of the extended room functionality which applies equally to the group functionality They do not differ in terms of usage a Ad...

Страница 10: ...rview create and customize scenes You can execute several commands with a single action Figure 15 1 The following is an explanation for creating a scene which is the same for editing a scene Menü Scenes a Scene title To title the scene b Scene Description Add an individual description for the scene c Select object The selection determines which motors rooms or groups are controlled d Choose action...

Страница 11: ...planation for creating a timer which is the same for editing a timer Menü Timer a Timer title To title the timer b Timer description Add an individual description for the timer c Time The selection determines at what time the timer is exe cuted d Days of week Determines on which days of the week the timer is exe cuted e Select com mand type Selection whether a single command or a scene is to be ex...

Страница 12: ... for the selected user b WiFi Connect to wireless network Selection of the WLAN network to connect to The list is updated via the refresh icon If a password is required this is queried in a dialog window In case there is already a con nection via Ethernet cable it will be prioritized Note During the process of connecting to a wireless network the connection to the Vestamatic AP might fail briefly ...

Страница 13: ...ield of the Vestamatic app If the transmission was successful you will receive a response in the app You can now control your devices with voice commands For an overview of possible voice commands please refer to the skill description in the Alexa app NOTE The verification code will be sent to the e mail address that is also used in the Amazon account If a wrong code is transmitted several times t...

Страница 14: ...ogbook entries for all actions Figure 18 a Device Informations The device information provide an overview of all paired devices Among other things the status of the limit positions and the room or group alloca tion can be seen c Legals View the privacy policy b Logbook The logbook shows information about when which commands were executed The overview not only covers individual users but also wheth...

Страница 15: ...er Requesting motor info failed 1 Missing or faulty feedback from the motor 2 Delayed feedback from the motor 1 Try again or reload page 2 Try again Motor not found during automatic scan 1 Search can take longer 2 PROG button on the motor not pressed 3 PROG mode of the motor not active 4 Motor in DeepSleep mode 5 Motor already paired to another app 1 Wait a little longer 2 Press the PROG button Gr...

Отзывы: