Verykool s351 Скачать руководство пользователя страница 15

6 Camera & Gallery

All the pictures you can capture or view on your phone are stored on Phone storage or SD card

(Micro SD card), and the Storage location depends on the settings, which you can change it via

Settings> Storage> Preferred install location. If you do not insert a Micro SD card, the pictures

will store in Phone storage by default.

Load pictures onto your memory card

Read the instructions below to add pictures to your Micro card or the phone storage.

1. Insert your Micro SD card which inserted into an adopter or a card reader (can be read) to your

computer.

2. On your computer, find the Turn on USB storage and open it.

3. Create a folder at the (Root Directory) called “Pictures” or some other descriptive name and

open it.

4. Copy .jpg or other image files into this folder. To organize pictures into albums that will display

in the Pictures application, create a folder and copy pictures there for each album you want to

display.

5. When finished, close the USB drive window and eject the drive as required by your computer's

operating system.

Camera & Camcorder

Captured pictures are saved to the “DCIM” folder on your Micro SD card or the phone.

Tip: Before you take a picture, wipe the sensor window (on the back cover) to remove any small

amounts of oil.

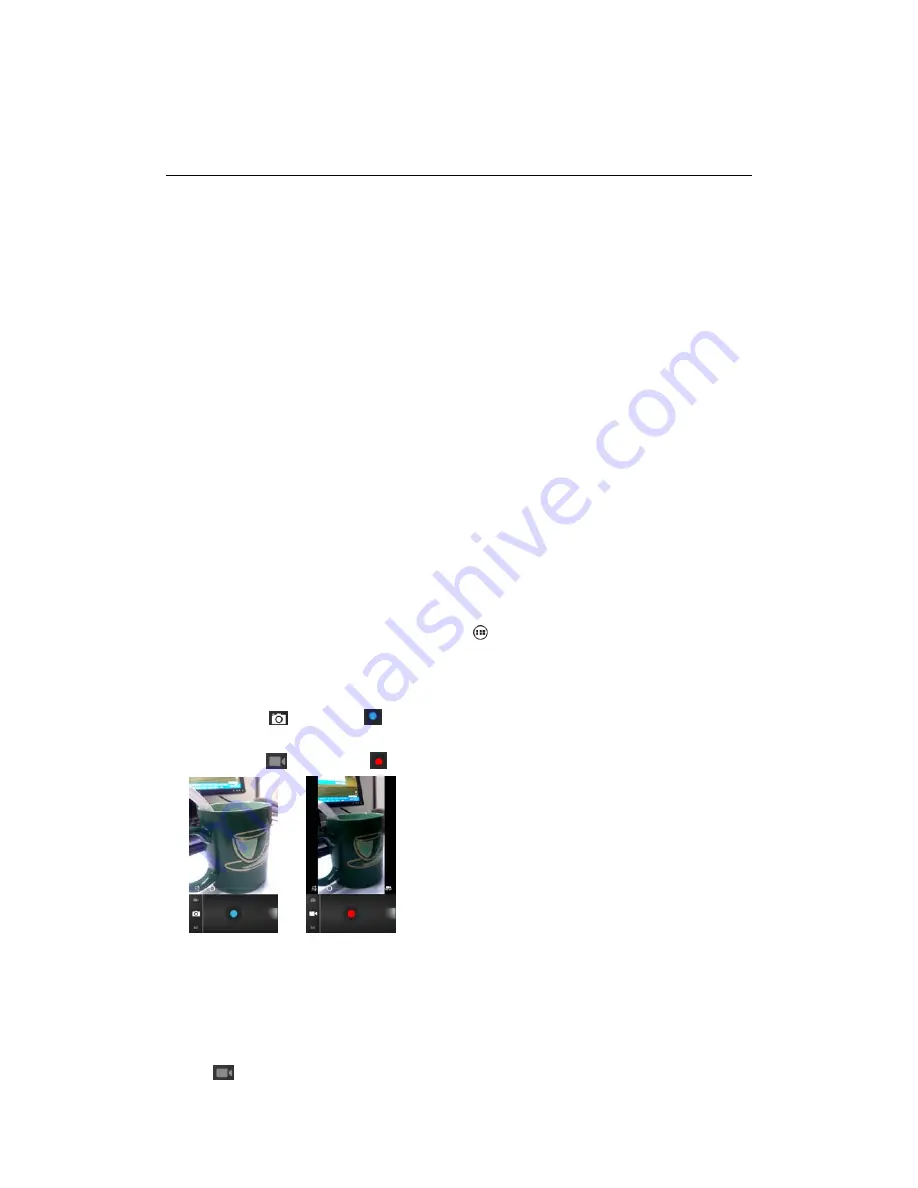
1. To open the Camera, on the Home screen, touch

and select Camera icon.

2. The Camera opens in capture mode. Frame your picture within the screen and hold the phone

steady. Touch Camera button to capture. Continue to hold the camera steady for a second after you

hear the shutter sound.

In capture mode

, touch icon

to take a picture.

In video mode

, touch icon

to record a video.

3. Immediately after capture, you can select to Save, Set as (contact icon or wallpaper), Share (via

a compatible application), or Delete your picture.

4. If you select to save, set as, or share, your picture is saved to Gallery application.

Video

To record a video, press Home key, touch application tab and then touch Camcorder. You can also

touch

icon and switch to video mode in Camera menu.

Содержание s351

Страница 1: ...User s Manual of Mobile Phone...

Страница 2: ...a contact 11 4 4 SIM contacts import and export 12 5 Messaging 13 6 Camera Gallery 15 7 Music 17 8 Browser 18 9 Clock 19 10 Calendar 20 11 Calculator 21 12 Search 22 13 Other applications 23 14 Setti...

Страница 3: ...Turn off when at a gasoline station 28 Turn off around exposure Area 28 Proper use 28 Use qualified after sale service 28 Accessories and batteries 28 Waterproof 28 Backup 28 Connect to other devices...

Страница 4: ...M2 in the same manner Insert the battery with metallic contact aligned to the phone battery contact and replace the back cover 1 2 Insert memory card This phone supports the T Flash memory card After...

Страница 5: ...rging is over cut off the connection between the charger and the standard power supply socket and then that between this device and the charger by pressing the buttons on both sides of the charger 1 4...

Страница 6: ...applications on your phone You can customize your Home screen as you like To add a Home screen item touch and hold an empty area to access the context menus choose wallpaper from items To remove items...

Страница 7: ...t To show all of the apps and widgets touch Apps 2 2 Onscreen Keyboard When you start a program or select a field that requires text or numbers the onscreen keyboard becomes available When you do not...

Страница 8: ...e status bar down Touch you can switch input methods 2 3Applications The applications tab holds all applications on your phone All applications that you downloaded and installed from Android Market or...

Страница 9: ...to Settings Applications Manage applications o make a call touch a phone number in Contacts an Email a text message or anywhere on your phone You can also enter the phone number manually by virtual ke...

Страница 10: ...wer an incoming call slide ANSWER Green icon button rightward 2 To reject a call slide REJECT button Red icon button leftward 3 3 Using call history 1 The missed call icon appears in the title bar whe...

Страница 11: ...a contact From Contacts you can quickly call or text a contact s default number as displayed below their name on the screen However to view all the information you ve stored for a contact and to initi...

Страница 12: ...acts stored on your phone by selecting this settings option 1 click the icon on the main menu 2 click left side Menu Key you will see 3 click Import export and you will see choose the type you want to...

Страница 13: ...nly the headers then you must first select the Download button to retrieve the message body If you are concerned about the size of your data downloads you can check the message size before you downloa...

Страница 14: ...imedia message Select from audio or picture files You can select to take a new picture if you want or record an audio file Any recordings you make will be stored automatically in the Music application...

Страница 15: ...each album you want to display 5 When finished close the USB drive window and eject the drive as required by your computer s operating system Camera Camcorder Captured pictures are saved to the DCIM f...

Страница 16: ...elect Gallery icon 2 Depending on how many pictures you ve stored they may take a few minutes to load 3 If you ve stored your pictures in folders on your Memory card then the folders will display as s...

Страница 17: ...saved on SD card Please insert SD card correctly before playing music At any level in your music library touch and hold a list a song artist album or playlist to open the context menu Select a song t...

Страница 18: ...n start typing the URL 2 Add a bookmark Bookmark the Web page you are currently viewing Press MENU and select Save to bookmarks Confirm the URL and name and then select OK To view all your bookmarks p...

Страница 19: ...e selector Slide the finger up or down to set the time you want and then select Done Repeat The current repeat selection is shown To change the setting select Repeat and make a selection from the menu...

Страница 20: ...pe the information in the fields Select date time Name that appears in Day view Description can be as long as you like Select a Repetition if you display more than one Set a default reminder time Set...

Страница 21: ...panel to insert advanced operators or delimiters such as sine cosine tangent square root parentheses etc Switch back and forth between calculator panels by pressing Menu key and selecting Advanced pa...

Страница 22: ...phone press Search Key to open the search bar Type in what you d like to search the search results will be listed under the search bar To make search faster you can select the search type like All Web...

Страница 23: ...13 Other applications You can find several games and practical application in your phone Such as Gmail Facebook Gtalk Maps Play Store You can enjoy your entertainment life easily...

Страница 24: ...nter Time and then set time Set date Click on the blank space of the input box enter the edit box to set the current date You can also press SL Key enter Date and then set date Time format You can cho...

Страница 25: ...for SIM1 and SIM2 Other alert rings Use this menu to customize various warning tones for the phone according to your needs Touch tone It can be set as on or off Vibrate on touch it can be set as on or...

Страница 26: ...e content of Photos 16 Maintenance of Mobile Phone Mobile phone is a high precision electronic product so please take good care of it The following suggestions can help you preserve it and lengthen it...

Страница 27: ...t or violated relevant wireless electric equipments 17 Safety Message and notices Failure to comply with the following precautions may be dangerous or illegal Please carefully read and observe the ter...

Страница 28: ...FCC Caution 15 19 Labelling requirements This device complies with part 15 of the FCC Rules Operation is subject to the following two conditions 1 This device may not cause harmful interference and 2...

Страница 29: ...R value reported under this standard during product certification for use at the ear is 1 05W kg and when properly worn on the body is1 07W kg This device was tested for typical body worn operations w...

Отзывы: