background image

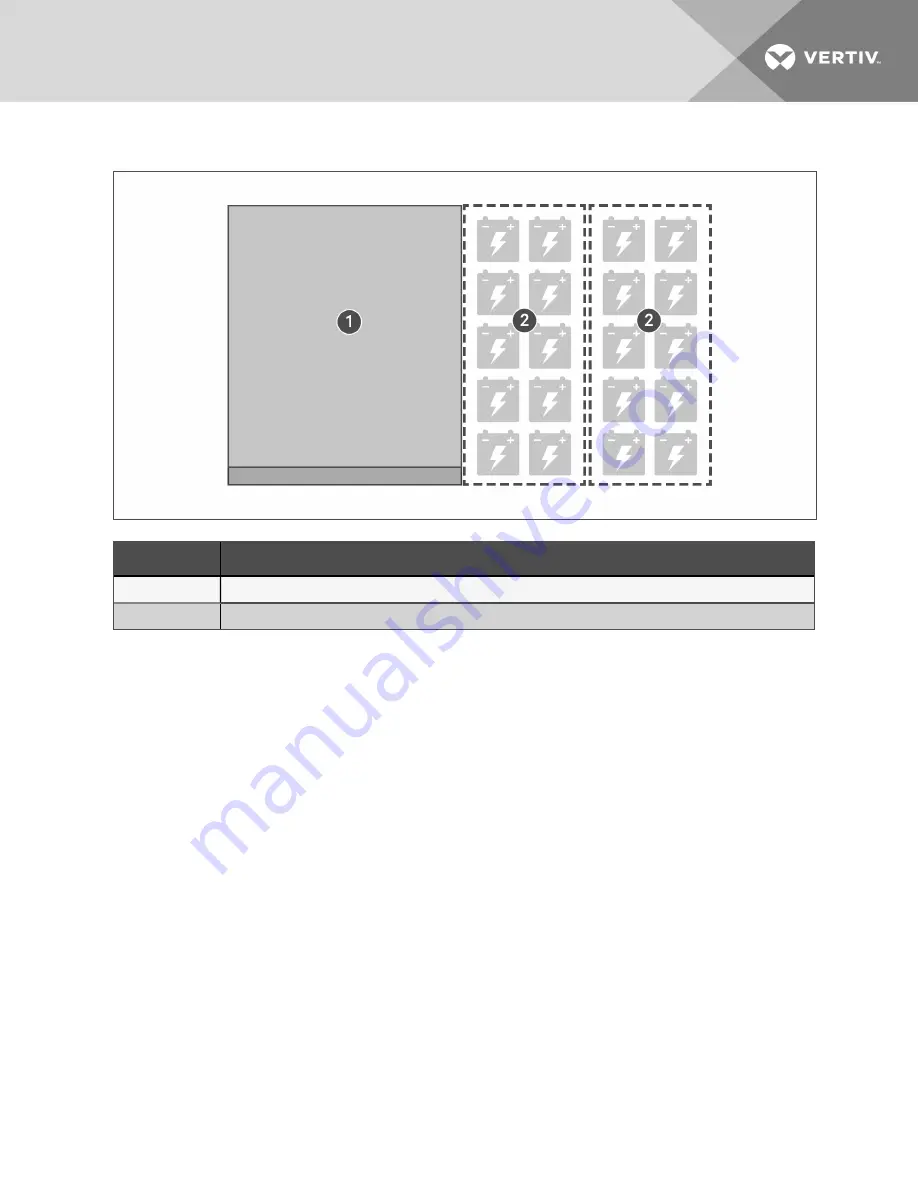
Figure 2.2 Connected and Internally-Wired UPS System

Item

Description

1

UPS

2

Battery cabinets

2 Mechanical Installation

7

Содержание Liebert

Страница 1: ...Liebert Large UPS Battery System Installer User Guide ...

Страница 2: ...d disclaims all liability for damages resulting from use of this information or for any errors or omissions Refer to other local practices or building codes as applicable for the correct methods tools and materials to be used in performing procedures not specifically described in this document The products covered by this instruction manual are manufactured and or sold by Vertiv This document is t...

Страница 3: ...stalling a Junction Cabinet 8 3 Electrical Installation 11 3 1 Grounding Configuration for Battery Systems 11 3 2 Connecting Equipment Ground Cables and Straps 11 3 3 Interconnecting Battery Cables in a Top Terminal Cabinet 12 3 4 Interconnecting Battery Cables in a Front terminal Cabinet 13 3 5 Connecting DC Input Power 15 3 6 Control Cabling 19 3 6 1 Connecting to Liebert EXL S1 20 3 6 2 Connect...

Страница 4: ...Vertiv Liebert Large UPS Battery System Installer Guide ii This page intentionally left blank ...

Страница 5: ... at all times For weights see Specifications on page 29 WARNING Risk of electrical shock and fire Can cause equipment damage personal injury or death Only normal safety precautions are necessary under typical operation and with all UPS doors closed The area around the UPS system should be kept free of puddles of water excess moisture and debris Only test equipment that is designed for troubleshoot...

Страница 6: ...Vertiv Liebert Large UPS Battery System Installer Guide 2 This page intentionally left blank ...

Страница 7: ... out the following preliminary checks Visually examine the equipment for transit damage both internally and externally Report any damage to the shipper and to your Vertiv representative immediately Verify that the correct equipment is being installed The equipment supplied has an identification tag on the inside of the main door Verify that the room in which the equipment will be installed satisfi...

Страница 8: ...nit and that floors are capable of supporting its weight Check that doorways lifts ramps and so on are adequate and that there are no impassable corners or changes in the level of corridors that would prevent passage Ensure that the cabinet weight is within the designated surface weight loading kg cm2 of any handling equipment For weights see Specifications on page 29 Move the battery cabinet with...

Страница 9: ...pping Bolts Cabinets with top terminal and front terminal batteries ship with extra bolts installed on the interior doors Once the cabinet is in the final position you can remove the bolts See Figure 2 1 below for the shipping bolt locations NOTE The outer doors are not shown in Figure 2 1 below Figure 2 1 Shipping Bolts on Inner Doors Item Description 1 Standard width cabinet 2 Reduced width cabi...

Страница 10: ...right side of the UPS In this configuration the battery junction cabinet may be on either end or between the battery cabinets Stand alone battery system The battery cabinet system stands alone In this configuration there is no junction cabinet and the battery cabinets are not connected to the UPS Battery power cables are routed directly to the DC busbars in the UPS I O cabinet NOTE Make sure that ...

Страница 11: ...Figure 2 2 Connected and Internally Wired UPS System Item Description 1 UPS 2 Battery cabinets 2 Mechanical Installation 7 ...

Страница 12: ...OTE Stand alone battery cabinets do not include a junction cabinet Junction cabinets vary in width depending on the rating of your system Figure 2 4 on the facing page shows an example assembly of a 17in junction cabinet For details of assembly busbar installation and cable routing refer to the submittal drawings that shipped with the battery system or contact your Vertiv sales representative for ...

Страница 13: ...Figure 2 4 Example Junction Cabinet Assembly Item Description 1 Front 2 Rear 2 Mechanical Installation 9 ...

Страница 14: ...Vertiv Liebert Large UPS Battery System Installer Guide 10 This page intentionally left blank ...

Страница 15: ...ped with the battery system or contact your Vertiv sales representative for the drawings For connected or attached cabinets ground cables and hardware are supplied For detached or stand alone cabinets the cables and hardware are field supplied See the terminal detail drawings for the ground busbar s location All cabinets and cabling must be grounded in accordance with local regulations WARNING Fai...

Страница 16: ...ery Cables in a Top Terminal Cabinet NOTE Make sure that you complete all cabinet and battery interconnections before making any power cabling connections The interconnects are very hard to access after the power wiring is complete Refer to the submittal drawings that shipped with the battery system or contact your Vertiv sales representative for the drawings Figure 3 2 on the facing page shows th...

Страница 17: ...omplete all cabinet and battery interconnections before making any power cabling connections The interconnects are very hard to access after the power wiring is complete Refer to the submittal drawings that shipped with the battery system or contact your Vertiv sales representative for the drawings Figure 3 3 on the next page shows the interconnection between each battery tray and battery jar 3 El...

Страница 18: ...inal Cabinet Battery Interconnection Layout Item Description 1 Cable interconnection 2 Battery location 3 Cabinet A 4 Cabinet B 5 Top of cabinet 6 Bottom of cabinet Vertiv Liebert Large UPS Battery System Installer Guide 14 ...

Страница 19: ...rawings UPS models with the static bypass only employ busbars that are contained by the battery cabinet and the input output cabinet UPS models with the back feed disconnect common mode choke or bypass sharing inductors or with any combination of these options employ busbars that extend through openings in the tops of the adjacent battery cabinet and input output cabinet These busbars require a pr...

Страница 20: ...gure 3 4 Attached battery cabinet busbar connections to EXL S1 250 600kVA Item Description 1 EXL S1 250 600kVA with backfeed disconnect or sharing inductors 2 EXL S1 250 600kVA without backfeed disconnect or sharing inductors 3 Rear of cabinet 4 Front of cabinet 5 Battery wiring cabinet 6 Backfeed disconnect and or sharing inductor inputI output cabinet 7 Standard inputI output cabinet 8 UPS input...

Страница 21: ...s to EXL S1 625 1200kVA ITEM DESCRIPTION 1 Standard input output cabinet 2 Battery positive busbar 3 Battery negative busbar 4 Battery cabinet 5 Negative battery bus 6 Positive battery bus 7 Front of cabinet 8 Rear of cabinet 3 Electrical Installation 17 ...

Страница 22: ...put output cabinet 2 Positive DC busbar 3 Negative DC busbar The Liebert NXL is available in multiple configurations single module multi module 1 N and N 1 For configurations without an input output cabinet refer to the submittals that shipped with the UPS Vertiv Liebert Large UPS Battery System Installer Guide 18 ...

Страница 23: ...ns must be less than 1000 ft 300 m NOTE Route control cables away from high voltage cables and busbars NOTICE Risk of improper installation Can cause equipment damage During system commissioning the Vertiv technician sets the jumpers on the external interface board EIB and battery interface board BIB If additional battery cabinets are added to the system after commissioning the jumpers on the EIB ...

Страница 24: ... on the EXL S1 communication board see Figure 3 8 on the facing page Terminal block Pin Connects to desribes external item Maximum Voltage Maximum Current TB1154 1 CAN 24V 24VDC 2A 2 CAN Common 3 CANbus High 4 CANbus Low Table 3 1 EXL S1 control contacts to BIB Vertiv Liebert Large UPS Battery System Installer Guide 20 ...

Страница 25: ...ecting to Liebert EXL Connect to TB1154 of the EXL control drawer see Figure 3 9 on the next page Terminal block Pin Connects to desribes external item Maximum Voltage Maximum Current TB1154 1 CAN 24V 24VDC 2A 2 CAN Common 3 CANbus High 4 CANbus Low Table 3 2 EXL control contacts to BIB 3 Electrical Installation 21 ...

Страница 26: ...e facing page or Figure 3 10 on the facing page depending on your NX model Terminal block Pin Connects to desribes external item TB3 1 CAN 24V Battery Interface Board TB1154 1 2 GND Battery Interface Board TB1154 2 3 CANbus High Battery Interface Board TB1154 3 4 CANbus Low Battery Interface Board TB1154 4 Table 3 3 NX control contacts to BIB Vertiv Liebert Large UPS Battery System Installer Guide...

Страница 27: ...Figure 3 10 Connector on the Communication Panel of 225 300kVA models Item Description 1 TB3 2 External communication panel 3 Unit with front doors not shown 3 Electrical Installation 23 ...

Страница 28: ...1154A on the NXL communication board see Figure 3 12 on the facing page Terminal block Pin Connects to desribes external item TB1154A 1 CAN 24V Battery Interface Board TB1154 1 2 GND Battery Interface Board TB1154 2 3 CANbus High Battery Interface Board TB1154 3 4 CANbus Low Battery Interface Board TB1154 4 Table 3 4 NXL control contacts to BIB Vertiv Liebert Large UPS Battery System Installer Gui...

Страница 29: ...Figure 3 13 on the next page for an overview of the equipment and connections Figure 3 14 on page 28 shows the typical location of the battery monitoring components when installed in the cabinet For detailed installation instructions refer to the Albér Universal Battery Diagnostic System Installer User Guide available at www Vertiv com NOTE The monitoring system transformer is powered from the out...

Страница 30: ...m Description 1 Control module 2 Battery module 3 Resistive load connection depending on battery configuration 4 Voltage sense and interior sense connections depending on battery configuration Vertiv Liebert Large UPS Battery System Installer Guide 26 ...

Страница 31: ...able 9 Float current transducer 10 Power cable 24VAC 11 Fiber optic cable 12 Alarm connections on control module 13 Control module power cord 14 Battery string 15 Connects to UPS protected 120 VAC outlet 16 Alarm report 17 Remote reset 18 Alarm contacts 19 Load 20 Charger 21 Transducer 22 Float current sensor 3 Electrical Installation 27 ...

Страница 32: ...al Room Temperature Sensor Your system may include an optional temperature sensor that monitors the ambient temperature of the room Monitoring the temperature allows temperature compensation charging by a connected Liebert UPS The sensor connects to the battery interface board at P1153 See Figure 3 7 on page 20 for the location of the connector on the board Vertiv Liebert Large UPS Battery System ...

Страница 33: ... Weight lb kg approx See Table 4 4 on page 32 Standard Color Black ZP 7021 Front Door Opening for serviceability More than 180 Degree of Protection for UPS Enclosure IP 20 with and without front door open Minimum Clearance Top 24 610mm Minimum Clearance Back 0 in Minimum Clearance Sides 0 in Cable Entrance Top or Bottom Standards and Conformities UL 1778 CSA 22 2 107 3 FCC Part 15 Class A ISTA Pro...

Страница 34: ...e Above MSL 4920ft 1500m as per IEC 62040 3 1 Maximum kW derate 330ft 100m rise between 4920 9900 ft 1500 3000m 1 Width dimensions are with side panels attached Subtract 1 4 in 35 mm for dimensions without side panels 2 Depth dimensions include the front door and rear panel 3 Contact the factory about storage at temperatures outside this range Table 4 1 Liebert Battery Cabinet Specifications conti...

Страница 35: ...rds and Conformities UL 1778 CSA 22 2 107 3 FCC Part 15 Class A ISTA Procedure 1H WEEE IBC 2012 CBC 2010 Environmental Storage Temperature Range F C 13 F to 158 F 25 C to 70 C Operating Temperature Range F C 32 F to 104 F 0 to 40 C Relative Humidity Maximum 95 Non Condensing Operating and Non Operating Maximum Altitude above MSL ft m 4920 1500 as per IEC 62040 3 1 maximum kW derate 330ft rise betw...

Страница 36: ...110 12 4 C D ZU UPS12 605PLP 5585 2533 700AT 1200AF 110 12 4 EnerSys PX 12HX300 3525 1599 350AT 600AF 65 7 3 EnerSys RX 12HX330 3965 1798 400AT 600AF 65 7 3 EnerSys UX 12HX400 4375 1984 450AT 600AF 65 7 3 EnerSys WX 12HX505 5295 2402 600AT 600AF 65 7 3 EnerSys XX 12HX540 5465 2479 600AT 600AF 65 7 3 EnerSys PG XE60 3155 1431 700AT 1200AF 60 6 8 EnerSys VG XE95 4275 1939 800AT 1200AF 60 6 8 EnerSys...

Страница 37: ...474 600AT 600AF 65 7 3 Table 4 4 Battery cabinet Weight and Breaker Frame Size continued Cable Size T B Copper One Hole T B Copper Two Hole T B Aluminum One Hole T B Aluminum Two Hole 8AWG 54930BE 54850BE 60104 TB 6AWG 54905BE 256 30695 868 60109 TB 4AWG 54906BE 256 30695 733 60114 TB 2 3AWG 54942BE 54811BE 60120 1AWG 54947BE 54857BE 60126 1 0AWG 54950BE 256 30695 593 60132 2 0AWG 54951BE 54862BE ...

Страница 38: ...92 22 95 11 1 2 M12 428 48 256 29 Table 4 6 Nut Bolt Combinations Torque Specifications NOTE The torque specifications in Table 4 7 below apply unless otherwise labeled Wiring type lb in Nm Power Wiring Current Rating 400 1200 Amps 300 34 Control Wiring AWG Wire Size or Range 22 14 3 5 to 5 3 0 4 to 0 6 Table 4 7 Circuit Breaker with Compression Lug Torque Specifications Vertiv Liebert Large UPS B...

Страница 39: ...Vertiv Liebert Large UPS Battery System Installer Guide ...

Страница 40: ... names and logos referred to are trade names trademarks or registered trademarks of their respective owners While every precaution has been taken to ensure accuracy and completeness herein Vertiv Group Corp assumes no responsibility and disclaims all liability for damages resulting from use of this information or for any errors or omissions Specifications are subject to change without notice SL 25...

Отзывы: