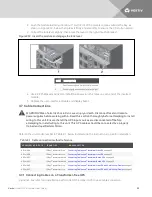
2. For added stability or earthquake-resistant installations, the shipping brackets can be used to
secure the unit to the floor.
a. Refering to Figure 3.4 below, drill 10.3-mm (13/32-in.) holes in the floor to accommodate
the mounting bolts removed from the pallet.
b. Use the mounting screws to install the mounting brackets on the front and rear of the
UPS (the brackets were removed from the sides of the unit when removing it from the
pallet, see
c. Secure the mounting brackets to the floor with the mounting bolts in the drilled holes. For
greater stability, use a higher-grade bolt.
Figure 3.4 Dimension-location of drilled holes for stationary mounting
3.5.2 Rack Installation
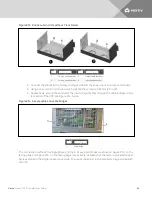
1. Install the cage nuts on the corresponding positions in the rack, see Figure 3.5 on the facing
page.
a. Install cage nuts in the 2 lower square holes of 1U space and in the 2 upper square holes
of 2U space on all 4 rack posts. These cage nuts secure the optional shelf that will support
the weight of the Liebert APS.
b. Install a cage nut in the middle square hole of 4U, 6U, 10U, 12U spaces, respectively in all
4 posts. These cage nuts help secure the UPS in the rack.
Vertiv
| Liebert® APS™ Installer/User Guide |
26
Содержание Liebert APS series
Страница 1: ...Liebert APS 5 20 kVA Modular UPS Installer User Guide...
Страница 6: ...Vertiv Liebert APS Installer User Guide 6...
Страница 10: ...Vertiv Liebert APS Installer User Guide 10 This page intentionally left blank...
Страница 50: ...Vertiv Liebert APS Installer User Guide 50 This page intentionally left blank...
Страница 76: ...Vertiv Liebert APS Installer User Guide 76 This page intentionally left blank...
Страница 80: ...Vertiv Liebert APS Installer User Guide 80 This page intentionally left blank...
Страница 109: ......


