https://www.zenstores.com/help/how-configure-zebra-gk420d-printer-printing-royal-mails-2d-barcode-labels/#:~:text=How%20to%20configure%20the%20Zebra%20GK420D%20printer%20for,your%20Royal%20Mail%202D%20barcode%20labels%20in%20Zenstores.
https://www.zenstores.com/help/how-configure-zebra-gk420d-printer-printing-royal-mails-2d-barcode-labels/#:~:text=How%20to%20configure%20the%20Zebra%20GK420D%20printer%20for,your%20Royal%20Mail%202D%20barcode%20labels%20in%20Zenstores.
https://www.zenstores.com/help/how-configure-zebra-gk420d-printer-printing-royal-mails-2d-barcode-labels/#:~:text=How%20to%20configure%20the%20Zebra%20GK420D%20printer%20for,your%20Royal%20Mail%202D%20barcode%20labels%20in%20Zenstores.
https://www.zenstores.com/help/how-configure-zebra-gk420d-printer-printing-royal-mails-2d-barcode-labels/#:~:text=How%20to%20configure%20the%20Zebra%20GK420D%20printer%20for,your%20Royal%20Mail%202D%20barcode%20labels%20in%20Zenstores.
https://www.zenstores.com/help/how-configure-zebra-gk420d-printer-printing-royal-mails-2d-barcode-labels/#:~:text=How%20to%20configure%20the%20Zebra%20GK420D%20printer%20for,your%20Royal%20Mail%202D%20barcode%20labels%20in%20Zenstores.
https://www.zenstores.com/help/how-configure-zebra-gk420d-printer-printing-royal-mails-2d-barcode-labels/#:~:text=How%20to%20configure%20the%20Zebra%20GK420D%20printer%20for,your%20Royal%20Mail%202D%20barcode%20labels%20in%20Zenstores.
https://www.zenstores.com/help/how-configure-zebra-gk420d-printer-printing-royal-mails-2d-barcode-labels/#:~:text=How%20to%20configure%20the%20Zebra%20GK420D%20printer%20for,your%20Royal%20Mail%202D%20barcode%20labels%20in%20Zenstores.
https://www.zenstores.com/help/how-configure-zebra-gk420d-printer-printing-royal-mails-2d-barcode-labels/#:~:text=How%20to%20configure%20the%20Zebra%20GK420D%20printer%20for,your%20Royal%20Mail%202D%20barcode%20labels%20in%20Zenstores.
14105 Avalon Boulevard, Los Angeles, CA 90061 | Tel 800-465-1660 x1 | Fax 310-353-7109
www.Versatables.com
Assembly
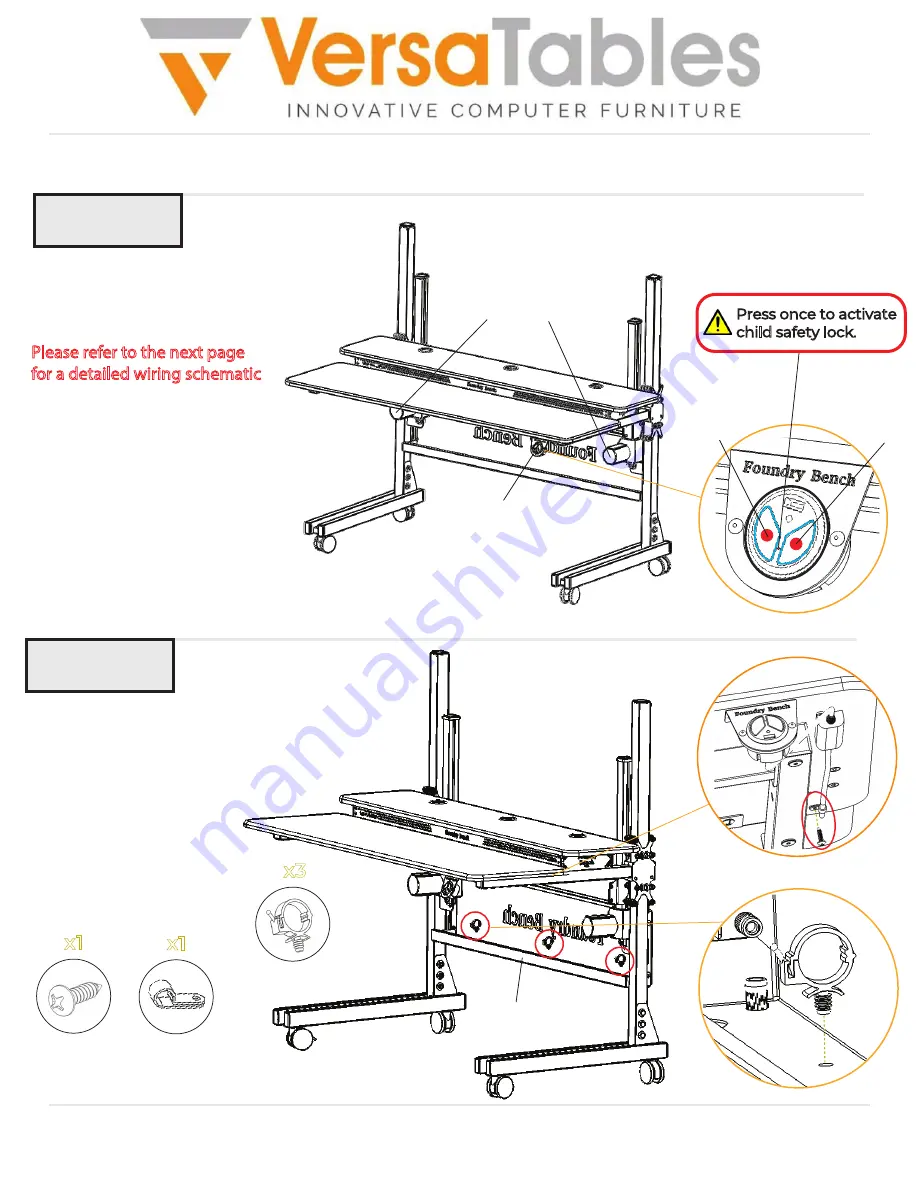
Step 13
Step 14
Insert (3) Cable Holders into
the bottom of the Back
Panel as shown and
organize the cables from
the previous step.
Use a wood screw and
P Clip to hold the control
switch’s cable as shown.
Back Panel
x3
Cable Holder
Connect both Actuators to
the USB Switch, and the USB
Switch to a power supply.
Please refer to the next page
for a detailed wiring schematic
.
Then, press the Down button and
Up button on the USB Switch to
ensure the actuators are functioning
properly.
Up
Down
USB Switch
Actuators
Press once to activate
child safety lock.
Cables
Cable Holders
x1
8A x 5/8”
Wood Screw
x1
P Clip


