5
Windsor High Efficiency Wood Stove
30005125
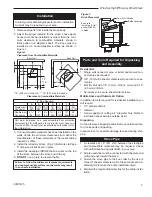
1. Do not install in sleeping room.
2. An outside air source is required to feed air to the fire-
box.
3. The stove must be securely fastened to the mobile
home floor.
4. The listed chimney package, with spark arrester, must
be attached directly to the stove.
5. The stove must be place on a noncombustible hearth
extension pad.
6. Overall height of mobile solid fuel heater and its chim-
ney shall not be less than 10’ (3 m) or more than 20’ (6
m).
WaRNiNg: it is important that no ceiling or floor
joists be cut when installing either the outside air kit
or chimney.
Mobile Home chimney installation
Locate the stove considering both floor and ceiling con-
struction. Outside air intake vent must pass through the
floor or wall. The chimney must pass through the ceiling.
Both must be done without interrupting structural forms.
Refer to outside air installation instructions supplied with
the kit. The first section of connector pipe must be fas-
tened to the stove with three (3) sheet metal screws.
important precautions
A source of fresh air must be provided into the room. Your
stove has been designed to burn clean and efficiently.
Failure to operate as instructed in this manual will result
in poor combustion with subsequent smoking, creosote
build up and unsatisfactory heat production. Do not store
combustible materials within 48” (1.2 m) of the stove. This
stove is designed to operate with the doors closed only.
cautiON: this stove is designed to burn wood only.
dO NOt
burn coal. Open the door slowly to allow gases
to escape up the chimney and help prevent smoke roll-
out.
dO NOt
burn salt-water driftwood, as it will corrode the
stove.
dO NOt
over-fire your stove. If any parts of your stove or
chimney connector start to glow, you are over-firing.
Outside air kit
An optional kit is available for installations utilizing outside
combustion air. Order the outside air kit and follow the
directions for installation.
Some older masonry chimneys have flue areas of 8” x
12”, 12” x 12” or as large as 16” x 16” and are probably
unlined. These chimneys would take more than 2 hours
to warm up and may smoke frequently (this is not a stove
problem). The solution would be to reduce the area by
relining it with an approved chimney liner or replacing the
chimney.
Regulations specify the chimney must extend 2’ (610 mm)
above a 10’ (3 m) radius of the top of the chimney.
Operation
Do not use a grate or elevate fire. Build wood fire directly
on hearth. When the stove is used for the first time the
solvents in the paint will smoke off.
Wood
This heater is designed to burn natural wood only. High-
er efficiency and lower emissions generally result when
burning air dried seasoned hardwood, as compared to
softwood or to green or freshly cut hardwood.
Only use dry seasoned wood. Green wood, besides
burning at only 60 percent of the fuel value of dry wood,
deposits creosote on the inside of your stove and along
the chimney. This can cause an extreme danger of chim-
ney fire. To be called “seasoned”, wood must be dried
for a year. Regardless of whether the wood is green or
seasoned, it should be stored in a well-sheltered, venti-
lated area to allow proper drying during the year to come.
Wood should be stored beyond recommended clearance
from combustibles.
dO NOt buRN:
Treated Wood
Solvents
Trash
Coal
Garbage
Cardboard Colored Paper
instructions for first burn - curing the Stove paint
Your stove has been painted with the highest quality stove
paint and has special break-in procedures. The heat gen-
erated by the normal operation of the stove, will serve to
harden the paint.
Ventilate the house during the first three times the stove
is used. The paint on the stove will give off smoke, carbon
dioxide and an odor. Without adequate ventilation, con-
centrations of smoke could irritate you or cause damage
to person and/or property. Open doors and windows and
use a fan if necessary. After the initial burns the paint will
be cured and there should be no more smoke.
Each of the initial burns should be conducted as follows:
1. The first and second burns should be approximately
250° F (120° C) for approximately 20 minutes.
2. The third burn should be between 500° F (260 to 370°
C) for at least 45 minutes. The important fact is the
paint should be cured slowly. Avoid hot fires during the
curing process.
During the curing process the paint will be gummy. Once
cured the paint will remain hard.
It is normal to see flat spots on painted surfaces of the
stove. The flat spots on the paint surface indicate the hot-
ter surfaces of the stove, and is caused by the heat ra-
diating through the paint. It is also expected that shiny
spots caused by friction from the packaging materials, will
disappear during the curing of the stove.

