EN
NL
ES
Ontario
2020-06
Utilización del sillón elevador
7
4.2.2
Ontario II
Función de elevado / Reclinar
reposapiernas
Ajuste sin escalonamientos
•
para ajustar el sillón de la posición de
sentado a la posición de levantado;
•
para bajar el reposapiernas si está
elevado.
Inclinación del reposapiernas
Ajuste sin escalonamientos
•
para inclinar el reposapiernas;
•
para ajustar el sillón de la posición de
levantado a la posición de sentado.
Respaldo erguido
Ajuste sin escalonamientos del
respaldo de la posición de inclinado
a la posición de sentado.
Función de tumbado para el
respaldo
Inclinación sin escalonamientos
del respaldo.
Cuando no se esté usando el sillón elevador, mantenerlo en la posición de sentado erguida y
no en la posición elevada.
4.2.3
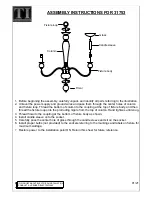
Zonas de atrapamiento
La imagen a continuación muestra las posibles zonas de atrapamiento del sillón elevador.
Tener mucho cuidado de no dejar que se atrapen ropa, dedos u otros objetos entre estas
piezas móviles.
Содержание Ontario
Страница 4: ...This page is intentionally left blank ...
Страница 46: ......
Страница 58: ......
Страница 89: ......
Страница 90: ......