background image


Pag

e

36


option.  Press the 

 button to highlight the 

Flash 

Power

 option.  Use the 

 button to navigate 

between the two different settings.  Press OK to 
save the settings. 

PASSWORD:  

Press the 

 button to highlight the 

Password

 option.  You can password protect your 

camera with this setting.  The default setting is 

OFF

.  

Make sure you write down your password or store 
it in your phone so you don’t lose it.

  If you set this 

option to 

ON

, you will not be able to access your 

camera without the password.  This is a very 
important security feature.  To turn the password 
ON, press the 

 button to toggle to 

ON

 and press 

OK

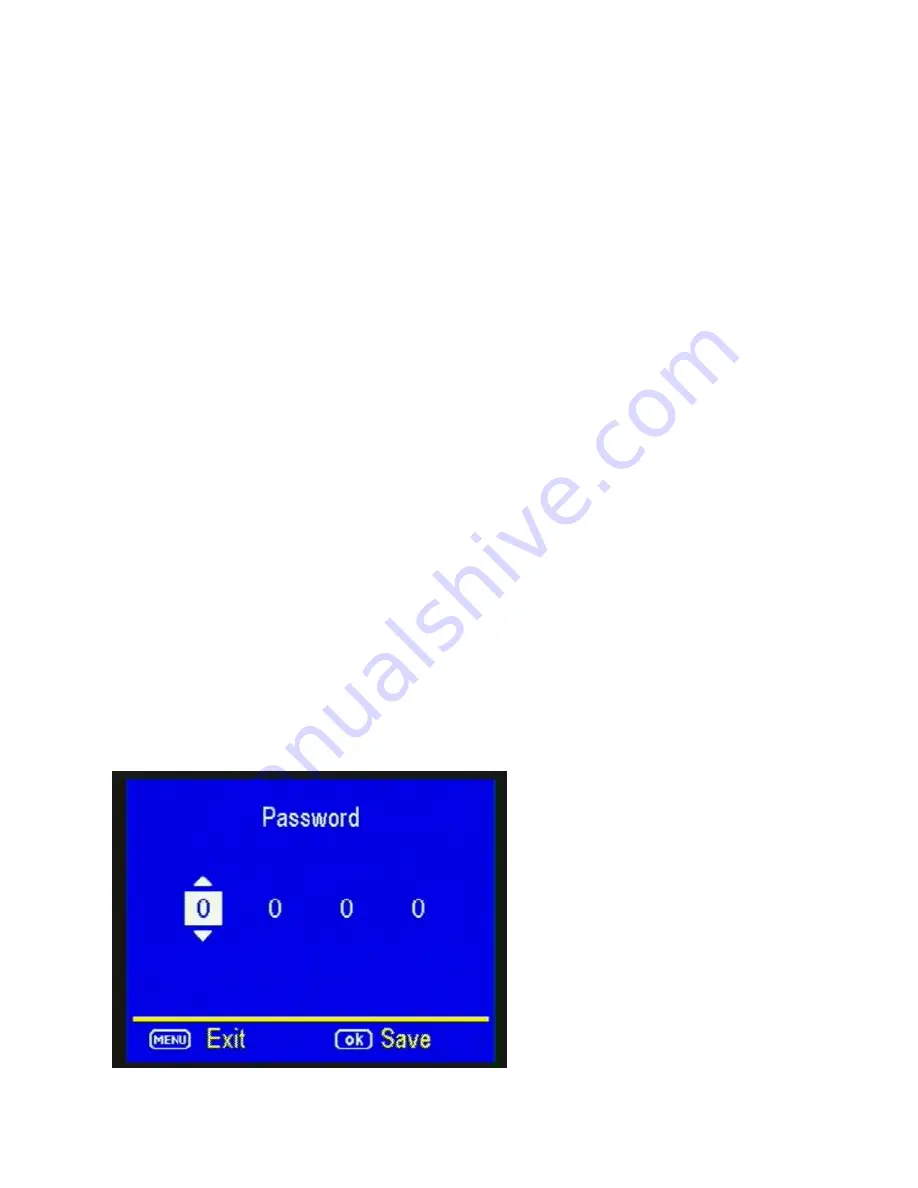
.  You will see the following screen: (Figure 27).  


Figure 27 

Содержание blackhawk

Страница 1: ...Page 1 2015 Verizon Network Ready Blackhawk Covert Scouting Camera Instruction Manual Watch the set up video on our website at www covertscoutingcameras com ...

Страница 2: ... you will need to set this camera up Internet Access to Choose Your Plan https covert revxsystems com At least 4 AA Batteries SD Card Note To send pictures as an email you must use a computer for the initial setup ...

Страница 3: ...omputer Download Tool 15 Send a Test Photo 23 Customizing Camera Settings 24 PIR Tab 27 NET Tab 32 SYS Tab 34 Formatting the SD Card 38 Viewing Photos on Color Display 40 Troubleshooting 42 Tricks and Tips on Field Setup 44 Warranty Policy 46 International Warranty Policy 48 Code Black Setup on a MAC 54 Network Carrier Suffix List 57 Technical Specifications 66 ...

Страница 4: ...ucts Check out our other products on our website at www covertscoutingcameras com New for 2015 is the highly anticipated Verizon network ready certified 3G model The Verizon camera will reach those areas in rural America We hope you enjoy hassle free performance from this quality product for years to come Covert Scouting Cameras Inc 4338 Greenridge Spa Road Lewisburg KY 42256 ...

Страница 5: ...Page 5 Antenna Color LCD Navigation arrows Selector switch Aux battery jack Camera Button Control Diagram Play Select OK Menu Delete Take photo manually USB SD card slot Figure 1 MEID Number ...

Страница 6: ... of Signal Acquired by Verizon Understanding main screen info Figure 2 Camera Mode Video Mode Icon of megabytes remaining on card Cellular service indicator of photos taken Battery life indicator Megapixels Chosen ...

Страница 7: ...ficantly when paired with a Covert Solar Panel DISCLAIMER Do not use external power source Example Solar Panel with non rechargeable AA battery installed in camera Install batteries by sliding the top battery into the sleeve then depressing the spring with the other battery and snapping down in place Pay attention to the or molded into each sleeve to determine if you insert the positive or negativ...

Страница 8: ...e type of plan you d like to add 3 Enter the MEID for your Covert Blackhawk found on the inside white label of the camera or on the outer packaging Figure 6 4 Follow the prompts to select your rate plan enter your personal billing information and complete your purchase Note This camera will function as a regular trail camera if the SIM card is not active All photos will store to the SD card Figure...

Страница 9: ...ve repeat that process the card will pop out enough to remove You can use any SD card size up to 32GB You must have the SD card in the camera to be able to turn the camera on and set it up The camera will only send the first picture of the multiple shot burst Figure 7 NOTE Every photo taken with this camera will be saved to the SD card even if it is sending the photos wireless You will have access...

Страница 10: ...on You will see the screen shown below Figure 8 2 Press the button 2 times to highlight the NET tab in yellow Press the button to highlight the Send Mode option Press the button to toggle the option in the white box to INSTANT Press OK to save this setting You will then be asked a max number 0 99 To receive an Figure 8 ...

Страница 11: ...ss the menu button This will take you back to the home screen You will need to be patient as the camera does its initial set up and looks for cellular service While finding the network you will see the word checking Then Search Network in red on the screen Once you see 1X RTT EVDO at the top right corner you are ready to move on ...

Страница 12: ...n the camera Press OK to save Then select your personal cell phone provider Figure 11 If you do not have SPRINT AT T US CELLULAR T MOBILE or VERIZON as your personal cell phone provider skip to page 15 5 Under the Carrier Option select the carrier of your personal cell phone or the carrier of the phone to which you are sending your pictures 6 Enter the ten digit phone number you are sending the pi...

Страница 13: ...Page 13 Figure 9 Note Make sure you do not enter a 1 before the area code phone number ...

Страница 14: ...f phone two Note You only need a minimum of one phone number The additional options are for your convenience to send to two phones and or three email addresses however it is recommended to use a 30 second delay for each email phone number This is the camera recovery period 8 To enter emails into your camera you must use a computer refer to the next page ...

Страница 15: ...ing SPRINT AT T US CELLULAR T MOBILE or VERIZON please follow the steps below Next Press the or button repeatedly until the NET tab is highlighted in yellow 1 Press the arrow to highlight the DOWNLOAD TOOL and press OK Figures 10 11 2 Turn the camera off by sliding the selector switch to the OFF position Figure 11 ...

Страница 16: ...onal PC card reader 4 Locate the SD card under MY COMPUTER and double click on it to show its contents Figure 12 5 Double click on the COVERT setup application 6 You will see a warning box like Figure 13 below Choose YES and the COVERT set up program will launch Figure 12 ...

Страница 17: ...see the following screen for setting up the NET options for your camera This is where you add phone numbers and e mail addresses and control the number of wireless photos sent from the camera each day Figure 14 Figure 13 ...

Страница 18: ...14 Figure 14 Make sure to save your path by clicking the 3 dot button to the right of the screen Selecting your SD card tells the camera where to save the pictures This is usually Removable Disk F or Removable Disk H ...

Страница 19: ...il every day If you want to limit this put the maximum number of photos you want the camera to send each day in the box If you want it to send unlimited photos set this value to 0 zero This sends a picture every time the device is triggered c Daily Report This option only sends you the last photo taken each day with a report of all the other activity during the day Choose the time that you want ea...

Страница 20: ...de only with no spaces or dashes Enter the phone number that corresponds with the suffix of your personal carrier For Full List SEE PERSONAL CARRIER SUFFIX LIST PAGE 59 Email Choose this option if you only want the photos sent to chosen e mail addresses You may enter up to 3 different e mail addresses in the Email field SEE PERSONAL CARRIER SUFFIX LIST PAGE 59 b Both Choose this option if you want...

Страница 21: ... which should default on the setup 12 Path The path is the location in which the settings are saved You will want to set your path to save to the drive where the SD card is located To do this you will pick the button with the 3 dots on it to the right of the path text bar This will allow you to choose the SD card from your windows explorer You must save this information to the SD card for the set ...

Страница 22: ...card from your computer and replace it in the camera 15 Slide the SELECTOR switch to the SETUP position and wait 15 20 seconds to show update success Wait for the camera to go through its set up process and find cellular service Press the MENU button 16 Press the button that has the CAMERA symbol on it 1 time to manually take a photo with the camera You will know that a photo has been Figure 16 ...

Страница 23: ...Y button located under MENU to enter the Play mode and then press the MENU button You will see the following screen Figure 17 18 Press the to highlight the SEND option and press OK Figure 18 19 The LCD screen will start to count up from step 1 to 10 with brief pauses between numbers Figure 17 Figure 18 ...

Страница 24: ... sent manually will not have the rename or battery meter on the picture Customizing the camera settings Setting the camera mode Press the button to highlight the Camera Mode option in yellow Either Photo or Video will show up in a white box to the right Press the button to toggle between Photo or Video until the option you want shows in the white box Press OK Figure 19 ...

Страница 25: ...s in the white box Keep in mind the higher the MP the larger the file and the faster your SD card can fill up PHOTO BURST Your camera can take a 1 2 or 3 shot burst every time the PIR is triggered to take a photo The camera will only send the first photo of the photo burst to your phone or e mail Press the or buttons to highlight the PHOTO BURST option To set this function press the repeatedly to ...

Страница 26: ... send videos to your phone or e mail It will only alert you that a video has been taken Recommend low flash when set to video Press the button to toggle between the VGA and QVGA options Press OK to save the setting VIDEO LENGTH You can adjust the length of time the camera takes a video from 5 60 seconds Press Figure 20 ...

Страница 27: ...x Long videos fill the SD card up quickly NOTE You need to double the time interval from what your video is set on Example 20 second video length your trigger interval needs to be at LEAST 40 seconds PIR tab Press the or buttons repeatedly until only the PIR tab is highlighted in yellow in the menu Screen should appear like Figure 21 Figure 21 ...

Страница 28: ...the H 80 setting might help differentiate between the outside temps and the body temps of the animal In cold conditions you may find that the L 10 option is best as the camera can easily differentiate the outside temps from the body temps of the subject If you want to turn off the PIR you would choose OFF Press the button to highlight the Sensitivity option Press the button repeatedly to toggle be...

Страница 29: ...e OK button to save the setting NOTE You need to have a 30 second trigger interval Your trigger interval needs to double for every phone number and or email address that you enter in your NET setup Example If you enter three phone numbers email address then you need to have at least a one and a half minute trigger interval TIP You can press and hold the or button to speed through the settings rath...

Страница 30: ...time option 5 60 seconds in 5 second increments 2 60 minutes and 2 8 hours Once you have chosen the time option you want press OK to save the setting The camera will continuously take photos in timed increments you set Remember this will generate a lot of photos and you may want to limit the number of photos sent via MMS daily START STOP If you only want your camera to be on during part of the day...

Страница 31: ...ime in hours military time and press the button to change to minutes and use the and to set the minutes Press the button to navigate to the Stop settings and repeat the process from above to set the Stop time You can press the and buttons to navigate back through the settings if necessary Once you have the start stop times set press OK to save the settings Figure 22 Figure 23 ...

Страница 32: ...ou would have to repeat the steps for setting up the wireless network to make changes to these settings Note In order to make changes to your setup you will have to insert your card back into your computer INSTANT MODE If you want the camera to send you a set amount of pictures then you want the camera settings to be turned on INSTANT MODE DAILY REPORT The daily report function will only send you ...

Страница 33: ...purchasing your camera since the device comes preactivated on Verizon s network However should your plan expire and need to be renewed EX Next year s hunting season then you need to renew your plan from Covert s website and then press OK on the ACTIVATION tab Figure 24 Figure 24 ...

Страница 34: ... Setting the clock Time stamp Flash range Password Over Write and Format Figure 25 SETTING THE CLOCK Scroll over to the SYS tab using the and buttons and then press the button to highlight the Set Clock option Press OK You will see the following screen Figure 26 Figure 25 Figure 26 ...

Страница 35: ...time set press OK to save the settings TIME STAMP Press the button to highlight the Time Stamp option The default setting for the Time Stamp option is ON This puts the Time Date Temp and moon phase at the bottom of the camera If you do not want the Time Stamp ON use the button to toggle to the OFF position Press OK to save the settings FLASH POWER You can set the Flash Power depending on your set ...

Страница 36: ... can password protect your camera with this setting The default setting is OFF Make sure you write down your password or store it in your phone so you don t lose it If you set this option to ON you will not be able to access your camera without the password This is a very important security feature To turn the password ON press the button to toggle to ON and press OK You will see the following scr...

Страница 37: ...t be completed within 10 days after your purchase Proof of purchase will be required RENAME Press the button to turn the rename to ON Press OK Enter your customized name for the camera 0 9 A Z Only OVER WRITE The Over Write function will save new photos over the old photos on your SD card if it becomes full Each time a new photo is taken the oldest photo on the card will be overwritten however the...

Страница 38: ... went out you can clear the contents of the card using the Format option If you have a new SD card you should always format the card before you use it in the camera To format the SD card press the button until the Format option is highlighted Press the OK button You will see a screen that has YES and NO on it use the button to navigate to YES and press OK Formatting the SD card Turn the camera ont...

Страница 39: ...press OK Your SD card is now formatted DEFAULT SET The Default Set resets the camera to factory settings The network information will save in the camera EX Your phone number If you want to start clean and re set all the settings to the original factory default settings you will choose this option Press the button to highlight the Default Set option Press OK Make sure 100 that you Figure 29 Figure ...

Страница 40: ...e field If you want to do this make sure the Selector switch is set to SETUP Press the Play button You can use the and buttons to toggle through the photos If you see photos you want to delete show the image on the screen and press the DEL button This will delete the photo that is showing on the screen You will see the screen below Use the button to navigate to YES and press OK If you do not want ...

Страница 41: ...the cable into the bottom of the camera Plug the USB end into the USB port on your home computer or USB capable television The USB will recognize the new hardware and download the proper driver to view the images or videos The screen on the camera will say Mass Storage Covert offers an auxiliary cable to extend your battery life with an external 6 or 12 volt battery In order to use 12 volt you mus...

Страница 42: ... 1 The service in your area is insufficient to run the camera 2 You need to add money to your Verizon account Send Fail 1 The parameters are not set correctly in the NET Setup Parameter error generally means it was not saved to the correct path 2 The camera does not have sufficient service to send the picture ...

Страница 43: ...ERT setup to make sure there are not any mistakes Check to make sure the numbers and email addresses are entered without any spaces or dashes 1 If it s a cellular service issue you may need to purchase a booster antenna from Covert Scouting Cameras to help boost the signal These can be very effective in boosting the signal to your camera in a poor signal area 2 If you are still having problems con...

Страница 44: ...ne numbers Be sure you have no spaces or dashes Cannot access the SET UP menu Reasons for issue 1 SD card not inserted 2 SD card is corrupt 3 Batteries are low Suggestions to remedy 1 Install new SD card 2 Replace batteries Tricks and tips on field setup For best results mount the camera approximately 3 feet off the ground facing straight forward as level as possible ...

Страница 45: ...ing directly into the sun either in the morning or the evening when game movement is at its peak Use the Covert Tree60 mounting system to mount the camera up higher pointing down on them for a better look Works great when you don t have a straight tree to attach to Included in this manual is an extra O ring seal for your Covert Code Black You don t need to do anything with this seal it is an extra...

Страница 46: ... This warranty includes one year repair or replacement service on product from date of purchase If you have problems with this product please do not contact the store you purchased it from Contact Covert Scouting Cameras Customer Service toll free at 877 462 1799 or e mail support dlccovert com Proof of purchase required for replacement Covert also offers a second year warranty Please visit our we...

Страница 47: ...pport dlccovert com toll free 877 462 1799 Please explain to the technician what issues you are having with your camera 2 If you are asked to return your camera to Covert Scouting Cameras you will be responsible for the cost of shipping to Covert Scouting Cameras In return Covert will provide fast and exceptional service as well as incur the cost of shipping back to you Only within the Continental...

Страница 48: ...fore shipping All accessories received by Covert Scouting Cameras will NOT be returned 5 This warranty only covers manufacturer s defects and does not cover damaged caused by misuse or abuse of the product Covert International Warranty Policy and Procedure 1 Outside the US service is the available through the distributor reseller of purchase 2 All returns must have an RA provided by Covert Copy of...

Страница 49: ...products for equal or improved quality All defective parts assemblies and products become the property of Covert Returns and claims will be handled according to the current Covert Scouting Cameras Inc procedure These warranties shall not apply to any defect failure or damage caused by improper use or inadequate maintenance and care Covert shall not be obligated under these warranties to repair a D...

Страница 50: ...onsumables or the use of Covert supplies not specified for use with this product d An item that has been modified or integrated with other products when the effect of such modification or integration increases the time or difficulty of servicing the product or degrades performance or reliability e To perform user maintenance or cleaning or to repair damage malfunction f Damage malfunction or degra...

Страница 51: ...in 10 days of purchase i To replace items that have been refilled are used up abused misused or tampered with in any way j To install replacement items that are not considered customer replaceable k To support software not supplied by Covert l To provide software or firmware updates or upgrades Any service identified in the above list and provided by Covert at the Customer s request shall be invoi...

Страница 52: ...EPONSIBILITY TO REPAIR OR REPLACE FOR DEFECTIVE PRODUCTS AND RELATED ITEMS IS SOLE AND EXCLUSIVE REMEDY PROVIDED TO THE CUSTOMER FOR BREACH OF THESE WARRANTIES Some states provinces and countries do not allow the exclusion or limitation of incidental or consequential damages or exclusions or limitation on the duration of implied warranties or conditions so the above limitations or exclusions may n...

Страница 53: ...Y STATEMENT IN NO EVENT SHALL COVERT AND ITS VENDORS BE LIABLE FOR ANY INDIRECT SPECIAL INCIDENTAL OR CONSEQUENTIAL DAMAGES INCLUDING LOSS OF PROFITS WHETHER BASED ON CONTRACT TORT OR ANY OTHER LEGAL THEORY AND IRRESPECTIVE OF WHETHER COVERT OR THE VENDOR HAS ADVANCE NOTICE OF THE POSSIBILITY OF SUCH DAMAGES ...

Страница 54: ...Page 54 Code Black Set Up on a MAC ...

Страница 55: ... a 14 day trial of Crossover 3 Once you have installed Crossover and the program is launched a dialogue box will appear that gives them several dropdown menu options Click on Will Install Other Application 4 Then click on Will Install into the bottle COVERT exe 5 A new dialogue box will then pop up allowing you to locate the SD card within the Finder window select click to enter the SD card and ca...

Страница 56: ... all the settings then change the path per your instructions back to the SD card click OK and it s done 8 Remove the SD card and put into the camera and go through the remaining owner s manual instructions to set up the camera ...

Страница 57: ...experttexting com Airfire Mobile number sms airfiremobile com Alaska Communications number msg acsalaska com Alltel Allied Wireless number message Alltel com Ameritech number paging acswireless com Assurance Wireless number vmobl com BellSouth number bellsouth cl ...

Страница 58: ...mmunications number psms bluesky as Boost Mobile number myboostmobile com BulkSMS com number bulksms net C Beyond All Page Wireless number cbeyond sprintpcs com Cellcom number cellcom quiktxt com Cellular South number csouth1 com Centennial Wireless number cwemail com ...

Страница 59: ... Mobility number mail msgsender com Cincinnati Bell number gocbw com SMS number mms gocbw com MMS Cingular number cingular com number mobile mycingular com Cleartalk number sms cleartalk us Consumer Cellular number cingularme com Cricket number mms mycricket com ...

Страница 60: ... sms advantagecell net Edge Wireless number sms edgewireless com Element Mobile number SMS elementmobile net Esendex number echoemail net General Communications Inc number mobile gci net Globalstar number msg globalstarusa com Golden State Cellular number gscsms com ...

Страница 61: ... Hawaiian Telcom Wireless number hawaii sprintpcs com Helio number myhelio com Iridium number msg iridium com i wireless T Mobile number iws iwspcs net i wireless Sprint PCS number iwirelesshometext com Kajeet number mobile kajeet net ...

Страница 62: ...troPCS number mymetropcs com Nextech number sms ntwls net Page Plus Cellular number mypixmessages com Panacea Mobile number api panaceamobile com Pioneer Cellular number zsend com Pocket Wireless number sms pocket com PC Telecom number mobiletxt ca ...

Страница 63: ...r sms rogers com RoutoMessaging number email2sms routomessaging com Simple Mobile number smtext com Southernlinc number page southernlinc com South Central Communications number rinasms com Straight Talk DOES NOT SUPPORT SMS GATEWAYS Solavei XXXYYYZZZZ tmomail net ...

Страница 64: ...ms com Telus Mobility number mms telusmobility com Ting number message ting com TracFone number mmst5 tracfone com Unicel number utext com Union Wireless number union tel com USA Mobility number usamobility net Viaero number mmsviaero com ...

Страница 65: ...Page 65 Voyager Mobile number text voyagermobile com West Central Wireless number sms wcc net XIT Communications number sms xit net ...

Страница 66: ...creen 2 0 LCD Memory Card Up to 32GB Video Resolution VGA QVGA PIR Sensor Multi Zone PIR Sensitivity Adjustable High Normal Low Trigger Time 0 65s Weight Less than 1 Pound without batteries Operation Storage Tem 20 60 C 30 70 C Trigger Interval 0s 60 min Time lapse 5 55 second in 5 second increments 1 59 minutes in 1 minute increments ...

Страница 67: ...A 8AA or 12AA Stand by Current 0 25 mA 6mAh Day Power Consumption 600 videos interval 5min video Length 10s 800 MMS use 12 AA batteries Low Battery Alert LED Indicator Mounting Rope Belt Python lock Dimensions 5 6 x4 75 x3 Operation Humidity 5 90 Security authentication FCC CE RoHS Verizon ...

Отзывы: