background image

                                                                                                                             CopyDisc Duplicator Series


43 


Note:


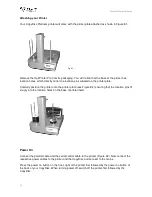
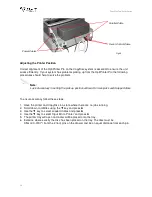
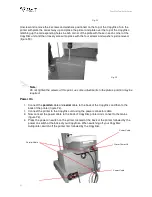
Only tiny movements to the printer plate are required. Use your hand to tap the printer  

              plate into position bit by bit.


8. Once the printer plate is in position, tighten the screws on the plate. 


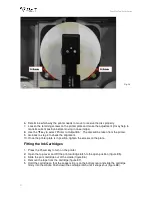
Fitting the Thermal Ribbon 


Your Prism thermal printer will come fitted with a colour thermal ribbon and a spare black ribbon. 
For details on how to change the ribbon, please see the printer manual for full details. 

 
Installing the PC Based CD Printer Drives 


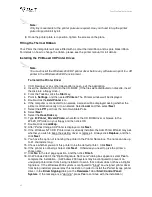
Note: 

You must install the Windows 2000/XP printer driver before any software can print to a CD 
printer in the Windows 2000/XP environment. 


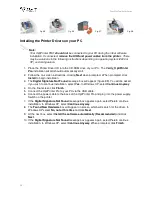
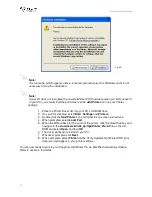
To Install the Printer Driver 


1.  If CD Designer or any other label editor is open, exit the application. 
2.  Insert the distribution CD into the CD-ROM.  (If the files were distributed on diskette, insert 

the disk into a floppy drive.) 

3.  From the Taskbar, click the 

Start

 key. 

4.  Point to 

Settings

, and then select 

Printers

. The Printers window will be displayed. 

5.  Double-click the 

Add Printer

 icon. 

6.  If the computer is connected to a network, a screen will be displayed asking whether the 

printer is attached locally or to a network. Select 

Local

 and then select 

Next


7.  Select the 

LPT1

 port from the list of Available Ports.  

8.  Select 

Next

9.  Select the 

Have Disk

 key. 

10. Type 

E:\Printer_Drivers\Prism\

, where 

E:

 is the CD ROM driver or browse to the 

Win2K_XP folder on your floppy and then click OK. 

11. Double-click on 

ccd2kxp

12. After "Perfect Image CD Printer is displayed, click 

Next

13. If the Windows NT CD-R Printer driver is already installed, the Add Printer Wizard may ask 

whether you wish to keep the existing driver or replace it.  Always click 

Replace,

 and then 

click 

Next

14. You have the option of renaming the printer in the Printer Name box. The name can be up 

to 31 characters long.   

15. Choose whether you want this printer to be the default printer.  Click 

Next

16. If the printer is not being shared, click 

Next

.   Otherwise you need to give the printer a 

share name. 

17. Click 

No

 to the test page question, and then click 

Finish

18. On Windows 2000 if the "Digital Signature Not Found" dialog box appears, select 

Yes

 to 

complete the installation.  (A Windows 2000 system may be configured to prevent an 
unsigned printer driver from being installed or to warn that a driver does not have a Digital 
Signature.  If the Windows 2000 system is configured to "block" an unsigned printer driver 
from being installed, please relax this restriction in order to install the Perfect Image printer 
driver, in the 

Driver Signing

 dialog on the 

Hardware

 Tab at 

Start/ Control Panel/ 

System

.  If the message is a "warning", press 

Yes

 to continue with the installation.) 

Содержание CopyDisc AutoPrinter Platinum

Страница 1: ... COMPLETE SOLUTIONS FOR ON DEMAND CD and DVD PRODUCTION Automated CD DVD Standalone Printer Series OPERATING and MAINTENANCE OPERATING and MAINTENANCE OPERATING and MAINTENANCE OPERATING and MAINTENANCE MANUAL MANUAL MANUAL MANUAL ...

Страница 2: ...0 305 CopyDisc P 55 Platinum ZZ 530 090 ZZ 500 201 CopyDisc AutoPrinter XC Platinum ZZ 430 090 ZZ 500 202 CopyDisc OptiPrinter Pro XC Platinum ZZ 530 090 ZZ 500 205 CopyDisc P 55 XC Platinum VERITY SYSTEMS LTD VERITY SYSTEMS INC 2 Eastern Road 5441 Merchant Circle Unit A Aldershot Placerville Hampshire California GU12 4TD 95667 United Kingdom United States Tel 44 0 1252 317000 Tel 530 626 9363 Fax...

Страница 3: ...oduced copied or exhibited to a third party without the written permission of Verity Systems ENVIRONMENTAL PROTECTION Waste electrical products should not be thrown away with household waste Please recycle where facilities exist Check with your local authority or retailer for recycling advice Verity Systems reserves the right to amend or modify the specifications and design criteria applying to th...

Страница 4: ...PERFORMANCE VERITY SYSTEMS SHALL IN NO EVENT BE LIABLE FOR DIRECT INDIRECT SPECIAL INCIDENTAL CONTINGENT OR CONSEQUENTIAL DAMAGES RESULTING FROM ANY DEFECT IN THE SOFTWARE OR ITS DOCUMENTATION INCLUDING DAMAGES FROM LOSS OF DATA EVEN IF VERITY SYSTEMS OR AN AUTHORIZED VERITY SYSTEMS DEALER HAS BEEN ADVISED OF THE POSSIBILITY OF SUCH DAMAGES YOU AGREE THAT VERITY SYSTEMS LIABILITY ARISING OUT OF CO...

Страница 5: ... tolerance for sub standard products makes their media the best choice for your requirements Used by professionals for mastering around the world Japanese made Taiyo Yuden is made by the inventor of the CD R disc All Taiyo Yuden media is manufactured in a single plant and on the same machine ensuring unparalleled consistency and quality like no other brand Taiyo Yuden has the widest play back comp...

Страница 6: ...oard 14 15 3 2 1 Key 14 15 3 2 5Stop Start Key 15 3 3LCD Display 15 3 4Menu Structure 15 19 3 4 1Print Only Mode 15 3 4 2Image Manager 16 17 3 4 2 1 Load New Print Image 16 3 4 2 2 Show Print Images 16 3 4 2 3 Delete Print Images 16 3 4 2 4 Rename Print Image 16 17 3 4 3Setup 17 3 4 3 1 Printer 17 3 4 3 2 Autoloader 17 3 4 3 3 Licence Key 17 3 4 3 4 Menu 17 3 4 4Utilities 18 19 3 4 4 1 Hard Disc U...

Страница 7: ...Section APPENDICES 29 48 Appendix A Menu Structure 29 31 Appendix B Technical Support 32 Appendix C Routine Maintenance 33 Appendix D CopyDisc OptiPrinter Pro Platinum 34 39 Appendix E CopyDisc AutoPrinter Platinum 40 44 Appendix F CopyDisc P 55 Platinum 45 48 Standard Terms and Conditions 49 51 ...

Страница 8: ...sc thermal printers Note Throughout this manual reference is made to CDs The procedure for DVDs CD Business cards and mini discs is identical except where stated 1 2 Network Operation The CopyDisc Platinum printers are operated using DiscPilot advanced networking software There is no drive fitted so the system is run directly from a PC on a network This easy to use yet sophisticated and versatile ...

Страница 9: ...be found on the DiscPilot Software CD 1 3 CopyDisc XC Systems 660 Capacity Not applicable to 220 disc capacity CopyDisc systems The CopyDisc4 XC and the CopyDisc8 XC used 3 input baskets spindles and 1 output spindle Baskets Spindles No 1 No 2 and No 3 are used as input baskets spindles in the first instance Each input basket spindle holds 220 blank discs giving a total capacity of 660 discs Spind...

Страница 10: ...tomatically moves onto the blank discs from input basket spindle No 2 As the original output spindle No 4 is full from printing all the discs from input basket spindle No 1 printed discs are now output into empty basket spindle No 1 Once input basket spindle No 2 is empty and basket spindle No 1 full the CopyDisc XC will begin loading discs from input basket spindle No 3 Printed discs will be outp...

Страница 11: ... will halt any job in the event of detecting an empty third input spindle At this point if the job is finished the processed media may be removed the spindles replenished with new media and the job re started If the job is not complete and the requested number of copied discs has not yet been fulfilled the LCD display will display Input Hopper Empty Select Cancel if you do not wish to continue wit...

Страница 12: ...es Baskets Quick Start Guide Manual CD Networking CDs including DiscPilot CD Label Designer CD and PublisherNET CD Warranty Card Note Please see appropriate appendix at the back for this manual for full details of contents Note If your Verity Systems CopyDisc Platinum printer is damaged during shipment please contact the freight carrier first and then contact your partner or Verity Systems Note Yo...

Страница 13: ...d to your CopyDisc Platinum printer plug it into the mains Switch on the printer followed by the CopyDisc Platinum robot After the power is turned on the Verity Systems CopyDisc Platinum printer goes through a series of self tests see section 3 1 for full details As all CopyDisc Platinum printers are operating via a network the CopyDisc needs to be connected to the server PC running PublisherNET P...

Страница 14: ...lowing are all the messages displayed during a normal power up Initializing System Check IDE Port Check Printer Check Autoloader And Finally HOME MENU Start Job Image Manager Utilities Setup If this series of messages are displayed then your CopyDisc Platinum printer is ready for use If this series of messages are not displayed or different messages are displayed see the Error Messages section sec...

Страница 15: ...menu is being displayed this key moves one level deeper into the menu structure or if the next step is executable it starts the process 3 2 5 Stop Key This key stops or aborts whatever is going on When writing CD R s the system is busy and this key may be sluggish so press and hold it down until prompted to do something else The STOP key exits without saving your changes within each menu 3 2 6 Sta...

Страница 16: ... 4 2 2 Show Print Images Show all print images currently stored on the hard drive 3 4 2 3 Delete Print Images Select a print image stored on the hard drive to be deleted by positioning the cursor next to that image Press the key and you are prompted to confirm deletion by selecting either Yes or No with the cursor Once selected press 3 4 2 4 Rename Print Image Rename a print image currently stored...

Страница 17: ...tioning the cursor next to either connected or disconnected and then press the key 3 4 3 2 Autoloader Your CopyDisc should be factory set to Publisher for 220 capacity CopyDisc systems or Autoloader D for CopyDisc XC 660 capacity systems Under Status select whether you wish the autoloader to be connected or not by positioning the cursor next to either enable or disable and then press the key 3 4 3...

Страница 18: ...e or Cancel with the cursor 3 4 4 2 Firmware Utilities The software that is used by the CopyDisc duplicators to copy and print discs can be changed to add new features or support for new drives The following functions are used to change the firmware in the machine Load System F W This function reads firmware from a firmware CD and installs it in the CopyDisc duplicator electronics 3 4 4 3 Loader U...

Страница 19: ...NG VIA DISCPILOT CopyDisc platinum printers are networked systems and they can only be operated using DiscPilot networking software via the users PC For full instructions on how to set up DiscPilot please refer to the DiscPilot User Manual enclosed on the DiscPilot Software CD The Make a Disc wizard provides the user with easy to use step by step procedures for printing discs To launch the wizard ...

Страница 20: ... be asked to provide a name for the job you are creating All jobs submitted must have a unique Job ID The Job ID must not be the same as any jobs already present on the Jobs in progress panel Enter a Job ID and click the Next button Select Print Label Only and then click Next ...

Страница 21: ...ard disc a network resource or on the remote CopyDisc s internal hard drive itself Create a New Label This will launch Label Designer and allow you to create a new print file prn Once you have chosen the type of job you wish to create click the Next button 4 1 Printing an Existing Label If you chose to print an existing print file prn the next screen will ask you to choose the location of the file...

Страница 22: ... this button for print files prn stored on the local PC s hard drive or stored on a network resource Click on the required button to select the existing image file Choose the required print file from those listed The above example shows print files stored on network folder Click on the required file to highlight it and then click the Open button ...

Страница 23: ... with an OptiPrinter Pro inkjet printer ensure that the print file prn you select has been created using the OptiPrinter Pro print driver The above shows the selection of the print file Click on Next You should now enter the number of copies that are to be made To submit the job the Submit Job button should be clicked This will cause the job to be sent to the remote CopyDisc unit ...

Страница 24: ...sc Duplicator Series 24 Now that the job has been submitted it is sent to the remote CopyDisc When the file submission is complete the Disc Wizard is closed and the job is shown in the Jobs in progress panel ...

Страница 25: ...hen the job is complete the job is automatically moved from the Jobs in progress panel to the Completed Jobs panel 4 2 Create a New Label Selecting Create a new label and then clicking Next will launch the CD Label Designer software ...

Страница 26: ... print files prn s NOTE Refer to the CD label Designer Help files for details on how to design and create disc labels When printing the label file ensure that the correct printer type for the CopyDisc is selected in the example below it is the OptiPrinter Pro inkjet printer ...

Страница 27: ...les and you will be given the opportunity to create a prn file of the image you have created when you exist CD Label Designer completely You can however choose to save the cld file at this stage as it allows you to open the file at a later stage to amend should you wish When you close the CD Label Designer program completely you will return automatically to DiscPilot The following prompt will appe...

Страница 28: ...t Job button should be clicked This will cause the job to be sent to the remote CopyDisc unit Now that the job has been submitted it is sent to the remote CopyDisc When the file submission is complete the Disc Wizard is closed and the job is shown in the Jobs in progress panel When the job is complete the job is moved from the Jobs in progress panel to the Completed Jobs panel ...

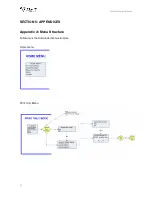
Страница 29: ...CopyDisc Duplicator Series 29 SECTION 5 APPENDICES Appendix A Menu Structure Following is the Autoloader menu structure Home menu Print Only Menu ...

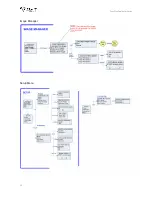
Страница 30: ...CopyDisc Duplicator Series 30 Image Manager Setup Menu ...

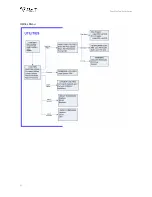
Страница 31: ...CopyDisc Duplicator Series 31 Utilities Menu ...

Страница 32: ... support personnel can be reached at UK Support US Support Verity Systems Ltd Verity Systems Inc Verity House 5441 Merchant Circle Unit A 2 Eastern Road Placerville Aldershot CA Hants GU12 4TD 95667 UK USA Tel 44 0 1252 796901 Tel 530 626 9363 Fax 44 0 1252 316555 Fax 530 626 9395 Email uksupport veritysystems com Email ussupport veritysytems com 8 30am 5 00pm GMT 8 30am 5 30pm PST ...

Страница 33: ...ry brush The main shaft should always clear and free from dirt and contaminants Every 10 000 CDs or more often if the unit is used or stored in a dirty environment the main shaft should be cleaned First remove the dirt using a lint free cloth and a degreasing agent not water Isopropyl Alcohol IPA is an ideal cleaning agent After this apply a small drop of light machine oil with a lint free cloth a...

Страница 34: ...emove your CopyDisc printer from their shipping cartons and verify that all parts are present If there are missing or damaged parts contact Verity Systems or an authorised partner reseller immediately to correct any miss packed or missing parts Verity Systems CopyDisc Platinum robot fitted with printer plate networked version OptiPrinter Pro inkjet printer Power Cables x 2 one for CopyDisc Platinu...

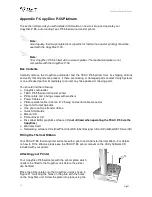
Страница 35: ...on the printer onto the printer plate see Figure E2 ensuring that the location pins fit snugly into the location holes on the base of printer itself Power On Connect the parallel cable and the serial control cable to the printer Figure E3 Now connect the respective power cables to the printer and the CopyDisc and connect to the mains Press the power on button on the front right of the printer firs...

Страница 36: ...nd dropped discs To ensure accuracy follow these steps 1 Have the printer and CopyDisc in a state where there are no jobs running 2 Scroll down to Utilities using the key and press 3 Use the key to select Loader Utilities and press 4 Use the key to select Input Bin to Printer and press 5 The printer tray will open and a disc will be placed onto the tray 6 Examine where exactly the disc has been pl...

Страница 37: ... to step 4 to check the alignment 10 Once the printer plate is in position tighten the screws on the plate Fitting the Ink Cartridges 1 Press the Power key to turn on the printer 2 Open the top cover and lift the print cartridge latch to the open position figure E5 3 Slide the print cartridge out of the cradle figure E6 4 Remove the tape from the cartridge figure E7 5 Hold the cartridge so that th...

Страница 38: ...9 You will be asked if you wish to continue installation select Yes In Windows XP select Continue Anyway 4 On the final screen click Finish 5 Connect the OptiPrinter Pro to your PC via the USB cable 6 Connect the power cable to the back of the OptiPrinter Pro and plug into the power supply Switch on the printer 7 If the Digital Signature Not Found message box appears again select Yes to continue i...

Страница 39: ...ngs and Printers 3 Double click the Add Printer icon and follow the on screen instructions 4 When prompted select Local Port 5 When the Wizard asks for the name of the printer click the Have Disk key and navigate to the enu drivers win2k_xp OptiPrinter_Pro inf file on the CD ROM and select Open and then OK 6 The driver will begin to install on your PC 7 Whenever prompted click Next 8 When complete...

Страница 40: ...c robot Prism thermal printer fitted with a colour thermal ribbon Printer Plate with 4 fixing screws and washers Power Cable x 2 Printer parallel cable and printer serial cable Input and output spindles User Manual CD and Quick Start Guide Printer Manual Folder hard copy Printer Driver CD Perfect Image Graphics software CD not utilised when operating the Prism via the CopyDisc Warranty Card Networ...

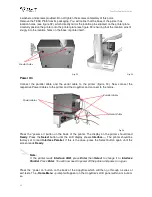
Страница 41: ...as some adjustments to the plate s position may be required Power On 1 Connect the parallel cable and serial cable to the back of the CopyDisc and then to the back of the printer figure F4 2 Connect the printer to the CopyDisc unit using the power connector cable 3 Now connect the power cable to the back of CopyDisc printer and connect to the mains figure F4 4 Press the power on switch on the prin...

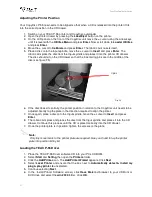
Страница 42: ...dle and places it into the printer tray Check to see if the disc is situated in the correct position within the tray The disc should sit on the rubber pad between the two alignment pins and the centring pin figure G6 If the disc is resting on the alignment pins the printer will not close or print 6 If the disc does not fit within the alignment and centring pins the printer s position in relation t...

Страница 43: ...ailable Ports 8 Select Next 9 Select the Have Disk key 10 Type E Printer_Drivers Prism where E is the CD ROM driver or browse to the Win2K_XP folder on your floppy and then click OK 11 Double click on ccd2kxp 12 After Perfect Image CD Printer is displayed click Next 13 If the Windows NT CD R Printer driver is already installed the Add Printer Wizard may ask whether you wish to keep the existing dr...

Страница 44: ...the What s This option in the mouse drop down menu to learn more about the usage of each feature Click OK to close each dialog 21 When you complete the installation you should re boot your system If a prior version of this printer driver was installed NT will continue to use the old version of the printer driver but may display the new version number until the system is re booted We recommend that...

Страница 45: ...r printer Printer plate and 4 fixing screws with washers Power Cables x 2 Printer parallel cable Cannon D 25 way and serial cable connector Input and Output Spindles One photo and one transfer ribbon Quick Start Guide Manual CD Printer Driver CD Disc Label Editor graphics software CD not utilised when operating the TEAC P 55 via the CopyDisc Warranty Card Networking software CDs DiscPilot Client C...

Страница 46: ... the printer and the CopyDisc and connect to the mains Press the power on button on the back of the printer The display on the printer should read Ready Press the Select button until the LCD display shows Interface The printer should be factory set to read Interface Parallel If this is the case press the Select button again until the screen reads Ready Note If the printer reads Interface USB press...

Страница 47: ...ntrally the printer position in relation to the CopyDisc unit needs to be adjusted Gently tap the plate in the direction required to align the printer 7 Once again place a disc onto the Input spindle move the cursor to Insert and press Enter 8 The robotic arm picks and places the disc from the Input spindle and places it into the CD drawer Continue this process until the CD is placed correctly int...

Страница 48: ...xt until you reach the end of the wizard Click Finish 8 A Hardware Installation warning may appear click Continue Anyway The TEAC P 55 print driver will be installed on your PC You are now ready to print to your CopyDisc P 55 Platinum via DiscPilot networking software Refer to section 4 for details ...

Страница 49: ...ser by Verity Systems that the goods are available for delivery to an independent carrier or to the Purchaser or his agent shall constitute delivery to the Purchaser In all cases the carrier acts as Agent of the Purchaser 6 EXPORT CONTROL If the goods or components thereof are licensed by the US Government for ultimate destination within the United Kingdom and any other EEC Country then the goods ...

Страница 50: ...s in a manner which makes them readily identifiable as the goods of Verity Systems The Purchaser is licensed by Verity Systems to agree to sell Verity Systems goods subject to the express conditions that the entire proceeds thereof are held in trust for Verity Systems and are not mingled with other monies or paid into any overdrawn Bank Account and shall be at all times identifiable as Verity Syst...

Страница 51: ...ufficient All references in the Terms and Conditions to the masculine gender shall be deemed to include the feminine and neuter genders Failure or neglect by Verity Systems to enforce at any time any of the provisions hereof shall not be construed a waiver of Verity Systems rights nor in any way affect the validity of the whole or part of this contract nor prejudice Verity Systems rights to take s...

Страница 52: ...aser or Liquidator and recover possession of all equipment for which full payment of the contract price has not been received in c above Supplied by Verity Systems Ltd Verity Systems Inc 2 Eastern Road 5441 Merchant Circle Unit A Aldershot Placerville Hampshire CA 95667 GU12 4TD United States United Kingdom Toll Free 800 642 5151 Tel 44 0 1252 317000 Tel 530 626 9363 Fax 44 0 1252 316555 Fax 530 6...

Отзывы: