background image

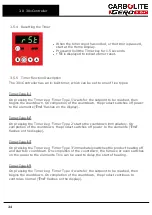
Set the Dwell Time

l

Start at the Home Display.

l

Repeatedly press the Page key until

t1

shows on the dis-

play.

l

Use the up and down Arrow keys to either switch off or
alter the value (Hr:Min)

l

The value will then be stored without any further input.

l

Press and hold down the Page key for 1.5 seconds to
return to the Home Menu.

Start the Timer

l

Start at the Home Display.

l

Pressing the Timer key starts the program.

l

Pressing the Timer key will automatically exit 'Hold' mode
if set (see section 3.2.5 for more information) and the
controller will start to operate.

l

Press and hold down the Page key for 1.5 seconds to
return to the Home Menu.

3.7

Maximum Output Setting

Depending on the furnace or oven model the maximum output power setting OP.Hi
may be accessible or hidden.

For silicon carbide heated furnaces the parameter is accessible to allow compensation
for element ageing, see the Fuses and Power Settings section of your product manual
(section 10.0) for more information on power limits.

In many models the maximum output power setting depends on the supply voltage,
refer to the Fuses and Power Settings section of your product manual (section 10.0.

3.8

Customer Calibration

The controller is calibrated for life at manufacture, there may however be sensor or
other system errors which affect the accuracy of the measured temperature. Customer
calibration is used to compensate for these errors. Access to this function is disabled
when the timer is operating.

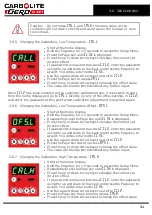
The 301 Controller has three types of customer calibration: factory calibration, single
point calibration and dual point calibration. See sections3.3.5 3.3.6 to access these.

3.8.1

Factory Calibration -

FAct

Factory calibration is the default setting, which has no offset adjustment. It simply
displays the temperature measured by the control thermocouple.

29

3.0   301 Controller

Содержание TZF 12/65/550

Страница 1: ... Operation and Maintenance Instructions 1200 C Tube Furnace 3 zone TZF Model 550mm 301 Controller 2132 End Zone Controllers TZF 12 65 550 301 Controller 2132 End Zone Controllers MEN TZF12065 01_301_2132 19 06 2019 ...

Страница 2: ...nu System 15 3 2 2 Navigation Diagram 15 3 2 3 Basic Function Guide 17 3 2 4 Home Display 18 3 2 5 Hold Mode 18 3 2 6 Checking the Temperature Setpoint from the Home Display 19 3 2 7 Changing the Temperature Setpoint 19 3 2 8 Changing the Temperature Setpoint Ramp Rate 19 3 2 9 Changing the Timer Time 20 3 3 Advanced Operation 20 3 3 1 Entering the Setup menu 20 3 3 2 Changing the Timer Type 20 3 ...

Страница 3: ...FS H 32 3 9 Over Temperature Protection 33 3 9 1 Over Temperature O T home display 33 3 9 2 Changing the Over Temperature Limit 34 3 9 3 Checking the Over Temperature Sensor Temperature 34 3 9 4 Over Temperature Protection Calibration 35 3 9 5 Over Temperature Activation 35 3 9 6 Resetting Over Temperature Activation 36 3 10 RS232 Communication Option 37 3 11 Temperature Controller Replacement 37 ...

Страница 4: ...dvice 54 5 5 Operator Safety 54 5 6 Tube Life 55 5 7 Pressure 55 5 8 Power Adjustment 56 5 9 Running at Low Temperatures 56 6 0 Maintenance 57 6 1 General Maintenance 57 6 2 Maintenance Schedule 57 6 2 1 Cleaning 59 6 3 Calibration 59 6 4 After Sales Service 59 6 5 Recommended Spare Parts and Spare Parts Kit 59 7 0 Repairs and Replacements 60 7 1 Safety Warning Disconnection from Power Supply 60 7...

Страница 5: ... 9 2 WC 13 31 67 9 3 2 and 3 phase With Neutral 68 9 4 Independent Zones control method C 68 9 5 Control by Broadcast Comms control method B 68 10 0 Fuses and Power Settings 69 10 1 Fuses 69 10 2 Power Settings 69 User Power Setting Adjustments 70 11 0 Specifications 71 11 1 Environment 71 5 ...

Страница 6: ...d to the elements Heat switch the switch disconnects power to the heating elements unless this switch is OFF there is a danger of electric shock when inserting objects into the product 1 2 General Warnings DANGER Electric shock Read any warning printed next to this symbol WARNING Risk of fatal injury DANGER Hot surface Read any warning printed next to this symbol WARNING All surfaces of a product ...

Страница 7: ...Caution Double Pole Neutral Fusing 7 1 0 Symbols and Warnings ...

Страница 8: ...of heat and on a non flammable surface that is resistant to accidental spillage or hot materials The surface on which the equipment is mounted should be stable and not subject to movement or vibrations The height of the mounting surface is important to avoid operator strain when loading and unloading samples Unless otherwise stated elsewhere in this manual ensure that there is at least 150 mm of f...

Страница 9: ...on shields is similar to that of plugs If stainless steel seals with gas inlets are supplied they are to be fitted as shown in fig 3 the stem of any insulating plug should touch the seal For vertical models with stainless steel seals a hook and eye arrangement holds the upper insulating plug assembly Horizontal models if heavy fittings are to be clamped to the end of an extended work tube they can...

Страница 10: ...2 0 Installation Fig 1 Insulating Plug standard length tube Key A Tube B Insulating Plug C Stem Fig 2 Insulating Plug long work tube 10 ...

Страница 11: ...p End Seal For assembly details refer to the separate work tube end seal manual Under no circumstances should any objects be placed on top of the product Always ensure that any vents on the top of the product are clear of any obstruction Always ensure all cooling vents and cooling fans if fitted are clear of any obstruction 2 3 Electrical Connections Connection by a qualified electrician is recomm...

Страница 12: ...ctory fitted supply cable are designed to be wired directly to an isolator or fitted with a line plug Products without a factory fitted supply cable require a permanent connection to a fused and isolated supply The product s electrical access panel should be temporarily removed and connections made to the internal terminals If the product is to be connected by line plug The plug should be within r...

Страница 13: ...o phase 2 L3 Black to phase 3 N Light Blue to neutral except delta PE Green Yellow to earth ground DO NOT connect a product ordered for three phase use to a single phase supply or to the wrong type of three phase supply 13 2 0 Installation ...

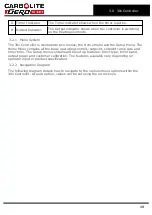
Страница 14: ...roller Key Description A Display B Over Temperature Key if fitted The Over Temperature key is used to access the over temperature menu Note Over Temperature is an option C Page Key The Page key is used to scroll through the parameters and switch between menus D Timer Key The Timer key is used to start view pause and reset the timer E Arrow Keys The Arrow keys are used to adjust the value of the se...

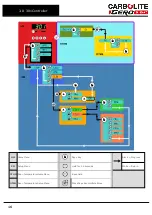
Страница 15: ...Menu contains all the basic operating controls setpoint setpoint ramp rate and timer time The Setup menu contains all the set up features timer type timer band output power and customer calibration The features available vary depending on operator input or product specification 3 2 2 Navigation Diagram The following diagram details how to navigate to the various menu options within the 301 Control...

Страница 16: ...01 Controller HM Home Menu Page Key Black Progress SM Setup Menu Hold for 1 5 seconds White Return OTHM Over Temperature Home Menu Keep Held OTSM Over Temperature Setup Menu Press Page Key multiple times 16 ...

Страница 17: ...libration type FAct Used to select the factory calibration settings PASS Flashes when a password is required to access further options C CL1 Select to access the single point calibration option C CL2 Select to access the dual point calibration options OFSt Used to set the single point calibration offset temperature C CAL L Used to set the low temperature point C for dual point calibration CAL H Us...

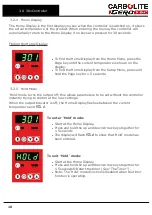
Страница 18: ... the Page key for 1 5 seconds 3 2 5 Hold Mode Hold mode turns the output off this allows parameters to be set without the controller instantly trying to control at the new settings When the output indicator is off the Home Display flashes between the current temperature and HOLd To enter Hold mode l Start at the Home Display l Press and hold the up and down Arrow keys together for 1 5 seconds l Th...

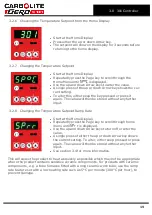
Страница 19: ...put 3 2 8 Changing the Temperature Setpoint Ramp Rate l Start at the Home Display l Repeatedly press the Page key to scroll through home menu until SPrr is displayed l Use the up and down Arrow keys to turn off or alter the value l A single press of either the up or down Arrow key shows the current setting To alter either keep pressed or press again The value will then be stored without any furthe...

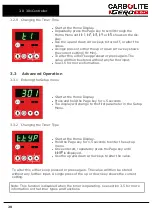
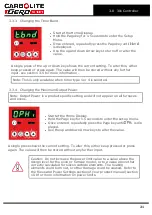
Страница 20: ...Entering the Setup menu l Start at the Home Display l Press and hold the Page key for 1 5 seconds l The display will change to the first parameter in the Setup Menu 3 3 2 Changing the Timer Type l Start at the Home Display l Hold the Page key for 1 5 seconds to enter the set up menu l Once entered repeatedly press the Page key until t typis displayed l Use the up and down Arrow keys to alter the v...

Страница 21: ...tting and will not appear on all furnaces and ovens l Start at the Home Display l Hold the Page key for 1 5 seconds to enter the set up menu l Once entered repeatedly press the Page key until OP Hi is dis played l Use the up and down Arrow keys to alter the value A single press shows the current setting To alter this either keep pressed or press again The value will then be stored without any furt...

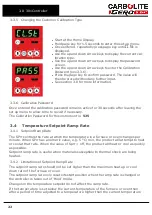
Страница 22: ... this instrument is 525 3 4 Temperature Setpoint Ramp Rate 3 4 1 Setpoint Ramp Rate The SPrr controls the rate at which the temperature in a furnace or oven changes per minute When SPrr has a numeric value e g 5 C min the product will attempt to heat or cool at that rate When the value of Sprr off the product will heat or cool as quickly as possible Setpoint ramp rate is useful when materials susc...

Страница 23: ...ler is in Hold mode pressing the Timer key will automatically exit Hold mode and the controller will start to operate 3 5 2 Checking the Time Remaining l Start at the Home Display l Press the Timer key once to check the time remaining l The display will flash t 3 times l It will return to the Home Display automatically 3 5 3 Pausing the Timer l Start at the Home Display l Press and hold the Timer ...

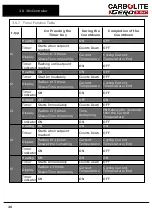
Страница 24: ...o the elements End flashes on the display Timer Type t2 On pressing the Timer key Timer Type 2 starts the countdown immediately On completion of the countdown the product switches off power to the elements End flashes on the display Timer Type t3 On pressing the Timer key Timer Type 3 immediately switches the product heating off and starts to countdown On completion of the countdown the furnace or...

Страница 25: ...hen the setpoint temperature is reached It is possible to set the timer running before the setpoint is reached by adjustment of the timer temperature band t bnd e g t bnd set to a value of 3 will result in the timer starting to countdown 3 C before the temperature setpoint is reached This is useful when furnaces or ovens that take a long time to reach setpoint are at a sufficiently high temperatur...

Страница 26: ...g Current Temperature Cycling Current Temperature End Timer Indicator ON ON OFF t3 Output OFF OFF ON Timer Starts Immediately Counts Down OFF Display Flashes t3 3 times Shows Time remaining Time Remaining END shows for 3 seconds then the Current Temperature Indicator ON ON OFF t4 Heating ON ON ON Timer Starts when setpoint reached Counts Down OFF Display Flashes t4 3 times Shows time remaining Cur...

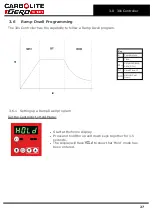
Страница 27: ... SPrr Setpoint Ramp Rate SPrr DT Dwell Time t1 NCD Natural Cool Down 3 6 1 Setting up a Ramp Dwell program Set the Controller to Hold Mode l Start at the home display l Press and hold the up and down keys together for 1 5 seconds l The display will flash HOLd to show that Hold mode has been entered 27 3 0 301 Controller ...

Страница 28: ...nu Set the Temperature Setpoint l Start at the Home Display l Repeatedly press the Page key until SP C shows on the display l Use the up and down Arrow keys to alter the value C l The value will then be stored without any further input l Press and hold down the Page key for 1 5 seconds to return to the Home Menu Set the Setpoint Ramp Rate l Start at the Home Display l Repeatedly press the Page key...

Страница 29: ...arameter is accessible to allow compensation for element ageing see the Fuses and Power Settings section of your product manual section 10 0 for more information on power limits In many models the maximum output power setting depends on the supply voltage refer to the Fuses and Power Settings section of your product manual section 10 0 3 8 Customer Calibration The controller is calibrated for life...

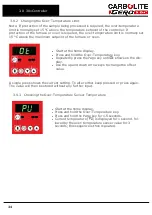
Страница 30: ... then seek advice as there is a risk of electric shock if done incorrectly 3 8 3 Changing the Single Point Calibration Offset OFSt l Start at the home display l Hold the Page Key for 1 5 seconds to access the Setup Menu l Repeatedly press the Page key until CL St is displayed l Press the up or down Arrow keys to display the current cal ibration offset l If a password is required to access C CL1 en...

Страница 31: ...bration Low Temperature Offset OFS L l Start at the home display l Hold the Page Key for 1 5 seconds to access the Setup Menu l Repeatedly press the Page key until CL St is displayed l Press the up or down Arrow keys to display the current cal ibration offset l If a password is required to access C CL2 enter the password using the up and down Arrow keys and press the Page key to accept You will be...

Страница 32: ... is displayed l Press the up or down Arrow keys to display the current cal ibration offset l If a password is required to access C CL2 enter the password using the up and down Arrow keys and press the Page key to accept You will be returned to CL St l Use the up and down Arrow keys to scroll to C CL2 l Press the Page key four times to access OFS H l Press the up or down Arrow keys to change the of...

Страница 33: ... oven from over heating 2 To provide an extra safety system to prevent the furnace or oven from heating in the event of a fault 3 9 1 Over Temperature O T home display When the Over Temperature key is pressed and held the O T home display is shown The home display shows the over temperature limit setting Finding the O T home display from the O T Home Menu l Press and hold the Over Temperature key ...

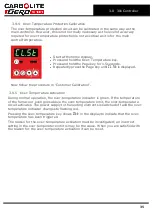
Страница 34: ...old the Over Temperature key l Repeatedly press the Page key until Ot shows on the dis play l Use the up and down Arrow keys to change the offset value A single press shows the current setting To alter either keep pressed or press again The value will then be stored without any further input 3 9 3 Checking the Over Temperature Sensor Temperature l Start at the home display l Press and hold the Ove...

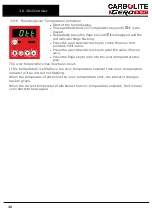
Страница 35: ...mer Calibration 3 9 5 Over Temperature Activation During normal operation the over temperature indicator is green If the temperature of the furnace or oven goes above the over temperature limit the over temperature circuit activates The power supply to the heating elements is switched off and the over temperature indicator changes to flashing red Pressing the over temperature key shows Ott in the ...

Страница 36: ...limit value l Press the up or down Arrow key to alter the value if neces sary l Press the Page key to return to the over temperature dis play The over temperature has now been reset If the temperature is still above the over temperature setpoint then over temperature indicator will be red but not flashing When the temperature falls below the over temperature limit the indicator changes back to gre...

Страница 37: ...the furnace or oven to a computer is done via a straight cable as follows Product end of cable female 9 pin RS232 Cable product to PC Computer end of cable 9 pin male Rx 3 _____________________ 3 Tx Tx 2 _____________________ 2 Rx Com 5 _____________________ 5 Com 3 11 Temperature Controller Replacement Before handling the controller wear an anti static wrist strap or otherwise avoid any possibili...

Страница 38: ...or process being damaged if it has gone into an Over Temperature condition Furnace or Oven This refers to the product purchased from Carbolite Gero 3 13 Controller Fault Fault Code Diagnostic Table Error Code Explanation Actions S br Temperature sensor failure Check all terminal connections between the temperature sensor thermocouple and temperature controller It is recommended to loosen then tigh...

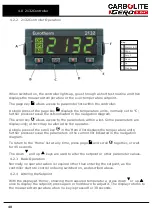
Страница 39: ... an audible alarm at the end of the timing period 4 2 2132 Controller Operation 4 2 1 Controls Most Carbolite Gero products are fitted with an instrument switch which cuts off power to the controller and other parts of the control circuit To operate the controller power must be supplied to the product and the instrument switch must be on If a time switch is included in the product circuit this mus...

Страница 40: ...d by the operator A single press of the scroll key in the Home list displays the temperature units further presses reveal the parameters in the current list indicated in the navigation diagram To return to the Home list at any time press page and scroll together or wait for 45 seconds The down and up keys are used to alter the setpoint or other parameter values 4 2 3 Basic Operation Normally no op...

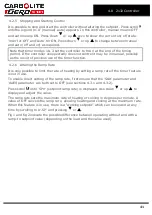
Страница 41: ... It is only possible to limit the rate of heating by setting a ramp rate if the timer feature is not in use To enable direct setting of the ramp rate first ensure that the StAt parameter and dwEll parameter are both set to OFF see sections 4 3 1 and 4 3 2 Press scroll until SPrr setpoint ramp rate is displayed Use down or up to display and adjust the value The ramp rate sets the maximum rate of he...

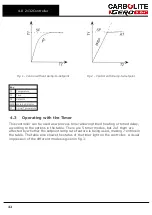
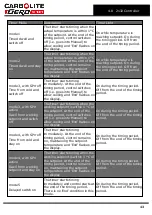
Страница 42: ...e Timer This controller can be used as a process timer allowing timed heating or timed delay according to the options in the table There are 5 timer modes but 2 of them are affected by whether the setpoint ramp rate feature is being used making 7 entries in the table The table also shows the status of the timer light on the controller A visual impression of the different modes is given in fig 3 42...

Страница 43: ...iming period mode 3 with SPrr active Dwell from working setpoint and switch off The timer starts timing when the working setpoint is within 1 C of the setpoint At the end of the timing period control switches off i e goes into Manual to allow cooling and End flashes on the display On during the timing period Off from the end of the timing period mode 4 with SPrr off Time from cold and stay on The ...

Страница 44: ... StAt parameter changes to run Note that the tmr display shows 0 zero during the last minute of timing and also shows 0 when the time has expired The timer light indicates whether timing is still in progress Method 2 Scroll to dwEll and use or to set the timing duration The advantage of method 2 is that dwEll need only be set once if repeated use of the same time period is required Scroll to StAt ...

Страница 45: ... setpoint ramp rate 5 Modes 3 4 with setpoint ramp rate off 6 Reaching temperature and continuing temperature Mode 5 7 Continuing at temperature modes 2 4 or cooling down modes 1 3 4 3 4 Stopping the Timer To stop the timer at any time while it is operating change the StAt User Calibration parameter to OFF This is the same as reducing tmr to zero The controller then acts as though it has reached t...

Страница 46: ...ode 1 as on the first row of the timer table but also includes the use of ramp rate To create this program 1 Start with display at home use arrow keys to alter the setpoint to 500 2 Press scroll until sp rr shows use arrow key to set value to 10 if you do not want to limit the ramp rate ignore this step or set the value to OFF 3 Press scroll until tm op shows use arrow key to set value to opt 1 4 ...

Страница 47: ... If a product is to be used at temperatures much lower than its design maximum control stability can often be improved by reducing the power limit Remember to make a record of the original setting before altering the power limit Example It is desired to operate a 1200 C furnace at 300 C The normal control settings can be expected to cause excessive overshoot as the furnace reaches temperature If t...

Страница 48: ... the calibration of the controller or of the complete system remember to reset the controller to factory calibration values by setting the CAL P parameter to FACt To enter a user calibration scroll to each of the following parameters in turn and set the desired values Pnt L low temperature for which an offset is to be entered OFS L offset value for the low temperature Pnt H high temperature for wh...

Страница 49: ... 6 It is not feasible to cover all possible alarm features which may be included by customer special order within this manual 4 6 Temperature Controller Replacement Before handling the controller wear an anti static wrist strap or otherwise avoid any possibility of damage to the unit by static electricity Refer to the detailed instructions supplied with the replacement controller Ease apart the tw...

Страница 50: ...4 0 2132 Controller 4 7 Navigation Diagram 50 ...

Страница 51: ... if SPrr in use 4 Manual Auto mAn off Auto on 5 Setpoint ramp rate OFF or value 6 Timer mode 7 Time remaining 8 Dwell time for timer 9 Timer status run or OFF 10 Enter password 11 If User Calibration 12 User 2 Point Calibration 13 Power limit setting if present 14 For factory acess to lists and parameters not available to the operator 51 4 0 2132 Controller ...

Страница 52: ...elements are isolated Find and correct the cause before resetting the over temperature controller according to the instructions supplied To switch off power to the heating elements use the heater switch To switch the product off use both the heater switch and the instrument switch If the product is to be left switched off and unattended isolate it from the electrical supply 5 2 Control Method Set ...

Страница 53: ... returns to the measured temperature when no key is pressed for a short period of time Sometimes a furnace using this type of control does not cool down because the end zones lose heat first and therefore the end zone controllers try to compensate for this by switching on the end zone elements preventing the furnace from cooling B Retransmission of Setpoint Three independent thermocouples are conn...

Страница 54: ...e of heat transfer between the zones The models listed in this manual are designed to achieve an extended uniform temperature zone by the use of three control zones rather than achieving different temperatures in each zone 5 4 General Operating Advice Heating element life is shortened by overheating Do not leave the product at high temperature when it is not required The maximum temperature is sho...

Страница 55: ...eneral rule for maximum heating or cooling rate is 400 internal diameter in mm to give C min for 75 mm i d tubes this comes to 5 C per minute The controller can be set to limit both the heating and cooling rate 5 7 Pressure Work tubes are not able to accept high internal pressure When gas seals or similar fittings are in use the gas pressure should be restricted to a maximum of 0 2 bar 3 psi A pre...

Страница 56: ...l l look at the OP Hi parameter l make a note of the value and compare with the 10 0 l observe the rating label if a range of voltages is stated it is not a 208 V multi voltage model l if in doubt check with Carbolite Gero each product has its own record card Refer to the controller instructions for how to change the power limit 5 9 Running at Low Temperatures The power limit may be adjusted to a ...

Страница 57: ...tted Electrical measurement Safety Switch Function split models only Set a safe temperature above ambient and open the furnace to see if the heater light goes out Safety Switch Function split models only Electrical measurement Electrical Safety external Visual check of external cables and plugs Electrical Safety internal Physically check all connections and cleaning of the power plate area Functio...

Страница 58: ...ted Check all seals and O rings and clamps Performance Element Circuit Electrical measurement Power Consumption Measure the current drawn on each phase circuit Cooling Fans if fitted Check whether the cooling fans are work ing 58 ...

Страница 59: ...ay contain calibration instructions 6 4 After Sales Service Carbolite Gero Service has a team of Service Engineers who can offer repair calibration and preventive maintenance of furnace and oven products both at the Carbolite Gero factory and at customers premises throughout the world A telephone call or email often enables a fault to be diagnosed and the necessary parts to be despatched In all co...

Страница 60: ... higher levels may be encountered during maintenance or repair Whilst there is no evidence of any long term health hazards it is strongly recommended that safety precautions are taken whenever the materials are handled Exposure to fibre dust may cause respiratory disease When handling the material always use approved respiratory protection equipment RPE eg FFP3 eye protection gloves and long sleev...

Страница 61: ...nal cover Within some models the thermocouple lies inside the product body the body must be removed from the control base and the end cap and insulation ring removed from one end Disconnect the product from the power supply Remove terminal cover to gain access to the thermocouple connections Make a note of the thermocouple connections Thermocouple cable colour codings are thermocouple leg colour p...

Страница 62: ...e ceramic board disc from one end Use a sharp knife to cut right through the insulation down to the wire wound tube element along the whole length of the body but do not cut either of the ceramic board end discs The knife cut must be in line with the element lead wires Slide the element gently out through the end of the product body Check the cylindrical case and clean out as appropriate Remove an...

Страница 63: ... may not be fitted If any fuse has failed it is advisable for an electrician to check the internal circuits Replace any failed fuses with the correct type For safety reasons do not fit larger capacity fuses without first consulting Carbolite Gero The fuses are located at the cable entry point Remove the back panel or control box back panel to gain access to the fuses 63 7 0 Repairs and Replacement...

Страница 64: ... a low temperature The door switch es if fitted may be faulty or need adjustment The contactor relay if fitted may be faulty The heater switch if fitted may be faulty or need adjustment The SSR could be failing to switch on due to internal failure faulty logic wiring from the controller or faulty controller There are no lights glowing on the controller Check the supply fuses and any fuses in the f...

Страница 65: ...r shows a low temperature The thermocouple may be faulty or may have been removed out of the heating chamber The thermocouple may be connected the wrong way around The controller may be faulty 2 Product heats up when the instrument switch is OFF The SSR has failed ON Check for an accidental wiring fault that could have overloaded the SSR 65 8 0 Fault Analysis ...

Страница 66: ...9 0 Wiring Diagrams 9 0 Wiring Diagrams 9 1 WC 13 01 Connections below show single phase with indirect safety switches and over temperature control 66 ...

Страница 67: ...9 2 WC 13 31 Connections below show single phase with indirect safety switches and over temperature control 67 9 0 Wiring Diagrams ...

Страница 68: ...erminal depending on EMC filter requirements 9 4 Independent Zones control method C When this is ordered there are three independent thermocouples instead of the four shown connected to the three controllers the words master and slave may be replaced by centre and end 9 5 Control by Broadcast Comms control method B When this is ordered there are three independent thermocouples connected to the thr...

Страница 69: ...stomer Fuses Required if no supply cable fitted Recommended if cable fitted See rating label for current See table below for fuse rating Model Phases Volts Supply Rating TZF 12 65 550 1 phase 110 120 20 A TZF 12 65 550 1 phase 200 240 10 A TZF 12 65 550 2 or 3 phase 380 220 415 240 6 A 10 2 Power Settings The power limit settings parameter OP Hi for this model are voltage dependant The figures rep...

Страница 70: ...Settings User Power Setting Adjustments Date Power Comments Note If a new set of elements are fitted then return the power settings to the original value Please refer to the rating label for product specific information 70 ...

Страница 71: ...work tube wound with resistance wire TZF 12 65 550 1200 2 0 65 600 550 38 Note Weights are approximate for horizontal models and do not include fittings or vertical stands 11 1 Environment The models listed in this manual contains electrical parts and should be stored and used in indoor conditions as follows Temperature 5 C 40 C Relative humidity Maximum 80 up to 31 C decreasing linearly to 50 at ...

Страница 72: ......

Страница 73: ...Notes Service Record Engineer Name Date Record of Work ...

Страница 74: ... us at the address below or ask your nearest stockist For preventive maintenance repair and calibration of all furnace and oven products please contact Carbolite Gero Service Telephone 44 0 1433 624242 Fax 44 0 1433 624243 Email ServiceUK carbolite gero com Carbolite Gero Ltd Parsons Lane Hope Hope Valley S33 6RB England Telephone 44 0 1433 620011 Fax 44 0 1433 621198 Email Info carbolite gero com...

Отзывы: