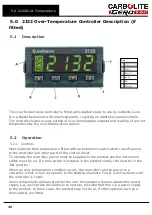
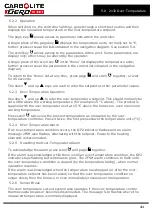
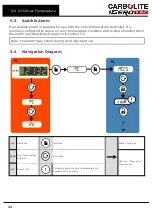
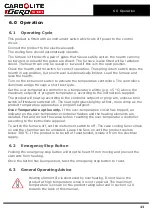
background image

set to on, then the relay closes during the segment and a small 1 appears in the top left
of the screen.

If more than one program segment output is fitted, then there are extra boxes
depending on how many event outputs there are.

3.10

Temperature Controller Replacement

Before handling the controller: wear an anti-static wrist strap or
otherwise avoid any possibility of damage to the unit by static electricity.
Refer to the detailed instructions supplied with the replacement
controller.

Ease apart the two lugs at the side; grip the instrument and withdraw it from its sleeve;
push in the replacement.

3.11

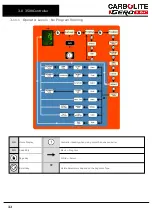
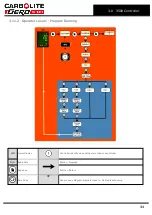
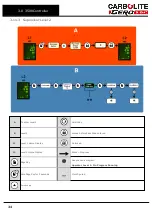
Controller Navigation Diagrams

The following diagrams detail how to navigate to the various menu options within the
3508 Controller. At each option, values can be set using the arrow keys.

31

3.0   3508 Controller

Содержание CARBOLITE GERO BLF 18/3

Страница 1: ...Installation Operation and Maintenance Instructions 1800 C Bottom Loading Furnace BLF Model 3 Litres 3508 Controller BLF 18 3 3508 Controller MEN BLF1803 001_3508 09 01 2019 ...

Страница 2: ...nstructions 9 2 4 Fitting the Chimney and Heating Elements 10 2 5 Electrical Connections 11 3 0 3508 Controller 13 3 1 PID control 13 3 2 3508P1 13 3 3 3508P10 13 3 4 3508P25 13 3 5 Basic Operation 14 3 5 1 Controller Layout 15 3 5 2 Keys 15 3 6 Quick Start Guide 15 3 6 1 Operation as a simple controller 15 3 6 2 Changing the Setpoint 15 3 6 3 Resetting the programmer 16 3 6 4 Understanding User L...

Страница 3: ...10 Temperature Controller Replacement 31 3 11 Controller Navigation Diagrams 31 3 11 1 Operator Level 1 No Program Running 32 3 11 2 Operator Level 1 Program Running 33 3 11 3 Supervisor Level 2 34 4 0 3508 Dual Loop Cascade Control if fitted 35 4 1 Principle of Cascade Control 35 4 2 Operation of Cascade Control 35 4 3 Bypassing Cascade Control 39 4 4 3508P1 Element Loop Loop 2 39 4 5 Caution 39 ...

Страница 4: ...ales Service 49 7 5 Recommended Spare Parts and Spare Parts Kit 49 7 6 Power Adjustment Controller 49 7 7 Power Adjustment Thyristor 50 8 0 Repairs and Replacements 51 8 1 Safety Warning Disconnection from Power Supply 51 8 2 Safety Warning Refractory Fibre Insulation 51 8 3 Safety Warning Molybdenum Disilicide Elements 52 8 4 Temperature Controller Replacement 52 8 5 Fuse Replacement 52 8 6 Therm...

Страница 5: ...11 0 Fuses and Power Settings 60 11 1 Fuses 60 11 2 Power Settings 60 12 0 Specifications 62 12 1 Environment 62 5 ...

Страница 6: ...ent light glows or flashes to indicate that power is being supplied to the elements 1 2 General Warnings DANGER Electric shock Read any warning printed next to this symbol WARNING Risk of fatal injury DANGER Hot surface Read any warning printed next to this symbol WARNING All surfaces of a product may be hot DANGER Read any warning printed next to this symbol Caution Double Pole Neutral Fusing 6 ...

Страница 7: ... advice on handling this material see section 8 2 2 2 Siting and Setting Up Place the product on a level surface in a well ventilated area Site away from other sources of heat and on a non flammable surface that is resistant to accidental spillage or hot materials The surface on which the equipment is mounted should be stable and not subject to movement or vibrations The height of the mounting sur...

Страница 8: ...e Ensure that the product is placed in such a way that it can be quickly switched off or disconnected from the electrical supply Under no circumstances should any objects be placed on top of the product Always ensure that any vents on the top of the product are clear of any obstruction Always ensure all cooling vents and cooling fans if fitted are clear of any obstruction 8 ...

Страница 9: ... Please ensure the plastic tie wrap used to fix the arm is removed before operation 1 Remove the back panel of the furnace 2 Locate the tie wrap that has been used to prevent the arm from moving It is marked with a tag as shown in the photograph below 3 Cut the tie wrap and discard 4 Replace the back panel 9 2 0 Installation ...

Страница 10: ...d separately together with other items shown in the list separately packed items BLF Elements 6 Element Clamps 6 Elements Clips 12 Braids 1 set Separators 6 or combined clips and braids may be supplied BLF 3 transit clamps Upper Clamp 1 Remove lower clamp first 2 Remove two M8 nuts and washers supporting plate 3 from underneath 3 Remove plate Lower Clamp 1 Remove bottom M8 nut 2 Remove two M6 bolt...

Страница 11: ...tion The supply voltage should agree with the voltage on the label and the supply capacity should be sufficient for the current on the label The supply should be fused at the next size equal to or higher than the current on the label A table of the most common fuse ratings is also given towards the back of this manual When the mains cable is factory fitted internal fuses are also fitted It is esse...

Страница 12: ...ve Neutral Reversible or Live Live 1 phase L Brown to live to either power conductor For USA 200 240V connect L1 N Blue to neutral to the other power conductor For USA 200 240V connect L2 PE Green Yellow to earth ground to earth ground Electrical Connection Details 12 ...

Страница 13: ...erature control when properly set This controller can store 10 programs of up to 50 segments each Programs can be operated individually or linked by a Call parameter as sub programs or to form single long programs The 3508P10 can also be used as a simple temperature controller 3 4 3508P25 The 3508P25 is a digital temperature controller which uses PID algorithms to give excellent temperature contro...

Страница 14: ... Indicator B Power Output Indicator C Not Used D Runs Holds Resets the current program E Page F Scroll G Down H Up I Power Output Percentage J Program Setpoint Temperature PSP when a program is running K Setpoint Temperature SP when basic controlling 14 ...

Страница 15: ...ute the display returns to Home 3 6 Quick Start Guide 3 6 1 Operation as a simple controller When switched on the controller goes through a short test routine and then shows the measured temperature Below it the setpoint temperature SP and percentage of power output The controller will immediately attempt to reach the set temperature and maintain it This will cause the product to heat as quickly a...

Страница 16: ...program runs The SP temperature of the controller does not apply when a program is operating To pause the program press RUN HOLD To stop the program and return to simple controlling reset press RUN HOLD for 2 seconds When the program ends the programmer will either Automatically reset to operation as a simple controller Dwell at the last temperature of the program with the RUN indicator flashing u...

Страница 17: ...Setting Up Controller Before using the controller or during its lifetime certain parameters may have to be set depending on specific requirements To do this the controller must be set to Supervisor Level 2 see Controller Navigation Diagrams 3 7 1 Maximum output power setting Press page until Control Output Hi is displayed Press up or down to adjust the value Depending on the product model the maxi...

Страница 18: ...e second segment type End type Dwell For the P10 and P25 programs can be linked together using a Call segment However a lower number program can not be called and a program can not be ended with a call segment A program can be ended in four ways 1 With End segment set to S OP the power to the elements is turned down to 0 no matter what the Setpoint temperature is 2 With End segment set to Reset an...

Страница 19: ...oling Off Holdback is switched off To set the holdback type press page twice then press scroll until the display shows Holdback Type for each segment and press up or down to set The default setting for holdback is OFF 3 8 3 Wait Segments Wait prevents the program proceeding to the next segment in a similar way to holdback until the selected Wait For parameter has been met There are 5 Wait For para...

Страница 20: ... the display will show ProgEdit 1 Program number On P10 or P25 models press up or down to select a new program number The display will show that new programs have only one segment Holdback Value Press scroll until the display shows Holdback Value If required Press up or down to set a value This value will be used in any segment where a Holdback Type is set Ramp Units These apply to Rate segments o...

Страница 21: ...p or down to select PrgIn1 PrgIn2 PrgIn1In2 PrgIn1orIn2 PVWaitIP GoBack to segment number visible only for GoBack segments Press scroll until the display shows GoBack Seg Press down to select a segment number to go back to GoBack Cycles visible only for GoBack segments Press scroll until the display shows GoBack Cycles Press up or down to set a value Call Cycles Visible only for call segments Pres...

Страница 22: ...rogram P10 and P25 To select a program Press page until Program Status Reset appears Press scroll then up or down to select a program number To operate the program Press RUN HOLD or Press scroll until the cursor moves to Reset Press up or down to select Run Run will be displayed 3 8 10 Program Status While a program is operating the home display shows 3 values l Top Measured temperature l Centre P...

Страница 23: ...not caught up with the program Programming note For P10 and P25 models other programs can be created or changed whilst the current program is operating 3 8 12 Power Failure Recovery If there is a power interruption to the controller during a program when power is restored the controller pauses the program then ramps the temperature back up to the current program setpoint PSP before continuing the ...

Страница 24: ...ed On P10 or P25 models press up or down to select a new program number a program with only 1 segment 3 Press scroll until Holdback Value is displayed Default 0 degrees 4 Press scroll until Ramp Units is displayed Press up or down to set to Min 5 Press scroll until Cycles is displayed Default 1 6 Press scroll until Segment 1 is displayed 7 Press scroll until Segment Type is displayed Press up or d...

Страница 25: ...set 13 Press page and scroll together to return to the home display To run the program either press RUN HOLD or 14 Press page until Program Status is displayed 15 Press scroll until the cursor moves to the program status of Reset 16 Press to select Run 25 3 0 3508 Controller ...

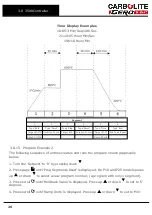
Страница 26: ...Time 120 min 3 8 15 Program Example 2 The following sequence of entries creates and runs the program shown graphically below 1 Turn the Setpoint to 0 by pressing down 2 Press page until Prog Segments Used is displayed On P10 and P25 models press up or down to select a new program number a program with only 1 segment 3 Press scroll until Holdback Value is displayed Press up or down to set to 5 degr...

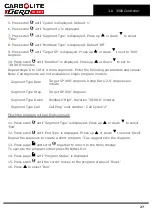
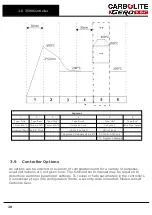
Страница 27: ...pe Rate Target SP 400 degrees Ramp Rate 2 0 degrees per minute Segment Type Step Target SP 200 degrees Segment Type Dwell Holdback High Duration 30 00 0 minutes Segment Type Call Call Prog next number Call Cycles 2 Finish the program with an End segment 11 Press scroll until Segment Type is displayed Press up or down to select End 12 Press scroll until End Type is displayed Press up or down to sel...

Страница 28: ...egment 4 Holdback Value 5 C P10 and P25 only Program 3 Example 3 9 Controller Options As options can be ordered in a variety of combinations and for a variety of purposes exact instructions are not given here The full Eurotherm manual may be required to determine customer parameter settings To reveal or hide parameters in the controllers it is necessary to go into configuration mode a security cod...

Страница 29: ...20 Link together 3 9 2 Digital Communications RS485 If an RS485 option is supplied the furnace is fitted with two D sockets Connection between products is by straight cable as follows Product end of cable female 25 pin 9 pin RS485 Cable product to PC Computer end of cable 9 pin 25 pin female 2 3 3 2 Tx 3 2 2 3 Rx Com 7 5 _________________ 5 7 Com 3 9 3 Comms Address Typically the comms address is ...

Страница 30: ...uration depends on customer requirements Remote input when specified may be switched on and off using the remote setpoint enable parameter in the controller level 2 if this was made available for a particular application In level 2 press page until REM SP Enable is displayed press up or down to select SP1 the normal controller setpoint or SP2 the remote input setpoint SPX will appear in the top le...

Страница 31: ... anti static wrist strap or otherwise avoid any possibility of damage to the unit by static electricity Refer to the detailed instructions supplied with the replacement controller Ease apart the two lugs at the side grip the instrument and withdraw it from its sleeve push in the replacement 3 11 Controller Navigation Diagrams The following diagrams detail how to navigate to the various menu option...

Страница 32: ...11 1 Operator Level 1 No Program Running HD Home Display Controller identity when using more than one controller R O Read Only Black Progress Page Key White Return Scroll Key Visible Parameters depend on the Segment Type 32 ...

Страница 33: ...ogram Running HD Home Display Controller identity when using more than one controller R O Read Only Black Progress Page Key White Return Scroll Key See previous diagram Operator Level 1 No Program Running 33 3 0 3508 Controller ...

Страница 34: ...er Level 2 Scroll Key B Level 2 Locked before Pass Code entered L1 Level 1 Home Display Unlocked L2 Level 2 Home Display Black Progress Page Key See previous diagram Operator Level 1 No Program Running Hold Page Key for 3 seconds If configured Arrow Key 34 ...

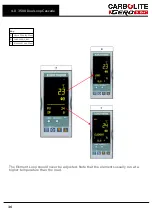
Страница 35: ...scade control system is configured to limit the element temperature to a band around the load temperature typically of 10 of the set point temperature The set point of the load loop shown at the top of the display can be adjusted by the operator The Element Loop shown at the bottom of the display should not be adjusted by the operator will automatically regulate the element temperature to achieve ...

Страница 36: ...0 3508 Dual Loop Cascade Key A Home Display View B Load Loop View C Element Loop View The Element Loop should never be adjusted Note that the elements usually run at a higher temperature than the load 36 ...

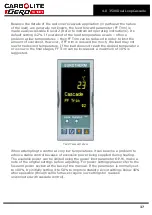
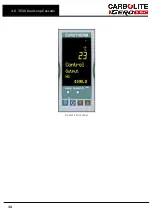
Страница 37: ...temperature or is slow in the final stages FF Trim can be increased a maximum of 10 is suggested Feed Forward View When attempting to control at very low temperatures it can become a problem to achieve stable control because of excessive power being supplied during heating The available power can be limited using the power limit parameter OP Hi make a note of the original settings before adjusting...

Страница 38: ...4 0 3508 Dual Loop Cascade Power Limit View 38 ...

Страница 39: ...ooling at low temperatures takes longer per degree than it does at high temperatures 4 5 Caution If the Load Thermocouple is removable leave it in the furnace or oven chamber whenever possible Operating with the Cascade Control active and with the Load Thermocouple in an unheated position such as lying on the work bench may cause the furnace or oven to heat up to its maximum temperature wasting po...

Страница 40: ...strument switch which cuts off power to the controller and other parts of the control circuit To operate the controller power must be supplied to the product and the instrument switch must be on If a time switch is included in the product circuit this must be in the ON position When an over temperature condition occurs the controller cuts the power to a contactor which in turn cuts power to the he...

Страница 41: ...perature set at 15 C above the furnace or oven maximum working temperature Press scroll twice view the present temperature as measured by the over temperature controller Press it twice the first press shows the temperature units C 5 2 4 Over Temperature Alarm If an over temperature condition occurs the OP2 indicator flashes and an alarm message 2FSH also flashes alternating with the setpoint Power...

Страница 42: ...erature condition and to stop sounding when the alarm is acknowledged as given in section 5 2 Note the alarm may sound during controller start up 5 4 Navigation Diagram HL Home List Page Key Black Progress OTSP Over Temperature Setpoint Scroll Key Dashed Through to other options AL Access List For factory access to list and parameters not available to the operator 42 ...

Страница 43: ...roller setpoint or program unless a time switch is fitted and switched off The heat light glows brightly at first more dimly as the product temperature approaches a program setpoint Over Temperature option only If the over temperature circuit has tripped an indicator on the over temperature controller flashes and the heating elements are isolated Find and correct the cause before resetting the ove...

Страница 44: ...heres metal oxides react with the silica layer on the surface of the elements and may lead to premature failure Protect the elements from splashes of molten metal and dust when loading the furnace and from fumes developed when melting especially from fluxes Also avoid compounds with a high alkali content The furnace is designed for use up to its maximum temperature in oxidising atmospheres but can...

Страница 45: ...trol This product is designed for heating and cooling at controlled rates The heating and cooling rates can be set in the temperature programmer The programmer enables the furnace to heat or cool at slower rates as desired and variable hold dwell periods can be programmed as required The programmer is used in conjunction with a phase angle thyristor power controller which incorporates a current li...

Страница 46: ... on the height of the work piece it may be necessary to hold the crucible up in the chamber when placing the work piece on the hearth ensure that appropriate tongs are available before starting Clamp Option This option assists the placing of the crucible over tall work pieces The clamp is provided in the form of a support shelf which can be fitted to a hinge on the case and a pair of insulated ton...

Страница 47: ... stop button to prove that it functions correctly Safety Switch Function Check that the hearth will not raise or lower with the cage open Safety Switch Function Electrical measurement Over Temperature Safety Circuit if fitted Set an over temperature setpoint lower than the current displayed temperature and check for an over temperature alarm as detailed in this manual Over Temperature Safety Circu...

Страница 48: ...ent on the standard required Operational Check Check that all functions are working normally Operational Check Thorough inspection and report incorporating a test of all functions Performance Element Circuit Electrical measurement Power Consumption Measure the current drawn on each phase cir cuit 48 ...

Страница 49: ...rbolite Gero factory and at customers premises throughout the world A telephone call or email often enables a fault to be diagnosed and the necessary parts to be despatched In all correspondence please quote the serial number and model type given on the rating label of the product The serial number and model type are also given on the back of this manual when supplied with the product Carbolite Ge...

Страница 50: ...ted with an adjustable resistor which is factory set to limit the maximum current supplied In the event of a change of supply voltage or the fitting of a new thyristor further adjustment may be required The maximum element currents for this model are listed in section 11 0 Please contact Carbolite Gero for further information 50 ...

Страница 51: ...irborne dust from these materials but much higher levels may be encountered during maintenance or repair Whilst there is no evidence of any long term health hazards it is strongly recommended that safety precautions are taken whenever the materials are handled Exposure to fibre dust may cause respiratory disease When handling the material always use approved respiratory protection equipment RPE eg...

Страница 52: ...t fuse types may or may not be fitted If any fuse has failed it is advisable for an electrician to check the internal circuits Replace any failed fuses with the correct type For safety reasons do not fit larger capacity fuses without first consulting Carbolite Gero The fuses are located at the cable entry point Remove the back panel or control box back panel to gain access to the fuses 8 6 Thermoc...

Страница 53: ...old each of them in place Care should be taken as insulation may fall if unsupported during the removal of the sections Once the insulation sections have been removed pass the tube up through the hole in the bottom of the furnace and locate within the recess of the furnace roof Once correctly located re fit the insulation sections and the corresponding brackets Re fit the stainless steel mesh guar...

Страница 54: ...rs or the clip tool provided depending on the type of clip or remove the combined clips and braids if supplied Lift out the old element and the insulation block handle the block with care as it is fragile Remove the clamps Handle the heating elements with extreme care as they are VERY FRAGILE Also avoid touching the heating surface the thin part of the element Carefully unpack the elements and ins...

Страница 55: ...Key A Braid B Roof Insulation C Element block D Element E Element Clamp See text Key A Clip B Braid Element Connections 3 phase example 55 8 0 Repairs and Replacements ...

Страница 56: ...nd Replacements Use of Clip Tool The distance from the top of the element clamp to the top of the element should be 40 mm Larger clips require the clip tool comprising two levers 1 Clip tool 2 Apply hand pressure 56 ...

Страница 57: ... wiring fault The controller shows a low temperature The door switch may be faulty or need adjustment The thyristor fuse may have blown The power thyristor could be failing to switch on due to internal failure faulty wiring from the controller or fault controller There are no lights glowing on the controller Check the supply fuses and any fuses in the product control compartment The controller may...

Страница 58: ...horted out or may have been moved out of the furnace The thermocouple may be connected the wrong way around The controller may be faulty 2 The HEAT light does not go off with the instrument switch and the fault persists when a 2 A control fuse is removed from its fuse holder The power thyristor has failed ON Check for an accidental wiring fault which could have overloaded the thyristor Isolate the...

Страница 59: ...10 0 Wiring Diagrams 10 1 195 1 1013 59 10 0 Wiring Diagrams ...

Страница 60: ...able fitted Recommended if cable fitted See rating label for current See table below for fuse rating Model Phases Volts Supply Fuse Rating Type Thyristor Fuse Rating Current Limit Element Circuit BLF 18 3 1 phase 208 V 32 A NS32 50 A 135 A BLF 18 3 1 phase 220 V 25 A NS32 50 A 135 A BLF 18 3 1 phase 230 V 25 A NS32 50 A 135 A 11 2 Power Settings The power limit settings parameter OP Hi for this mo...

Страница 61: ...Please refer to the rating label for product specific information 61 11 0 Fuses and Power Settings ...

Страница 62: ...ght kg Height Diameter Bottom Loading Furnaces heated by Molybdenum Disilicide elements with electrically operated hearth BLF 18 3 1800 4 8 190 150 3 155 12 1 Environment The models listed in this manual contains electrical parts and should be stored and used in indoor conditions as follows Temperature 5 C 40 C Relative humidity Maximum 80 up to 31 C decreasing linearly to 50 at 40 C 62 ...

Страница 63: ...Notes Service Record Engineer Name Date Record of Work ...

Страница 64: ... us at the address below or ask your nearest stockist For preventive maintenance repair and calibration of all furnace and oven products please contact Carbolite Gero Service Telephone 44 0 1433 624242 Fax 44 0 1433 624243 Email ServiceUK carbolite gero com Carbolite Gero Ltd Parsons Lane Hope Hope Valley S33 6RB England Telephone 44 0 1433 620011 Fax 44 0 1433 621198 Email Info carbolite gero com...

Отзывы: