
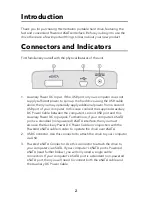


1. Connect the specifi ed cables for the desired interface type:
USB
: Connect the included USB cable from the USB port on the drive to
an available USB port on your computer.
Powered eSATA
: Connect the included Powered eSATA Cable from the
eSATA port on the drive to an available Powered eSATA port on your
computer. Your computer’s port might be might be labeled as “USB/
eSATA” or as “
eSATA “.
Standard eSATA (non-powered)
: First connect the included Auxiliary
DC Power Cable from an available USB port on your computer to the
Auxiliary Power DC Input jack on the drive. Then connect the included
Powered eSATA Cable from the eSATA port on the drive to an available
eSATA port on your computer.
2. The hard drive will mount automatically and a new icon will appear
in My Computer (Windows) or a new icon will appear on the desktop
(Mac).
Depending on your computer’s operating system and the interface type you
are using, the following special notes may apply:
Note 1: USB under Windows. If you are using a USB 1.1 port on your Windows
computer, the following cautionary note may appear on your display: Hi-Speed
USB Device plugged into non-Hi-Speed USB hub. This does not indicate a problem
because the drive is compatible with both USB 1.1 and USB 2.0 ports. Simply close
the message and proceed. However, in this case the drive will operate only at USB
1.1 speeds.
Note 2: USB or eSATA under Mac OS X 10.2. Mac OS X version 10.2 will not mount
any single FAT32-formatted (MS-DOS) partition greater than 128GB. To work around
this OS limitation, you may partition the drive into smaller FAT32 partitions, or you
may reformat the drive to HFS+ format.
Note 3: eSATA. Though the eSATA interface standard provides for “hot-plugging”
of the drive, some computers may not follow the standard precisely. If you fi nd that
your drive does not mount after attaching to a computer that is powered on, then
shut down the computer, attach the drive, and then boot up your computer.
Note 4: USB bus power. Most computers will supply suffi cient power through the
USB port to operate the drive. However, if the drive does not immediately spin up
and mount this may indicate that your laptop is not supplying suffi cient power. In
this case you may optionally apply additional power from a second USB port of your
computer. To do this connect the supplied Auxiliary DC Power Cable between the
computer’s second USB port and the Auxiliary Power DC Input jack on the drive.


