Venus KVM 16 Скачать руководство пользователя страница 15


Figure 2-5. Console Installation 


2.4


Optional Module Installation 


IP Module 

Please refer to “IP KVM Module User Manual” for details. 
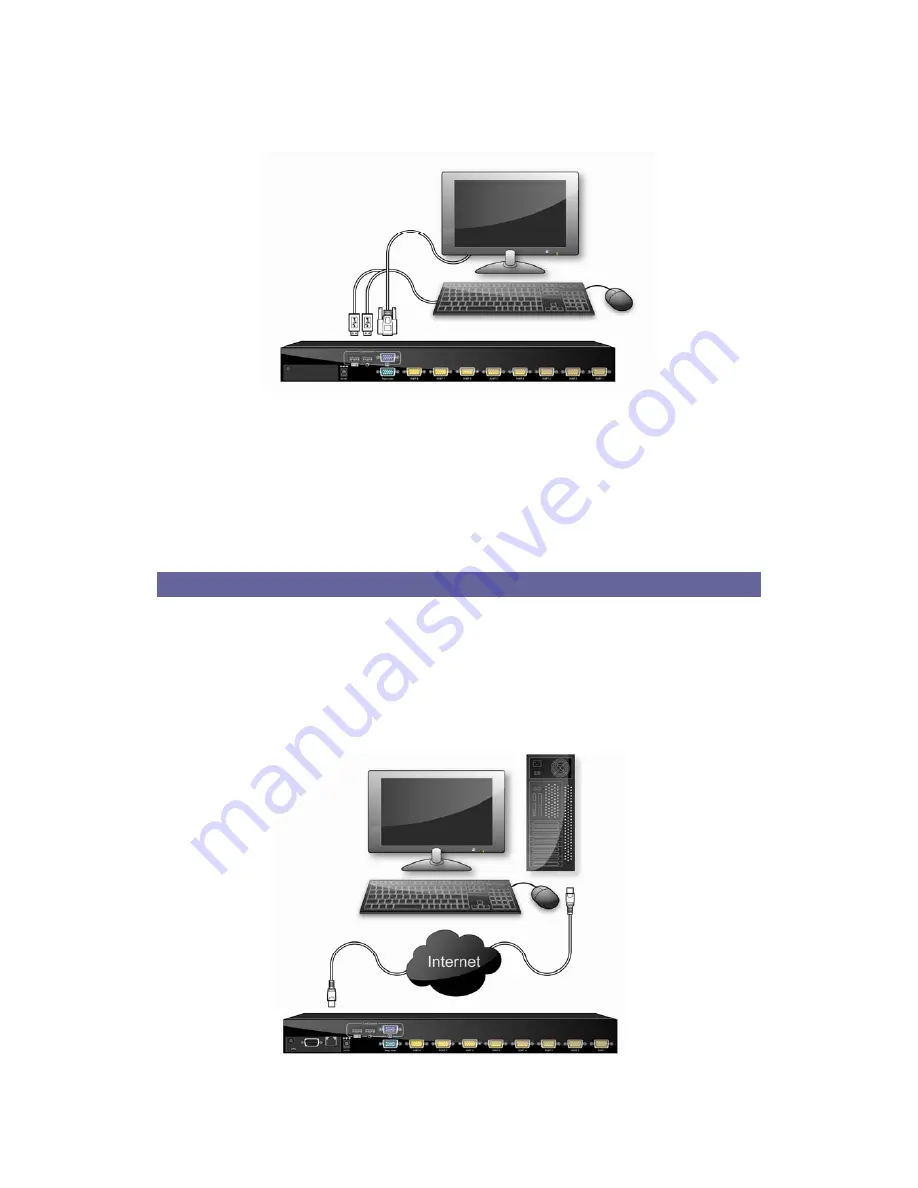
 

IP Remote Console 

Installation

: Power off the KVM switch firstly. Remove the cover of the add-on 

slot, slide in the IP Module and make sure the module is fully inserted into the 
slot.  
The IP Module redirects local keyboard, mouse and video data to a remote 
administration console. It allows you to control one or many computers locally at 
the server site or remotely via the Internet using a standard browser. 


Figure 2-6. IP Module Installation


Содержание KVM 16

Страница 1: ...KVM 8 16 Combo Free KVM Switch User s Manual Rev 1 0...

Страница 2: ...l Module Installation 12 2 5 Power ON 13 2 6 CAT5 KVM Receiver R Box 14 2 7 CAT5 Receiver Installation 14 2 8 When video signal is foggy or unclear 14 2 9 Daisy Chain Connection 14 3 Usage 16 3 1 Butt...

Страница 3: ...II 6 Troubleshooting 30 7 Certifications 31...

Страница 4: ...5 cable With the IP based remote console port you can control one or many computers locally at the server site or remotely via the Internet using a standard browser You can securely gain BIOS level ac...

Страница 5: ...er accounts Hot Plug add or remove connected computers without powering off the KVM switch or computers Support two user layers and search computer server name Plug n Play monitor support Keyboard sta...

Страница 6: ...er s manual CD ROM 1 PCS Quick Installation Guide 1 PCS AC to DC Power Adapter 1 PCS Rack Mount Kit 1 SET Daisy Chain Cable 0 9M 1 PCS KVM Cable HDDB 15 VGA PS 2 x 2 1 8M 1 PCS KVM Cable HDDB 15 VGA U...

Страница 7: ...odule RJ 45 Connector CAT5 console up to 1000 feet away from KVM switch with superior auto adjust RGB gain delay control capability IP Based Remote Module RJ 45 8P8C for 10 100M Ethernet DB9 male for...

Страница 8: ...hinese Auto Scan Intervals 5 99 Sec Keyboard Emulation PS 2 or USB Mouse Emulation PS 2 or USB Housing Metal Power DC Power adapter 12VDC 1A Operation Temperature 0 50 Storage Temperature 20 60 Humidi...

Страница 9: ...extender receiver One VGA Monitor One USB Keyboard One USB Mouse Optional computer Table 1 3 System Requirements Model No Venus 16 Console side One VGA Monitor One USB Keyboard One USB Mouse Computer...

Страница 10: ...1 2 HDDB 15 VGA PS 2 x 1 1 8M Daisy Chain Cable VGA Cable HDDB 15 pin Male to Male Figure 1 3 Daisy Chain Cable Daisy chain needs the cable all 15 lines connected This is a special VGA cable normal VG...

Страница 11: ...itch 16 port Combo free KVM Switch 8 port Combo Free KVM Switch with IP module 16 port Combo Free KVM Switch with IP module 8 port Combo Free KVM Switch with CAT5 module 16 port Combo Free KVM Switch...

Страница 12: ...onvenient place to put your KVM Switch The 19 rack mount form factor makes it ideally mountable on a 19 rack When mounting to a rack attach the included brackets to the sides of the KVM Switch Take no...

Страница 13: ...ut cable has three connectors a HDDB 15 male type for computer video a purple mini din 6 pin PS 2 connector for keyboard and a green mini din 6 pin PS 2 connector for mouse Plug these three connectors...

Страница 14: ...ale port on the back of the KVM unit labeled with the monitor symbol at the Local Console connector There may be USB local console or PS 2 local console For USB local console connect the USB keyboard...

Страница 15: ...h firstly Remove the cover of the add on slot slide in the IP Module and make sure the module is fully inserted into the slot The IP Module redirects local keyboard mouse and video data to a remote ad...

Страница 16: ...ble to the R Box in the remote end Figure 2 7 CAT5 Module Installation 2 5 Power ON Check connections and plug in power supply Double check whether all cables connectors are properly connected You can...

Страница 17: ...4 Connect Local Computer to R box with the accompanied 3 in 1 HDDB 15 cable 5 Power on the R Box by plugging in the power adaptor 6 Push the SELECT button to select remote or local Computer 2 8 When...

Страница 18: ...h When the master unit starts up it will query all daisy chained Slave units and automatically set up the Bank ID for each Slave unit So the 7 seg LED on the Master unit will display 1 Slave 1 will di...

Страница 19: ...and button 5 simultaneously to switch to port 13 and the port red LED will turn on After power on the KVM switch all of console ports Local or Remote consoles will be linked to Computer port 1 3 2 Fro...

Страница 20: ...AX BANK 3 4 Hot plug The KVM Switch supports Hot Plug function for any non PS 2 connectors You may Hot Plug the USB mouse or USB keyboard as you like DO NOT hot plug PS 2 port Some O S Operation Syste...

Страница 21: ...ey mode Then you have to enter Command in 2 seconds If you have not pressed any key during Hotkey mode over 2 seconds the Hotkey mode will be escaped and back to Operation System control state A Comma...

Страница 22: ...anel Figure 4 1 Hotkey Example There are two methods to activate the OSD menu 1 Activate OSD by Mouse Hold the left mouse button press and release the Esc key will active the Port Display Hold the rig...

Страница 23: ...M system can setup one SUPERVISOR and eight USERS Before not setting up administrator user s name and his password none of administrator users could access OSD menu When you login with Supervisor plea...

Страница 24: ...on or port switch either by panel button OSD or Hotkey the screen will display the following information one digit BANK NUMBER two digit PORT NUMBER PORT NAME and current Hotkey any input or mouse mov...

Страница 25: ...k Esc Quit 1 Show port 01 08 2 Show port 09 16 3 Show port 17 24 4 Show port 25 32 Table 5 2 OSD Function Key CONSOLE OFF logout so the next person needs to enter user name and password in order to do...

Страница 26: ...ter Select Move F1 Go to Main Menu F2 Console off F3 Back Esc Exit Table 5 3 OSD Function Key 5 3 1 LANGUAGE The default language is ENGLISH Moving the cursor by keyboard Up Arrow key or the Down Arro...

Страница 27: ...USE to move After you have selected the PC port already you can either press the Enter Key or Move the cursor to PC name double clicks the left button of mouse to switch the PC port immediately Press...

Страница 28: ...ption Enter Start Port Search F1 Go to Main Menu F2 Console off F3 Back Esc Exit Table 5 5 OSD Function Key Search the computer by port name Enter will show the all the port 5 3 4 USER SECURITY At USE...

Страница 29: ...nsole off F3 Back Esc Exit Table 5 6 OSD Function Key Press ENTER key to get USERS list The left column S means SUPERVISOR and 1 2 3 8 mean ADMINISTRATOR The maximum NAME is eight characters maximum A...

Страница 30: ...column is the PC name list the following 8 column the access right of each ADMINISTRATOR use OSD MOUSE or Enter key to active inactive the access right of each port X means to disable access and O me...

Страница 31: ...rval from one PC port to next PC port The default SCAN time is 10 seconds and the maximum scan time is 99 seconds can not use number pad Press Enter key to save SCAN TIME 5 3 8 OSD MOUSE You can chang...

Страница 32: ...Figure 5 12 OSD Mouse OSD Function Key Description Enter Save Move F1 Go to Main Menu F2 Console off F3 Back Esc Exit Table 5 10 OSD Function Key...

Страница 33: ...use first then plug in keyboard Make sure the USB or PS 2 mouse works when directly plugged into the computer Avoiding moving the mouse or pressing the mouse buttons when switching ports 4 No video si...

Страница 34: ...en tested and found to comply with Part 15 of the FCC Rules Operation is subject to the following two conditions 1 This device may not cause harmful interference 2 This device must accept any interfer...

Отзывы: