.3.
Assembly Instructions
Step 3 (R eceiv er installation and w iring )
Step 2 (C eiling brack et installation and fan into the installed Brack et. )
①
P u t th e receiv er into th e
Bracket and arrang e th e wires
②
Adj u st th e p osition of C anop y ,
th en lock it
③
C onnect th e wires according to th e p olarity ( th e color of th e
Hou se p ower cord m ay b e dif f erent if th e color is th e sam e) .
AC I N L ( Brown)
AC I N N ( Blu e)
G rou nd( Y ellow/ g reen)
L F or lig h t( R ed)
N N eu tral( Blu e)
T o M otor
U ( P ink)
V( G ray )
W ( R ed)
H ouse pow er
F AN
C an b e installed on < 15º slop ed roof .
C h oose th e f ollowing installation m eth ods
according to th e actu al situ ation of th e roof .
②
③
Snap th e b asically assem b led f an into th e
installed Bracket.
F AN
C lick!
b u ckle
O F F
①
T u rn of f th e f an p ower su p p ly at th e circu it
b reaker b ox and th e wall switch . I f it is a
cem ent roof , p lease drill th e installation
h ole at th e installation location.
C em ent roof
or
Solid wood roof
N ot inclu ded
Screw
P
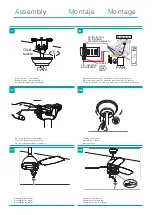
lace the receiver in the holder,
C
oloca el receptor en el soporte,
P
lacez le récepteur dans le support.
T
ighten the screws.
A
priete los tornillos.
S
errez les vis.
I
nstall the fan in the bracket,
I
nstala el soporte del ventilador,
I
nstallez le support du ventilateur.
7
8
9
10
11
12
A
ssembly
M
ontaje
M
ontage
A
ssemble the light kit.
E
nsamblar el kit de luz.
A
ssemblez le kit d’éclairage.
M
ake the connections. If in doubt, consult a technician
H
az las conexiones. Si tienes dudas consulta a un técnico.
F
aites les connexions. En cas de doute, consultez un technicien.
A
ssemble the blades.
E
nsamblar las palas.
A
ssemblez les lames.
.3.
Assembly Instructions
Step 3 (R eceiv er installation and w iring )
Step 2 (C eiling brack et installation and fan into the installed Brack et. )
①
P u t th e receiv er into th e
Bracket and arrang e th e wires
②
Adj u st th e p osition of C anop y ,
th en lock it
③
C onnect th e wires according to th e p olarity ( th e color of th e
Hou se p ower cord m ay b e dif f erent if th e color is th e sam e) .
AC I N L ( Brown)
AC I N N ( Blu e)
G rou nd( Y ellow/ g reen)
L F or lig h t( R ed)
N N eu tral( Blu e)
T o M otor
U ( P ink)
V( G ray )
W ( R ed)
H ouse pow er
F AN
C an b e installed on < 15º slop ed roof .
C h oose th e f ollowing installation m eth ods
according to th e actu al situ ation of th e roof .
②
③
Snap th e b asically assem b led f an into th e
installed Bracket.
F AN
C lick!
b u ckle
O F F
①
T u rn of f th e f an p ower su p p ly at th e circu it
b reaker b ox and th e wall switch . I f it is a
cem ent roof , p lease drill th e installation
h ole at th e installation location.
C em ent roof
or
Solid wood roof
N ot inclu ded
Screw
.4.
Assembly Instructions
Step 4 (
Blad es and
L ig ht k it installation)
①
Alig n th e b lades with th e m ou nting h oles,
and th en f ix th em with screws.
Step 5 (Sw itch on and ceiling fan w ork s)
O N
3
4
5
6
1
2
1H
3H
6H
Z
Z
Z
③
I nstallation of lig h t cov er
②
I nsert
R em ov e th e p re- installed screws.
C onnect th e lig h t kit cab le, and th en lock
th e lig h t kit.
.3.
Assembly Instructions
Step 3 (R eceiv er installation and w iring )
Step 2 (C eiling brack et installation and fan into the installed Brack et. )
①
P u t th e receiv er into th e
Bracket and arrang e th e wires
②
Adj u st th e p osition of C anop y ,
th en lock it
③
C onnect th e wires according to th e p olarity ( th e color of th e
Hou se p ower cord m ay b e dif f erent if th e color is th e sam e) .
AC I N L ( Brown)
AC I N N ( Blu e)
G rou nd( Y ellow/ g reen)
L F or lig h t( R ed)
N N eu tral( Blu e)
T o M otor
U ( P ink)
V( G ray )
W ( R ed)
H ouse pow er
F AN
C an b e installed on < 15º slop ed roof .
C h oose th e f ollowing installation m eth ods
according to th e actu al situ ation of th e roof .
②
③
Snap th e b asically assem b led f an into th e
installed Bracket.
F AN
C lick!
b u ckle
O F F
①
T u rn of f th e f an p ower su p p ly at th e circu it
b reaker b ox and th e wall switch . I f it is a
cem ent roof , p lease drill th e installation
h ole at th e installation location.
C em ent roof
or
Solid wood roof
N ot inclu ded
Screw


