background image

GB - 12

CONNECTIONS

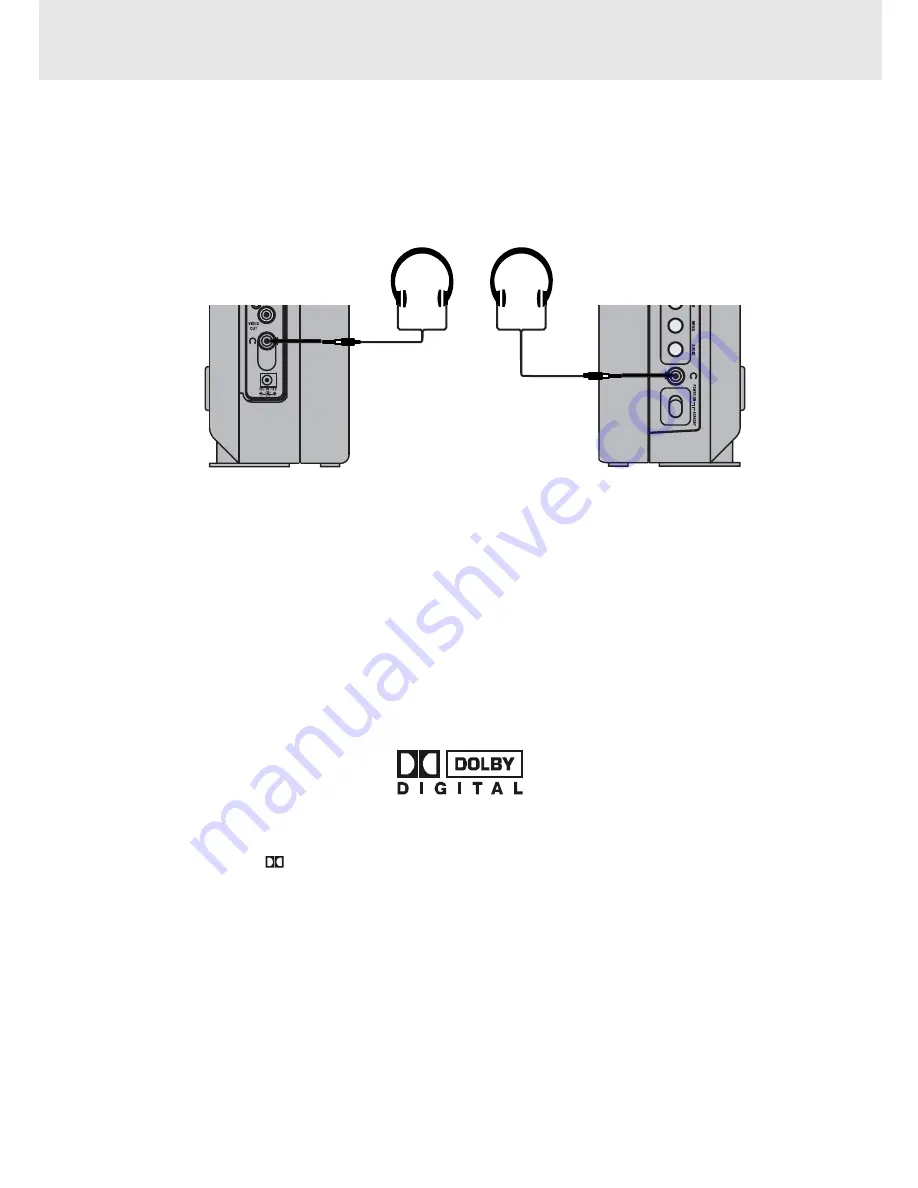
Using  Headphones

• Turn down the volume before connection, and then adjust the level.
• When headphones are connected, no sound will be output from the unit's speakers.

Caution:
• Avoid listening to sound at levels which may be harmful to your ears.

Right side of unit

Dolby Digital (for DVD)

Dolby Digital is a sound system developed by Dolby Laboratories Inc. that gives movie theatre ambience to
audio output when the unit is connected to a Dolby Digital 5.1 channel processor or amplifier.
This unit automatically recognizes DVDs that have been recorded with Dolby Digital.
Not all Dolby Digital sources are recorded with 6 channels.
Some sources marked Dolby Digital may be recorded in Dolby Surround, a 2 channel system. Look for this logo
on your unit.

Manufactured under license from Dolby Laboratories.
'Dolby' and the double-D 

 symbol are trademarks of Dolby Laboratories.

HEADPHONES

(3.5mm diameter plug)

Left side of unit

Содержание PVS1680

Страница 1: ...811 168091 031 Printed in China FOR USA OWNER S MANUAL CD PLAYBACK 1 VIEWER R CD R RW Car DVD Theater System ...

Страница 2: ...ision Corporation and is intended for home and other limited viewing uses only unless otherwise authorized by Macrovision Corporation Reverse engineering or disassembly is prohibited On Placement Do not use the unit in places which are extremely hot cold dusty or humid Place the unit on a flat and even surface Do not restrict the air flow of the unit by placing it in a place with poor air flow by ...

Страница 3: ...aken so that the grounding or polarization means of an appliance are not defeated 12 Power Cord Protection Power supply cords should be routed so that they are not likely to be walked on or pinched by items placed upon or against them paying particular attention to cords at plugs convenience receptacles and the point where they exit from the appliance 13 Cleaning The appliance should be cleaned on...

Страница 4: ...e 6 7 Power Supply 8 Using the AC adaptor 8 Using the car adaptor 8 Installation 9 Installing the unit onto the seat back in a car 9 Viewing Angle Adjustment 9 Wall Mounting 9 Turning on the unit 9 Connections 10 12 Using this unit with other equipment 10 11 Using Headphones 12 Playing a Disc 13 15 Playing Disc 13 Pausing playback still mode 13 Stopping playback 13 To skip to a different track 13 ...

Страница 5: ...t if they were purchased from outside your geographic area or made for business purposes Title Chapter and Tracks DVDs are divided into titles and chapters If the disc has more than one movie on it each movie would be a separate title Chapters are sections of titles Audio CDs are divided into tracks A track is usually one song on an Audio CD Note Numbers identify each title chapter and track on a ...

Страница 6: ...here is a strong ambient light source the performance of the infrared REMOTE SENSOR IR may be degraded causing unreliable operation The recommended effective distance for remote operation is about 16 feet 5 meters REMOTE CONTROL ACCESSORIES Please check and identify the supplied accessories Use numbers indicated in parentheses when asking for replacement parts To order accessories contact 1 800 25...

Страница 7: ...ton During DVD playing switch the camera angle of the video presentation when scenes with multiple camera angles are recorded on a DVD 7 VOL VOL VOLUME button Adjust the volume 8 MENU button Open and close DVD s menu 9 NEXT button Move forward through titles chapters or tracks on a disc 10 CURSOR buttons Use to highlight selections on a menu screen and make adjust certain settings ENTER button Con...

Страница 8: ...button to resume playback 10 NEXT button Press NEXT button to advance to titles chapters tracks 11 PREV button Press PREV button to go back to previous titles chapters tracks 12 ZOOM button Zoom into an image of a DVD 13 MENU button Open and close DVD s menu 14 AUDIO button Selectoneoftheaudiosoundtracksprogrammedon DVD 15 Headphone jack 16 POWER ON STANDBY switch 17 Remote sensor IR Receive the r...

Страница 9: ...V jack 2 To the cigarette lighter socket 12V car plug adaptor Left side of unit POWER SUPPLY Using the AC adaptor This AC adaptor operates on AC between 100V and 240V but In the U S A and Canada the AC power supply cord must be connected to a 120V AC power supply only When connecting to an AC supply outside of the U S A and Canada use a plug adaptor to suit the AC outlet configuration Using the ca...

Страница 10: ... the correct mounting position on the wall use attached the template sheet for wall mounting 2 Insert a fixing screw s at the marked position on the wall 3 Align the slot hole s of the unit over the screw and pull the unit downward until it is firmly hooked Installing the unit onto the seat back in a car The unit is designed to allow users to install onto the seat back by supply straps 1 Connect t...

Страница 11: ... from the speakers will be low B Connecting a TV If your TV has Audio Video inputs you can also connect the unit to your TV using the Audio Video cable 1 Connect the yellow plug from VIDEO OUT jack on your unit to VIDEO IN jack on your TV 2 Connect the red and white plugs from AUDIO OUT jacks on your unit to AUDIO IN jacks on your TV Left side of unit Yellow Red White Yellow Red White VCR TV Yello...

Страница 12: ...a DVD movie onto a videotape the resulting copy will be unclear with poor sound quality This is NOT caused by a defective DVD system C Another source connection Using an Audio Video cable not included Connect ONLY the red and white plugs from AUDIO OUT jacks on your Unit to the AUDIO IN jacks on another audio equipment or Using the Coaxial Digital Audio cable not included Connect from coaxial DIGI...

Страница 13: ...Inc that gives movie theatre ambience to audio output when the unit is connected to a Dolby Digital 5 1 channel processor or amplifier This unit automatically recognizes DVDs that have been recorded with Dolby Digital Not all Dolby Digital sources are recorded with 6 channels Some sources marked Dolby Digital may be recorded in Dolby Surround a 2 channel system Look for this logo on your unit Manu...

Страница 14: ...or It takes a short while for your unit to load the disc After loading for some discs the unit will automatically start playback of the disc 6 Press the PLAY button Notes Let the disc door open completely before removing the disc Pushing the disc door to close the disc door after you remove the disc DVD CD Pausing playback still mode Press the II PAUSE button To resume normal playback press the PL...

Страница 15: ...ed point to resume playback at normal speed PLAYING A DISC Zooming into an image While a disc is playing press the ZOOM button While an image is zoomed you can use and button to shift the view and display the part you want To return to the normal view press the ZOOM button until the off symbol shows The screen will return to normal When you reach the edge of the image the display will not shift an...

Страница 16: ... While a disc is playing press the AUDIO button to show the current audio format number 2 Press the AUDIO button repeatedly to select the desired audio format DVD Subtitle selection 1 While a DVD is playing press the SUBTITLE button on the remote control to display the current language setting as shown in the example below 2 Press the SUBTITLE button on the remote control repeatedly to select the ...

Страница 17: ...emote control to set your desired chapter then press the ENTER button to confirm Time skip Elapsed time from the beginning of the currently playing chapter and the remaining time from the beginning of the currently playing title Press the GOTO button on the remote control to set your desired point to start playback then press the ENTER button to confirm Angle setting The current angle is displayed...

Страница 18: ...pter track If you know the title chapter track number you want to play you can locate a specifc title chapter track by directly selecting a title chapter track number 1 Press the GOTO button on the remote control to search your desired title chapter track 2 Press or button to highlight a title chapter track and press the corresponding number button s for the chapter you want 3 Press the ENTER butt...

Страница 19: ...n the screen and you can see how many angles are recorded on the disc 2 Press the ANGLE button on the remote control repeatedly to select your desired angle 3 The unit will change to your desired angle about 3 seconds later 4 Press the DISPLAY button to resume the normal screen Audio setting 1 Press the DISPLAY button twice The FUNCTION menu is displayed on the screen and you can see how many audi...

Страница 20: ...hapter numbers in 3 Use or button to move to the other field 4 Repeat steps 2 to 3 5 Press the PLAY button to start the programmed playback Notes If you press the STOP button the programmed selections will be cleared 3 Use or button to other field 4 Repeat steps 2 to 3 5 Press the PLAY button to start the programmed playback Track CD DVD PROGRAMMABLE MEMORY Advanced playback Title Chapter Programm...

Страница 21: ...ack 3 While the disc is playing press the REP REPEAT button on the remote control until the Off indicator displays on the screen REPEAT PLAYBACK Advanced playback You can play a single track and whole disc repeatedly Repeating a single track You can play the same track repeatedly 1 While the disc is playing press the REP REPEAT button on the remote control until the Repeat Single indicator display...

Страница 22: ... during MP3 playback 2 During MP3 playback if you press the STOP button twice and then press PLAY button again it will start to play from the beginning of the file which you stopped If you press the STOP button once and then press PLAY button again It will resume playback from the location where you stopped playback On screen display Press the or CURSOR button to select the file you want to listen...

Страница 23: ...ted will show on TV in Full Screen and automatically display one by one again in about 6 seconds intervals You can press the PAUSE button to interrupt playback and press the PLAY button to resume playback You also can use GOTO function or use the numbered buttons to enter the number to quickly select any image You can press the ZOOM button to enlarge the picture in 3 levels Press the ANGLE button ...

Страница 24: ...IDEO setting TV Shape 1 Press SETUP button on the remote control while the disc is stopped 2 Use or button to select Video then press the ENTER button 3 Use or button to select TV Shape then press the ENTER button 4 Use or button to shift and select the TV type then press the ENTER button 5 To exit the FUNCTION SETUP MENU and return to the normal screen press the SETUP button continued to next pag...

Страница 25: ...ode clips the right and left sides of the image so that it can be viewed on a conventional screen Some wide screen DVDs that do not permit Pan Scan mode playback are automatically played in letterbox mode black bands top and bottom Cut off when a wide screen video image is played continued to next page continued to next page continued to next page continued to next page continued to next page Brig...

Страница 26: ... press the ENTER button 5 If you want to exit the SETUP MENU and return to the normal screen press the SETUP button continued to next page continued to next page continued to next page continued to next page continued to next page AUDIO setting Digital Out 1 Press SETUP button on the remote control while the disc is stopped 2 Use or button to select Audio press the ENTER button 3 Press the ENTER b...

Страница 27: ...lt do the following 1 Press SETUP button on the remote control while the disc is stopped 2 Use or button to select the Rating then press the ENTER button 3 Use or button to shift and select the Factory Set then press the ENTER button 4 Use or button to shift and select Yes then press the ENTER button 5 To exit the FUNCTION SETUP MENU and return to the normal screen press the SETUP button Note When...

Страница 28: ... then press the ENTER button If you make a mistake before pressing the ENTER button press the or CURSOR button and enter your 4 digit security code again You cannot play DVD discs rated higher than the level you selected unless you cancel the parental lock function The parental lock level is equivalent to the following ratings Level 1 Kid Safe Level 5 PG_R Level 2 G Level 6 R Level 3 PG Level 7 NC...

Страница 29: ...to Portuguese Quechua Rhaeto Romance Kirundi Romanian Russian Kinyarwanda Sanskrit Sindhi Sangho Serbo Croatian Singhalese Slovak Language Name Slovenian Samoan Shona Somali Albanian Serbian Siswat Sesotho Sundanese Swedish Swahili Tamil Telugu Tajik Thai Tigrinya Turkmen Tagalog Setswana Tonga Turish Tsonga Tatar Twi Ukrainian Urdu Uzbek Vietnamese Volapük Wolof Xhosa Yoruba Chinese Zulu Code MG ...

Страница 30: ...ER use solvents such as benzine or alcohol to clean the disc Do NOT use irregular shape discs example heart shaped octagonal etc They may cause malfunctions MAINTENANCE TROUBLE SHOOTING GUIDE SYMPTOM CAUSE AND REMEDY Make sure that you ve select DVD mode The system is in pause mode or in Slow motion Play mode Press the PLAY button to return to normal play mode Fast forward or fast reverse is perfo...

Страница 31: ...nside the unit due to a sudden change in temperature Wait about an hour for it to clear and try again The disc does not play Severe hum or noise is heard TROUBLE SHOOTING GUIDE The region number of the disc doesn t match the region number of this unit The DVD AV IN switch is not select DVD mode Select the SCREEN switch other than OFF no picture Clean the disc The disc is scratched The picture is n...

Страница 32: ...811 168091 031 Printed in China FOR CANADA ...

Отзывы: