background image

GB - 6

ACCESSORIES

PLEASE ChECK AND IDENTIFY ThE SUPPLIED ACCESSORIES.

Remote control (with batteries) ............................................................................................................................  x 1

GETTING STARTED

USING ThE REMOTE CONTROL

•  Point the remote control at the remote sensor located on the unit.

•  When  there  is  a  strong  ambient  light  source,  the  performance  of  the  infrared  remote  sensor  may  be  degraded, 

causing unreliable operation.

•  The recommended effective distance for remote operation is about 16 feet (5 meters). 

bATTERY REPLACEMENT

When the batteries become weak, the operating distance of the remote control is greatly reduced and you will need to 

replace the batteries.

CAUTION:

Danger of explosion if battery is incorrectly replaced. Replace only with the same or equivalent type. 

WARNING: 

• Do not dispose of batteries in a fire. Batteries may explode or leak.

• Batteries shall not be exposed to excessive heat such as sunshine, fire or the like.

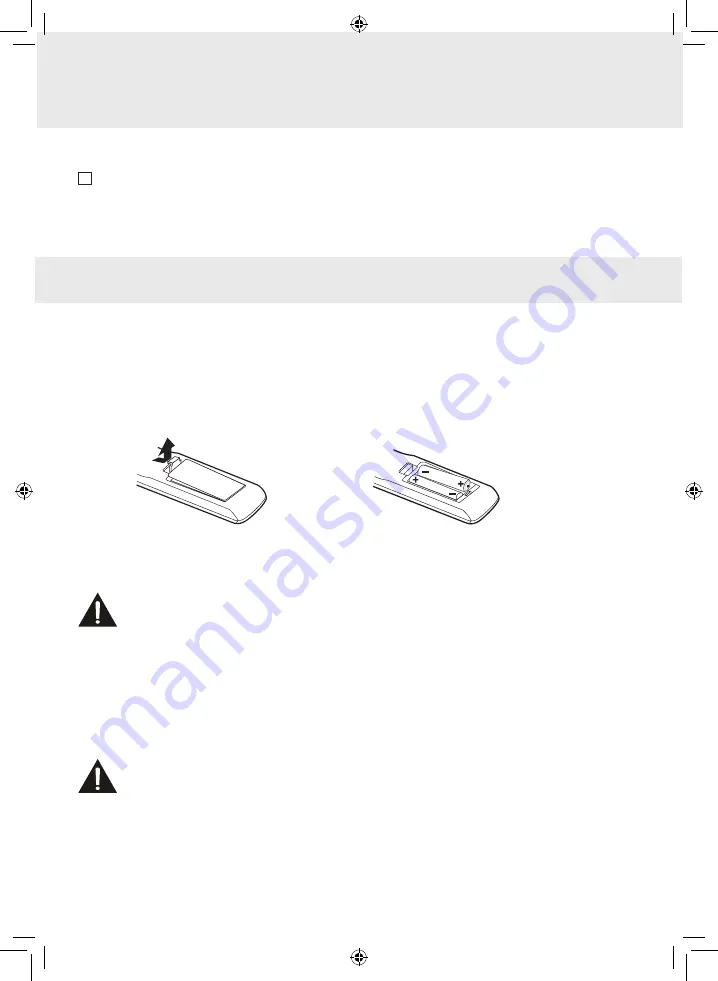
TO INSTALL ThE bATTERIES

1. Open the battery door.

2. Insert 2xAAA batteries

NOTES

•  If the remote control is not going to be used for a long time, remove the batteries to avoid damage caused by battery 

leakage corrosion.

•  Do  not  mix  old  and  new  batteries.  Do  not  mix  ALKALINE,  standard  (CARBON-ZINC)  or  rechargeable  (NICKEL-

CADMIUM) batteries.

•  Always remove batteries as soon as they become weak.

•  Weak batteries can leak and severely damage the remote control.

PLV76198S23E10 IB ENG.indd   6

9/8/2009   9:57:24 AM

Содержание PLV76198E

Страница 1: ...19 LCD TV PLV76198E OWNER S MANUAL PLV76198S23E10 IB ENG indd 1 9 8 2009 9 57 23 AM ...

Страница 2: ...at may cause undesired operation This equipment has been tested and found to comply with the limits for a Class B digital device pursuant to Part 15 of the FCC Rules These limits are designed to provide reasonable protection against harmful interference in a residential installation This unit generates uses and can radiate radio frequency energy and if not installed and used in accordance with the...

Страница 3: ...cement of the obsolete outlet 10 Protect the power cord from being walked on or pinched particularly at plugs convenience receptacles and the point where they exit from the apparatus 11 Only use attachments accessories specified by the manufacturer 12 Use only with the cart stand tripod bracket or table specified by the manufacturer or sold with the apparatus When a cart is used use caution when m...

Страница 4: ... Control 7 TV 8 CONNECTIONS 9 10 CONNECTING A TV ANTENNA CABLE SATELLITE 9 CONNECTING TO A VCR CAMCORDER VIDEO GAME SYSTEM CABLE SATELLITE SYSTEM 9 CONNECT THE POWER CORD 10 USING HEADPHONES 10 INSTALLATION 11 INSTALLING REMOVING THE BASE STAND 11 MOUNTING ON THE WALL 11 TV SETUP 12 13 PICTURE MENU 12 AUDIO MENU 12 TV MENU 13 SETUP MENU 13 TROUBLESHOOTING GUIDE 14 MAINTENANCE 14 limited warranty 1...

Страница 5: ...button to highlight Auto Scan then press the ENTER or button to confirm 7 The unit will immediately search all channels for those with adequate signal strength and store those channels with signals in memory The unit will take a few minutes to finish auto scan and after this is completed the unit will switch to the first channel found Turning On the Unit for the first time The first time you turn ...

Страница 6: ...e batteries CAUTION Danger of explosion if battery is incorrectly replaced Replace only with the same or equivalent type WARNING Do not dispose of batteries in a fire Batteries may explode or leak Batteries shall not be exposed to excessive heat such as sunshine fire or the like TO INSTALL THE BATTERIES 1 Open the battery door 2 Insert 2xAAA batteries NOTES If the remote control is not going to be...

Страница 7: ... volume 6 LAST CH Press to switch repeatedly between the last two channels displayed 7 STANDBY ON Button Press to turn ON the unit or put it in STANDBY OFF mode 8 FUNCTION Button Press to switch between TV AV 9 LCD MODE Button Press to Select from preset screen display settings to match the type of show you are watching 10 CH CH Buttons Press to select the channel upward or downward 11 NUMERIC But...

Страница 8: ...nd to change TV channels 6 VOL VOL controls Adjusts the volume level and highlights selections Left Right on the TV menu screen 7 Color LCD screen 8 Remote sensor Point the remote control here Standby indicator 9 Removable stand 10 Power cord 11 Headphones jack 12 TV ANTENNA terminal Connects a TV antenna or CATV cable CONTROL REFERENCE GUIDE tv 2 3 6 9 10 11 12 7 8 4 5 1 PLV76198S23E10 IB ENG ind...

Страница 9: ...ient ability to receive signals in your home Orientation and location of the antenna is typically critical for best results you may find that placement of the antenna near a window or in an elevated location improves performance CONNECTING TO A VCR CAMCORDER VIDEO GAME SYSTEM CABLE SATELLITE SYSTEM Connect an AUDIO VIDEO cable not included as shown Make sure you connect the cable from the AUDIO VI...

Страница 10: ...ot of wall outlet then fully insert When you are not going to use the unit for a long period of time disconnect the power cord USING HEADPHONES Earphones Turn down the volume before connecting headphones earphones to the unit then adjust the volume to your desired level When headphones earphones are connected no sound will come from the front speakers NOTE Avoid listening to sound at high levels f...

Страница 11: ...ard or sharp object or anything that could scratch or damage the LCD display comes into contact with it Do NOT exert pressure on the front of the unit at any time because the screen could crack 1 Disconnect all cables or cords connected to the unit 2 Lay the unit down on a flat surface with the back side facing up Please make sure to place a soft cushioned material such as a pillow or thick piece ...

Страница 12: ...er options 6 Press button to return to the previous menu 7 To exit the TV SETUP MENU and return to the normal screen press the MENU button PICTURE MENU 1 Press the MENU button 2 Press ENTER or button to highlight Picture Mode 3 Use the or button to select other options Contrast Brightness Sharpness Color Tint Aspect Ratio Color Temperature 4 Use the ENTER or button to make adjustment The screen wi...

Страница 13: ...tton to highlight Time Setting then use the or button to select other options Time Setting Sleep Timer Password Setting Parental Control Closed Caption OSD Language Reset 4 Use the ENTER or button to make adjustment 5 Repeat steps 3 to 4 to adjust other options 6 Press button to return to the previous menu 7 To exit the TV SETUP MENU and return to the normal screen press the MENU button Time Setti...

Страница 14: ...y Make sure the antenna cable is firmly connected Make sure all input cables are firmly connected Check the PICTURE MENU within the TV SETUP MENU Check to make sure the program you are watching is broadcast in Color and not Black White Make sure the unit is plugged in and turned on Make sure TV mode is selected Try a new channel to check for possible station trouble Make sure the antenna is connec...

Страница 15: ... Customer will be required to ship the unit to the Service Center indicated at the time Customer Support is contacted to make the necessary repairs The customer is responsible for all transportation charges to the service facility Packaging and Shipping Instruction When you send the product to the VENTURER service facility you must use the original carton box and packing material or an equivalent ...

Страница 16: ... the date of purchase This limitation does not apply to implied warranties arising under state law This warranty gives you specific legal rights and you may also have other rights which may vary from state to state Some states do not allow limitation on how long an implied warranty lasts when an action may be brought or the exclusion or limitation of incidental or consequential damages so the abov...

Отзывы: