background image


17 


Mounting 


Mounting on concrete wall or ceiling 

The awnings must be installed at least at the height of 2.5 m on a reinforced concrete wall or ceiling. 

Please ask professionals for help if you are not sure.   


Make sure the wall/ceiling is plane, so that bracket seats solidly. 


WARNING! Three healthy adults are needed to move and install the awning. 


For safe and smooth installation think about how you will be securing the awning to the wall 

ahead of time. 


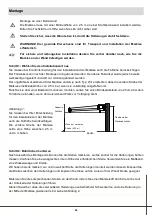
Step 1: Chose the installation area 

Ensure that you also take this drop height into account in your decision on where to install the awning. The 

drop angle can still be changed after assembly. The ideal drop angle, however, has already been set at the 

factory and may only be changed minimally.   

The approximate total drop area of the awning varies depending on the type. We recommend that the awning 

front bar has a height of at least 2.5 m when it is fully extended.   

In the event you would like to mount it above a balcony door, you should leave a space of at least 20 cm 

above the door frame if there is enough space available above the door frame.   

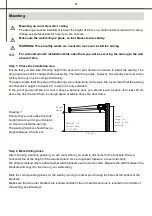
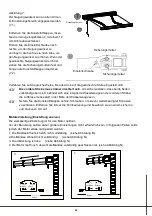
Drawing 1: 

Ensure that you also take this drop   

height into account in your decision 

on where to install the awning. 

The awning front bar should have a 

height between 2.5 and 4 m.   

Total

drop

Height of

front bar

(≥2.5m)

Floor

Upper

edge of

wall hook

height


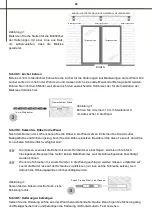
Step 2: Mark drilling holes 

After choosing mounting position you can mark where you need to drill holes for the brackets. Draw a 

horizontal line at the height of the required place. Use a long taper measure, a level and chalk. 

We already marked where and with what width brackets need to be mounted. Measure the width between the 

brackets and copy it to the line on your wall/ceiling.   


Mark the corresponding places on the wall by running a marker pen through the holes at the bottom of the 

brackets.   

Make sure the two outer brackets are located outside of the arm stands and one is located in the middle of 

the awning, see Drawing 2. 

Содержание COSALEA EM6700

Страница 1: ...Guide de l utilisateur pour store enroulable Instruction manual for Retractable Awning Bedienungsanleitung für einfahrbare Markise Manual de instrucciones para el Toldo retráctil Store COSALEA EM6700 ...

Страница 2: ...z à monter et à utiliser le store familiarisez vous avec ce produit Assurez vous que toutes les pièces listées dans la liste d emballage ci dessous sont fournies et intactes Si vous constatez des pièces manquantes ou endommagées veuillez ne pas installer le store et contactez votre revendeur Les paramètres techniques principaux 1 Taille Max 4 5x3 5m 2 Notes 4 5m 3 5m signifie que la largeur est de...

Страница 3: ...gonale et contre écrou 2 ou 3 ou 4 Fixation avec contre écrou rondelle et anneau de verrouillage 4 ou 6 ou 8 Manivelle 1 Manuel de l utilisateur 1 Largeur de store 3 5 m 3 6 m 5 0 m 5 5 m 6 0 m Supports 2 pcs 3 pcs 4 pcs Ancrag 4 pcs 6 pcs 8 pcs Description ...

Страница 4: ...uvaise installation peut entraîner de graves blessures 9 Les pièces mobiles de l appareil doivent être installées plus haut que 2 5 m au dessus du sol ou d un autre niveau qui pourrait lui donner accès 10 Avant l installation retirez tout cordon et désactivez tout équipement non nécessaire pour le fonctionnement de l alimentation 11 installez la commande de mise en marche du dispositif manuel à un...

Страница 5: ...e enroulez le store si l angle de tangage est inférieur à 14 Personne n est autorisé à grimper sur le store suspendre quoi que ce soit sur le store est interdit Un revêtement est utilisé pour protéger la peinture Il doit être retiré après Quand il est déplié diverses forces incluant le vent et la pluie affecteront un store Parfois ces forces substantielles doivent être amorties par le store et tra...

Страница 6: ...changé au minimum La zone de chute totale approximative du store varie selon le type Nous recommandons que la barre de devant du store soit à une hauteur d au moins 2 5 m lorsqu il est complètement déroulé Dans le cas où vous voudriez le monter au dessus d une porte de balcon vous devriez laisser un espace d au moins 20 cm au dessus du cadre de la porte s il y a assez d espace disponible au dessus...

Страница 7: ...ur Etape 4 Insérez les ancrages dans le mur Après perçage des trous vous pouvez insérer les ancrages dans le mur Retirez l écrou de verrouillage rondelle et anneau de verrouillage avant que vous n insériez l ancrage Rangez ces pièces afin que vous puissiez les atteindre facilement à la prochaine étape Il peut être nécessaire d enfoncer les boulons d ancrage avec un marteau en bois s ils ne s enfon...

Страница 8: ...her lorsque le store est installé N essayez pas de fixer les supports muraux à des pierres branlantes du mur ou toutes surfaces qui ne sont pas absolument dures Etape 6 Installez le store Après que tous les supports ont été montés correctement vous pouvez fixer le store Au moins trois échelles sont nécessaires pour installer le store afin d obtenir la hauteur requise Assurez vous que les échelles ...

Страница 9: ...vous pourrez l utiliser dans le futur lors du rangement du store Attention Mal placé ou mal appliqué le store peut causer de graves dangers Montez uniquement le store vous même lorsque vous comprenez complètement les instructions de montage et lorsque vous êtes sûr que le mur sur lequel vous voulez monter le store est adéquat Pour votre sécurité et celle des autres veuillez contacter un monteur au...

Страница 10: ...au milieu du niveau Placez les bouchons en plastique sur les vis pour les protéger contre la corrosion due au climat Retirez toujours la télécommande et gardez la dans un endroit sûr et sec Paramétrage du moteur paramétrage marche arrêt Le paramétrage par défaut en usine est le mieux pour le moteur Des paramétrages plus importants avant de l utiliser ne devront pas par conséquent être nécessaires ...

Страница 11: ...ent correctement Avant d installer les crochets Pour permettre d atteindre pratiquement toute zone verticale en dessous Assurez vous que le montage est dans un endroit pour installer la protection prescrite correspondantes de la télécommande IP 20 Ne pas monter sur des objets métalliques ou magnétiques pour éviter des interférences Pile Utilisation REMARQUE Lorsque vous insérez la pile assurez vou...

Страница 12: ...ion par télécommande Appuyez sur le bouton déroulement EXT pour dérouler le store L enrouleur monte et le store sera déroulé Appuyez sur le bouton enroulement RET pour fermer le store L enrouleur descend et le store sera enroulé Appuyez sur le bouton stop STOP pour stopper le déroulement enroulement du store loop crank handle 8 Le mécanisme de la manivelle du store n a pas d arrêt pour limiter les...

Страница 13: ... lors du traitement de produits raffinés et cela ne peut pas être totalement évité même avec le plus grand soin Ainsi elles ne constituent pas non plus un motif de réclamation Imperméabilité à la pluie les toiles acryliques et polyester de protection solaire sont imprégnés d hydrofuges et à une inclinaison minimum de 14 degrés va résister à une légère courte pluie En cas de pluie forte ou plus les...

Страница 14: ... start mounting and using the awning please get familiar with this product Make sure all parts listed up in below packing lists are delivered and intact If you find that there are parts missing or damaged please do not install the awning but contact your dealer The main technical parameter 1 Size Max 4 5x3 5m 2 Notes 4 5m 3 5m means the width is 4 5 meters projection is 3 5 meters 3 Power supply 2...

Страница 15: ... or 4 Anchor with locknut washer and locking ring 4 or 6 or 8 Crank handle 1 Instruction manual 1 Description 1 Brackets 6 Torsion bar 11 Motor Supplying Cord 2 Fabric 7 Roller 12 Motor 3 Rain cover 8 Arms 4 Side cover 9 Crank 5 Arm Shoulder 10 Front bar ...

Страница 16: ...and disable any equipment not needed for powered operation 11 Install the actuating member of a manual release at a height less than 1 8 m 12 The actuating member of a biased off switch is to be located within direct sight of the driven part but away from moving parts It is to be installed at a minimum height of 1 5 m 13 This appliance can be used by children aged from 8 years and above and person...

Страница 17: ...e sometimes substantial forces must be absorbed by the awning and transferred to the assembled structure via its mounting brackets Under extreme loads excessive attractive force can be exerted on the anchor bolts Therefore before starting assembly check the load bearing capacity of the mounting base and if necessary take corresponding measures to ensure stable installation of the brackets If the m...

Страница 18: ... m when it is fully extended In the event you would like to mount it above a balcony door you should leave a space of at least 20 cm above the door frame if there is enough space available above the door frame Drawing 1 Ensure that you also take this drop height into account in your decision on where to install the awning The awning front bar should have a height between 2 5 and 4 m Total drop Hei...

Страница 19: ...all Remove lock nut washer and locking ring before you insert the anchor Store these parts so that you can reach them easily in the next step It may be necessary to drive the anchor bolts in with a wooden hammer because they do not go in easily Do not use a metal hammer for this purpose because this could damage the threads on the top of the bolts If the bolts need to be driven into the wall with ...

Страница 20: ... installed Do not try to secure the wall brackets to loose wall stones or any surfaces that are not absolutely firm Step 6 Install awning After all three brackets have been mounted properly you can fix the awning At least three ladders are required to install the awning in order to obtain the required height Ensure that the ladders are firmly resting on the ground so that you cannot fall Only use ...

Страница 21: ...safety of other people please contact an authorized assembler for help Operation Adjusting the pitch angle The awning is already delivered with an optimally adjusted pitch angle However users can adjust the screen angle within a range of 5 50 degrees as desired Extend the awning no more than 1 4 of its full projection before adjusting Once you have achieved the highest possible range of pitch the ...

Страница 22: ...e maximum distance Turn the OPEN adjustment screw with the tool in a clockwise direction to reduce the maximum distance Use the rear adjustment screw to adjust the minimum distance see Figure N Turn the CLOSE adjustment screw with the tool in counter clockwise direction in order to reduce the minimum distance as condition 2 and 3 Turn the CLOSE adjustment screw with the tool in clockwise direction...

Страница 23: ...tlet and press the button extension EXT and the retract key RET continually pressed A red light appears for about 8 seconds on the remote and when the light is extinguished the remote control is connected with the awning Loose the extension key EXT and retract key RET again Extend and retract the awning The awning can be extended and retracted by a crank handle included in delivery or remote contr...

Страница 24: ...se pigment displacements which appear darker with backlight like stripe of dirt They do not decrease the value or the performance of the awning Chalk effects are light stripes that are created when processing refined goods and cannot be totally avoided even with the greatest of care Thus they also do not constitute a reason for complaint Rain impermeability Acrylic and polyester sun protection awn...

Страница 25: ...und Inbetriebnahme der Markise machen Sie sich bitte mit diesem Produkt vertraut Stellen Sie sicher dass alle in der Packliste aufgelisteten Teile ausgeliefert und intakt sind Sollten Sie feststellen dass Teile fehlen oder beschädigt sind installieren Sie die Markise bitte nicht sondern kontaktieren Ihren Händler Die wichtigsten technischen Parameter 1 Abmessungen max 4 5x3 5 m 2 Hinweis 4 5 m 3 5...

Страница 26: ...erungsring 4 oder 6 oder 8 Kurbelgriff 1 Bedienungsanleitung 1 Markisen Breite 3 5 m 3 6 m 5 0 m 5 5 m 6 0 m Halterungen 2 St 3 St 4 St Dübel 4 St 6 St 8 St Beschreibung 1 Halterungen 6 Drehstab 11 Motoranschlussleitung 2 Stoff 7 Rolle 12 Motor 3 Regenschutz 8 Arme 4 Seitenabdeckung 9 Kurbel 5 Querträger 10 Vordere Strebe ...

Страница 27: ... aus die für den Netzbetrieb nicht erforderlich sind 11 Installieren Sie das Betätigungselement des manuellen Auslösers in einer Höhe unter 1 8 m 12 Das Betätigungselement eines Totmannschalters muss in Sichtweite des Antriebs aber von beweglichen Teilen entfernt sein Es muss in einer Höhe von mindestens 1 5 m installiert werden 13 Dieses Gerät darf von Kindern ab 8 und Personen mit eingeschränkte...

Страница 28: ...inschließlich Wind und Regen beeinträchtigt Diese manchmal erheblichen Kräfte müssen von der Markise abgefangen und auf die montierte Konstruktion über die Halterungen übertragen werden Unter extremer Belastung kann eine übermäßige Anziehungskraft auf die Ankerschrauben ausgeübt werden Deshalb überprüfen Sie vor der Montage die Tragfähigkeit der Montageplatte und ergreifen die entsprechenden Maßna...

Страница 29: ... sollten Sie einen Mindestabstand von 20 cm über dem Türrahmen einhalten wenn dort ausreichend Platz zur Verfügung steht Abbildung 1 Sie müssen bei Ihrer Entscheidung für den Installationsort der Markise auch die Fallhöhe berücksichtigen Die vordere Strebe der Markise sollte eine Höhe zwischen 2 5 m und 4 m haben Total drop Height of front bar 2 5m Floor Upper edge of wall hook height Schritt 2 Bo...

Страница 30: ... diese Teile auf damit Sie im nächsten Schritt einfach verfügbar sind Sie müssen eventuell die Dübel mit einem Holzhammer einschlagen weil sie nicht einfach hineinpassen Benutzen Sie hierfür keinen Metallhammer weil die Schraubgewinde beschädigt werden können Wenn die Schrauben mit einem Hammer in die Wand geschlagen werden müssen empfehlen wir zuerst die Mutter lose auf der Schraube zu platzieren...

Страница 31: ...teinen oder sonstigen Oberflächen die nicht komplett fest sind zu befestigen Schritt 6 Markise installieren Nachdem alle Halterungen ordnungsgemäß montiert wurden können Sie die Markise befestigen Sie benötigen mindestens drei Leitern um die Markise zu installieren damit Sie die erforderliche Höhe erhalten Stellen Sie sicher dass die Leitern fest auf dem Boden stehen damit Sie nicht herunterfallen...

Страница 32: ...ufbewahrung der Markise verwenden Achtung Wenn Sie die Markise an der falschen Stelle anbringen oder falsch anwenden kann dies ernsthafte Gefahren verursachen Montieren Sie die Markise nur selbst wenn Sie die Montageanleitung komplett verstanden haben und sich sicher sind dass die Wand an der Sie die Markise montieren möchten geeignet ist Für Ihre eigene und die Sicherheit anderer Personen kontakt...

Страница 33: ...waage an der vorderen Strebe die Luftblase muss exakt in der Mitte der Wasserwaage sein Setzen Sie die Kunststoffkappen auf die Schrauben um sie vor wetterbedingter Korrosion zu schützen Entfernen Sie immer die Fernbedienung und bewahren sie an einem sicheren und trockenen Ort auf Motoreinstellung Einstellung aus ein Die werksseitige Einstellung ist für den Motor optimal Vor der Benutzung sollten ...

Страница 34: ... Markise richtig funktionieren bevor Sie die Haken montieren um den Großteil des vertikalen Bereichs erreichen zu können Stellen Sie sicher dass der Aufbau an einer Stelle ist wo der entsprechende vorgeschriebene Schutz IP 20 der Fernbedienung installiert werden kann Nicht auf Gegenständen aus Metall oder magnetischen Objekten montieren um Interferenzen zu vermeiden Batterie Nutzung HINWEIS Beim E...

Страница 35: ...e bewegt sich nach oben und die Markise wird ausgefahren Drücken Sie die Taste Einfahren RET um die Markise zu schließen Die Rolle bewegt sich nach unten und die Markise wird eingefahren Drücken Sie die Stopptaste STOP um das Ausfahren Einfahren der Markise anzuhalten loop crank handle 8 Der Kurbelantrieb der Markise hat keine Stoppfunktion um die Umdrehungen der Rolle zu stoppen Um den Stoff nich...

Страница 36: ...erden Sie stellen daher auch keinen Beanstandungsgrund dar Wasserundurchlässigkeit Sonnenschutzmaterialien für die Markise aus Acryl und Polyester sind mit wasserabweisenden Produkten imprägniert und widerstehen bei einer minimalen Neigung von 14 Grad einem leichten kurzen Regen Bei stärkerem oder längerem Regen muss die Markise eingefahren werden um Schäden zu vermeiden Nass eingefahrene Markisen...

Страница 37: ...r e instalar el toldo familiarícese con el producto Asegúrese de que todas las piezas que se indican en la lista de embalaje están incluidas y en buen estado Si hubiese alguna pieza dañada o faltase alguna pieza no instale el toldo póngase en contacto con su distribuidor Especificaciones técnicas 7 Dimensiones Máx 4 5 x 3 5 m 8 Notas Notas 4 5 m x 3 5 m significa el ancho es de 4 5 metros y la pro...

Страница 38: ... y contratuerca 2 o 3 o 4 Anclaje con tuerca de seguridad arandela y anillo de bloqueo 4 o 6 o 8 Manivela 1 Manual de instrucciones 1 Anchura del toldo 3 5 m 3 6 m 5 0 m 5 5 m 6 0 m Soportes 2 piezas 3 piezas 4 piezas Anclaje 4 piezas 6 piezas 8 piezas Descripción ...

Страница 39: ...das las instrucciones ya que una instalación incorrecta podría provocar lesiones graves 9 Las piezas móviles de la unidad deben instalarse a una altura superior a 2 5 m sobre el suelo u otro nivel que podría facilitar el acceso a las mismas 10 Antes de instalar la unidad retire todos los cables innecesarios y desactive cualquier equipo que no sea necesario para el funcionamiento con alimentación 1...

Страница 40: ...e o colgar algo en el toldo Las láminas se han incluido para proteger la pintura Una vez completada la instalación las puede retirar Cuando está extendido tanto la lluvia como el viento le pueden afectar negativamente En ocasiones las fuerza transmitida por las lluvia o el viento puede ser absorbida por el toldo y transferida a la estructura por medio de los soportes de montaje Bajo cargas extrema...

Страница 41: ... ya se ha establecido en la fábrica y el cambio que se puede realizar es mínimo La zona de caída total aproximada del toldo varía dependiendo del tipo de modelo Se recomienda que la barra delantera del toldo esté a una altura de al menos 2 5 m cuando está completamente extendido En el caso de que quisiera montar el toldo encima de una puerta del balcón se debe dejar un espacio de al menos 20 cm po...

Страница 42: ... Inserción de los anclajes en la pared Después de perforar los agujeros se pueden insertar los anclajes en la pared Retire la tuerca la arandela y el anillo de bloqueo antes de insertar el anclaje Guarde estas piezas de manera que las tenga disponibles fácilmente en el siguiente paso Puede que sea necesario conducir los pernos de anclaje con un martillo de madera ya que no pasan fácilmente No util...

Страница 43: ... se puedan arrancar cuando el toldo esté instalado No trate de asegurar los soportes de pared a pared piedras sueltas o a cualquier superficie que no sea absolutamente firme Paso 6 Instalación del toldo Después de que todos los soportes se hayan montado correctamente puede fijar el toldo Necesita al menos una escalera de tres peldaños para instalar el toldo con el fin de obtener la altura deseada ...

Страница 44: ...tección la puede utilizar en el futuro para el almacenamiento del toldo Atención Colocar e instalar erróneamente el toldo puede causar un peligro muy serio Solamente debe instalar el toldo si ha comprendido perfectamente las instrucciones de instalación y cuando esté cien por cien seguro de que el techo pared son válidos para instalar el toldo Para su propia seguridad y la de otras personas póngas...

Страница 45: ...iamente en fábrica por lo que no es necesario realizar muchos ajustes No obstante debe ajustar el motor en los siguientes casos 1 El toldo no se abre por completo Consulte la Figura M 2 El toldo no se cierra por completo Consulte la Figura N 3 La cubierta está suelta Consulte la Figura N 4 El motor sigue funcionando aunque el toldo está completamente cerrado Consulte la Figura N Floor Close Open M...

Страница 46: ...icos Antes de realizar la instalación compruebe si el dispositivo remoto y el toldo están funcionando correctamente antes de instalar los ganchos Debe alcanzar prácticamente todo el área vertical debajo del mismo Asegúrese de que el soporte se encuentra en un lugar adecuado para instalar la protección indicada correspondiente IP 20 No lo instale sobre objetos metálicos o magnéticos para evitar int...

Страница 47: ...el toldo se retrae Presione el botón de parada STOP para detener la extensión retracción del toldo loop crank handle 8 El mecanismo de manivela del toldo no tiene tope para limitar las revoluciones del tubo de la persiana Para evitar daños en el tejido debe enrollar siempre correctamente la tela del toldo Los toldos se han diseñado para proteger frente al sol solamente No lo utilice nunca durante ...

Страница 48: ...los toldos de protección solar acrílicos y de poliéster están impregnados con repelentes al agua y con una inclinación mínima de 14 grados soportará lluvia ligera y de corta duración En caso de lluvia fuerte o duradera los toldos deben retirarse para evitar daños Los toldos que e enrollen húmedos deben extenderse de nuevo tan pronto como sea posible para que se puedan secar Las ondulaciones en las...

Страница 49: ...48 VS Jul 2017 ...

Отзывы: