


2.0 Site Requirement
5
2.1
Information
1. The unit is designed for installation in external
walls with a thickness of between 150mm to
315mm.
2. The unit must be sited and connected by a
suitably qualified person and be in accordance
with current UK Building Regulations and I.E.E.
Wiring Regulations (BS 7671).
3. The unit is intended for permanent connection
to the mains electrical supply.
4. The unit is intended for fixed wiring installation.
5. Wiring to the unit in the UK must be via a
switched fused spur. The switched fused spur
must have a 3mm minimum contact gap in all
poles.
6. Ensure that the mains electrical supply is
compatible with the rating label attached to the
product.
7. The unit must be sited such that the ambient
temperature will not exceed 40° C.
8. Do not site the appliance in the vicinity of
excessive levels of airborne oil or grease.
9. If the unit is installed in a room containing a
fuel burning appliance, the installer must ensure
that air replacement is adequate for both
appliances.
10. The unit must not be installed at a level below
500mm from the floor.
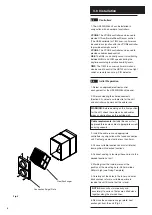
11. The internal grille surround must be sited at
least 125mm away from any wall or projecting
surface (Fig. 3).
12. The external grille of the unit must be sited at
least
6
00mm away from any flue of gas or solid
fuel appliances. This is to avoid back flow of
gases entering the room.
13. All safety regulations and requirements must
be strictly followed to prevent hazards to life and
property both during and after installation and
during subsequent maintenance or servicing.
14. Ensure the mains electrical supply is switched
off before commencing installation or
maintenance.
Fig. 3
125mm
Min
125mm
Min
500mm
Min Above
Floor Level
Содержание HR300RW6
Страница 2: ...2...
Страница 10: ...6 0 Notes 10...
Страница 11: ...11...
Страница 12: ...Vent Axia Ltd Fleming Way Crawley West Sussex RH10 9YX www vent axia com Comp No 372561 Iss B 0405...