


3
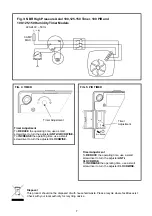
Open up the internal cover to access
the spirit level bubble and terminals
J.
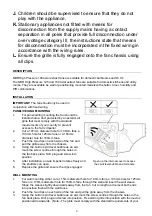
Children should be supervised to ensure that they do not
play with the appliance.
K.
Stationary appliances not fitted with means for
disconnection from the supply mains having a contact
separation in all poles that provide full disconnection under
over voltage category III, the instructions state that means
for disconnection must be incorporated in the fixed wiring in
accordance with the wiring rules.
L.
Ensure the grille is fully engaged onto the fan chassis using
all clips.
DESCRIPTION
NBR High Pressure 100 axial extract fans are suitable for domestic bathrooms and W.C’s.
The NBR High Pressure 125 and 150 axial extract fans are suitable for domestic kitchens and utility
rooms. They are available as wall or panel/ceiling mounted models with shutter, timer, humidity and
PIR combinations.
INSTALLATION
IMPORTANT:
The fan should only be used in
conjunction with fixed wiring.
PANEL/CEILING MOUNTING
1.
For panel/ceiling mounting the fan should be
installed into a duct protected by an exterior air
grille that must comply with the standard
requirements of your country to prevent
access to the fan’s impeller.
2.
Cut a 107mm diameter hole for 100mm fans, a
130mm hole for 125mm fans or a 155mm
diameter hole for 150mm fans.
3.
Push the two clips on each side of the fan and
pull the grille away from the chassis.
4.
Using the built in spirit level bubble as an aid,
mark the screw centres through the holes in
the fan back plate. Drill, plug and screw into
position.
5.
After installation, ensure impeller rotates freely and
the shutters can open.
6.
Replace the grille and ensure the clips engaged.
WALL MOUNTING
1.
For wall mounting either cut a 115mm diameter hole for 100mm fans, a 140mm hole for 125mm
fans or a 170mm diameter hole for 150mm fans, through the wall and insert the wall sleeve.
Slope the sleeve slightly downwards away from the fan. Cut to length and cement both ends
into position flush with the wall faces.
2.
Push the two clips on each side of the fan and pull the grille away from the chassis.
3.
Using the built in spirit level bubble as an aid, mark the screw centres through the holes in the
fan back plate. Drill, plug and screw into position. Fix exterior grille into position with the louvres
positioned downwards. (Note:- The grille must comply with the standard requirements of your