background image

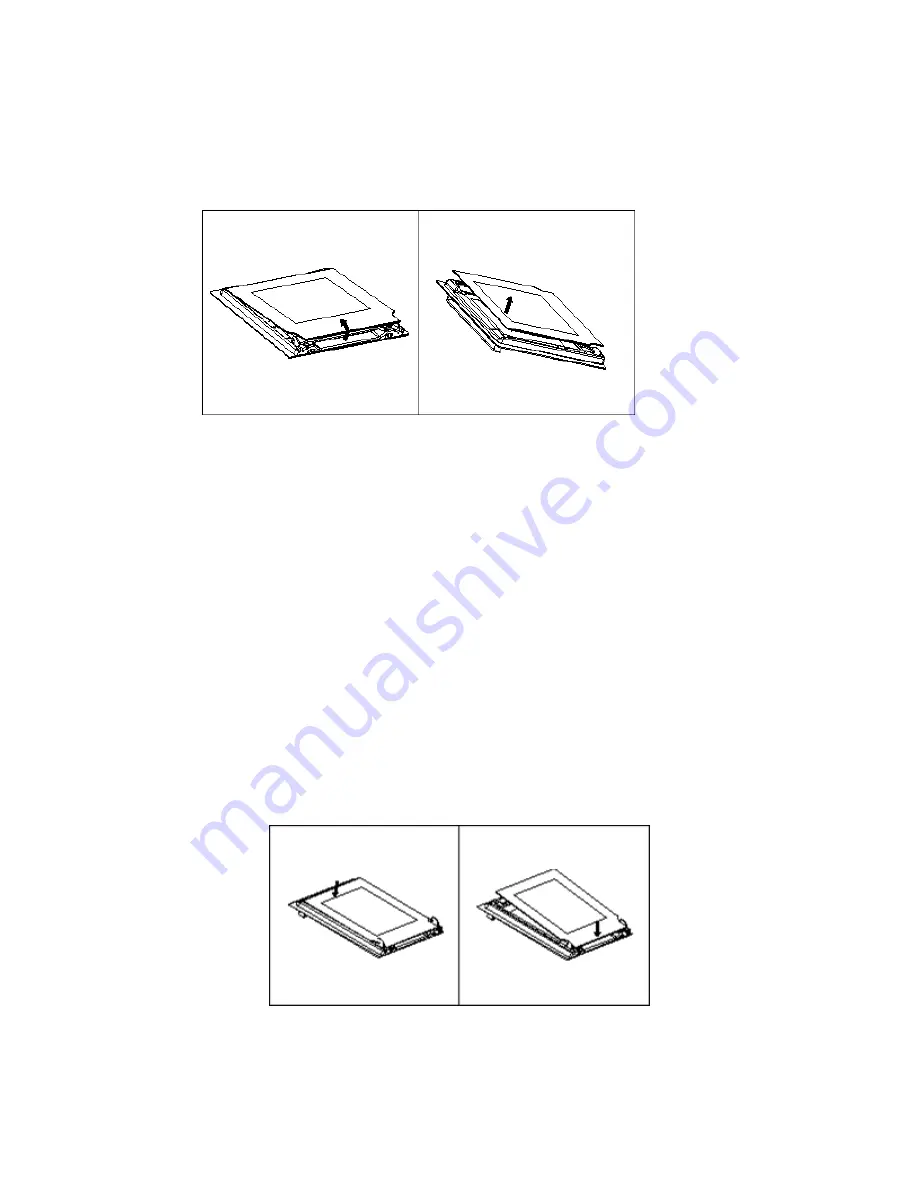
Removing the inner door glass for cleaning 
 

o


Do not use any abrasive cleaner that could cause damage. 


o


Remember that if the surface of the glass panel becomes scratched, 
this could lead to a dangerous failure. 


o


To facilitate cleaning, the


inner door glass can be lifted out.  


Grip the top and the bottom of the inner door glass panel.  


Gently pull the bottom of the inner door glass panel upwards. 

 
Do not raise the panel more than 35° as it can damage the 
securing clips.


The securing clips at the bottom of the glass panel will pop out and 
the glass panel will be free to remove. 

 
NOTE: If the top securing clips do not also pop out when pulling 
the bottom of the glass panel upwards, then pull the top of the 
glass panel upwards until the top also pops out. 


After cleaning, insert the glass panel correctly back into the door in 
the reverse order. Ensure the securing clips slot back into place and 
the glass panel locks into place securely. 


IMPORTANT: Remember where the panel of glass is removed 
from so you can reassemble the door correctly. Do not mix the 
glasses up or rearrange the order. 


23

Содержание VEOP610SS

Страница 1: ...nual contains important information including safety installation points which will enable you to get the most out of your appliance Please keep it in a safe place so that it is easily available for future reference for you or any person not familiar with the operation of the appliance JW 18 01 13 ...

Страница 2: ...ation 14 Oven functions 15 16 Pausing a cooking function 16 Cancelling a cooking function 16 The enquiry function 16 Safety lock 17 Energy saving function 17 Internal light 17 Cooking guidelines 18 19 Warnings 19 Cleaning and maintenance 20 23 Pyrolytic cleaning 20 21 General cleaning 21 Replacing the oven bulb 21 Removing the oven door for cleaning 22 Removing the inner door glass for cleaning 23...

Страница 3: ...Environmental note 4 o The packaging materials that Venini uses are environmentally friendly and can be recycled all packaging material with due regard for the environment o Please discard ...

Страница 4: ...housing and all materials used in the installation must be able to withstand a minimum temperature of 85 C above the of the room it is located in whilst in use o Certain types of vinyl or laminate kitchen furniture are particularly prone to heat damage or di temperatures below the guidelines given above o Any damage caused by the appliance being installed in contravention of this temperature limit...

Страница 5: ...pliance sult in injury to the person lifting the appliance Great care should be taken whilst using this appliance and when o IMPORTANT The appliance must be disconnected from the mains before following the cleaning procedure Child Safety o Venini strongly recommend that ba touch the appliance at any time o If it is nece at all times General Safety o Do not place door hinges o Do not leave heated o...

Страница 6: ...oubt about the amount of ventilation that you will require in accordance with the standards currently in force This appliance must be used by a trained person for domestic purposes only Installation This appliance must be o Venini declines any responsib installation of this appliance o Heat steam and moisture will be created during use of the appliance take care to avoid injury and ensure that the...

Страница 7: ...ens Height 597 mm W D Product specifications o 10 functions o Energy efficiency class A o Oven capacity gross net 65 60 LED semi automatic timer o o Cooling fan o Thermostatically controlled grill Quadruple glazed removable door o o Removable inner door glass o Manual child safety lock control panel o Automatic safety d Standard accessories o Ename o 2 x Safety Shelves o Trivet tional extras o ...

Страница 8: ...ted by opening the oven door and looking on the right hand side of ate of Purchase Electrical details Rated Voltage 220 240 V Supply Connection 15 A M M Cooling fan o A tangential cooling fan is fi surface temperature lower o After you have finished cooking and switched off the oven the cooling fan will continue to run for a period of For future reference please record the following information wh...

Страница 9: ...ustment knob inder time 2 Alarm timer symbol 3 Oven light indicator 2 Minute minder button 3 Clock button 4 Pause Stop cook 5 Start cooking 6 7 LED display LED display 8 Oven function symbols 9 Oven temperature 10 Safety lock symbol 11 Time of day minute m 1 1 10 10 ...

Страница 10: ...button again The minute digits will flash on the LED display o Turn the adjustment knob to adjust the minute time it is possible to adjust the minute digit between 0 and 59 o When the correct minute time appears on the LED display press the clock button for a third time to confirm the time of day The symbol between the digits will flash and the time of day wil light on the LED display IMPORTANT Yo...

Страница 11: ...LED display 7 o Turn the adjustment knob 6 to adjust the hour time it is possible to adjust the hour digit between 0 and 9 o When the correct hour time appears on the LED display press the minute minder button again The minute digits will then flash o Turn the adjustment knob 6 to adjust the minute time it is possible to adjust the minute digits between 0 and 59 o When the correct minute time appe...

Страница 12: ... o After you have selected an oven function and pressed start the oven will start to heat and 9 00 hours appears on the display o 9 00 Hours is the default duration time and after 9 00 hours the oven will automatically turn off This is a safety feature o During cooking it is possible to adjust the cooking time cooking duration by turning the selector knob 1 o Press the start cooking button 5 to co...

Страница 13: ...default cooking time displayed is 9 00 hours o During cooking it is possible to select and adjust the cooking time by turning the selector knob 1 o Press the start cooking button 5 to confirm the oven cooking duration that you have chosen and the oven timer will start o During cooking you can adjust the cooking temperature by turning the adjustment knob 6 The oven temperature 9 will appear on the ...

Страница 14: ...N This method of cooking provides traditional cooking with heat from the top and the lower element it also utilises the circulation fan This ensures a fast and even distribution of the heat Suitable for light and delicate baking such as pastries FAN AND GRILL This method of cooking utilises the top element in conjunction with the fan which helps to provide a quick circulation of heat This function...

Страница 15: ...time will pause o To continue cooking after pausing the cooking function you should press the start cooking button 5 o The oven will resume cooking using the same oven function and temperature as previously set The cooking time will continue counting down from the point it was at when the stop cooking button was pressed Cancelling a cooking function o During cooking if you wish to cancel the cooki...

Страница 16: ...ined above if you want to stop or change any oven function Energy saving function IMPORTANT The energy saving function can only be set when an oven function and temperature are not selected o Press the start cooking button 5 for 3 seconds and the oven will enter energy saving mode and the LED display will switch off o Energy saving mode will be entered automatically if a button or control knob are...

Страница 17: ...ven on the food packaging by at least ten minutes o IMPORTANT You should ALWAYS pre heat the oven if you are baking o If there is no guidance given on the food packaging specifically for cooking in fan oven mode you can generally reduce the cooking time and temperature by 10 from the information given for conventional oven cooking o Make sure that frozen foods are thoroughly thawed before cooking ...

Страница 18: ...d always be placed on the shelves provided o The grill heating element and other internal components of the oven become extremely hot during operation avoid touching them inadvertently when handling the food which you are grilling o Important Be careful when opening the door to avoid contact with hot parts of the oven and steam o Important Be careful when using the oven that you do not touch the h...

Страница 19: ...g the oven function selector knob 1 to the cleaning symbol as shown on page 14 15 PYA will appear on the LED display o Press the start button 5 to confirm A cleaning period of 2 hours is automatically set 2 00 will appear on the LED display 11 NOTE If the oven door is not properly closed the start button will be invalid and DOOR PYA will be shown on the LED display o The length of cleaning cycle c...

Страница 20: ...her a sponge or soft cloth No abrasive cleaners should be used o We would recommend that an appropriate stainless steel cleaner and polish is regularly used on the stainless steel surfaces of this appliance o If you use any form of oven cleaner on your appliance then you must check with the manufacturer of the cleaner that it is suitable for use on your appliance o Any damage that is caused to the...

Страница 21: ...e sure that the door is supported at all times and that you place the door on some padded material whilst cleaning it o The oven door and door glass should only be cleaned using a damp cloth and a small amount of detergent The cloth MUST NOT have come into contact with any form of cleaning product or chemical previously o To refit the door you should slide the hinges back into their slots and open...

Страница 22: ...mage the securing clips The securing clips at the bottom of the glass panel will pop out and the glass panel will be free to remove NOTE If the top securing clips do not also pop out when pulling the bottom of the glass panel upwards then pull the top of the glass panel upwards until the top also pops out After cleaning insert the glass panel correctly back into the door in the reverse order Ensur...

Страница 23: ...APPLIANCE MUST BE EARTHED o This appliance should be wired into a 15A double pole switched fused spur outlet having 3 mm contact separation and placed in an easily accessible position adjacent to the appliance The spur outlet must still be accessible even when your oven is located in its housing o To connect the oven power cord loosen and remove the cover on the terminal block in order to gain acc...

Страница 24: ...damaged then it must be replaced by an appropriate replacement which can be obtained from the Spares Department Positioning the appliance o Ensure that the aperture that you will be fitting the oven into is of the size given in the above diagram o The oven must be fitted into an oven housing with the ventilation cut outs shown in the Ventilation requirements section on the next page o Ensure that ...

Страница 25: ... out requirements for the installation of the appliance into a tall housing unit o Ensure that the oven has been securely fixed into the housing unit The fixing of the oven into the housing is made by using four screws and caps which are supplied with the oven o Open the door of the oven and then screw through the four holes on the edge of the oven cabinet into the housing unit 26 ...

Страница 26: ...working or cuts out for long periods of time during use Allow the oven to cool for approximately 2 hours Once cool check whether the appliance is again working properly o My food is not cooking properly Ensure that you are selecting the correct temperature and the correct cooking function for the food that you are cooking It may be appropriate to adjust your cooking temperature by plus or minus 10...

Страница 27: ...HE APPLIANCE YOURSELF Please note that if a service technician is asked to attend whilst the product is under guarantee and finds that the problem is not the result of an appliance fault then you may be liable for the cost of the call out charge The appliance must be accessible for the service technician to perform any necessary repair If your appliance is installed in such a way that a service te...

Страница 28: ...Think Appliances Pty Ltd 416 424 Barry Rd Coolaroo VIC 3048 Sales Telephone 1300 132 824 Service Telephone 1800 444 357 Website www thinkappliances com 29 ...

Отзывы: