

6
ADVANCED PROGRAMMING
Alarm
PRG
PC3R
Out 1
Out 2
Out 3
ON OFF
ON OFF
ON OFF
Reset
Alarm
PRG
PC3R
Out 1
Out 2
Out 3
ON OFF
ON OFF
ON OFF
Reset
Alarm
PRG
PC3R
Out 1
Out 2
Out 3
ON OFF
ON OFF
ON OFF
Reset
Alarm
PRG
PC3R
Out 1
Out 2
Out 3
ON OFF
ON OFF
ON OFF
Reset
Alarm
PRG
PC3R
Out 1
Out 2
Out 3
ON OFF
ON OFF
ON OFF
Reset
Alarm
PRG
PC3R
Out 1
Out 2
Out 3
ON OFF
ON OFF
ON OFF
Reset
Alarm
PRG
PC3R
Out 1
Out 2
Out 3
ON OFF
ON OFF
ON OFF
Reset
Alarm
PRG
PC3R
Out 1
Out 2
Out 3
ON OFF
ON OFF
ON OFF
Reset
Alarm
PRG
PC3R
Out 1
Out 2
Out 3
ON OFF
ON OFF
ON OFF
Reset
Alarm
PRG
PC3R
Out 1
Out 2
Out 3
ON OFF
ON OFF
ON OFF
Reset
Alarm
PRG
PC3R
Out 1
Out 2
Out 3
ON OFF
ON OFF
ON OFF
Reset
Alarm
PRG
PC3R
Out 1
Out 2
Out 3
ON OFF
ON OFF
ON OFF
Reset
Alarm
PRG
PC3R
Out 1
Out 2
Out 3
ON OFF
ON OFF
ON OFF
Reset
Alarm
PRG
PC3R
Out 1
Out 2
Out 3
ON OFF
ON OFF
ON OFF
Reset
Alarm
PRG
PC3R
Out 1
Out 2
Out 3
ON OFF
ON OFF
ON OFF
Reset
Alarm
PRG
PC3R
Out 1
Out 2
Out 3
ON OFF
ON OFF
ON OFF
Reset
Alarm
PRG
PC3R
Out 1
Out 2
Out 3
ON OFF
ON OFF
ON OFF
Reset
Alarm
PRG
PC3R
Out 1
Out 2
Out 3
ON OFF
ON OFF
ON OFF
Reset
Alarm
PRG
PC3R
Out 1
Out 2
Out 3
ON OFF
ON OFF
ON OFF
Reset
Alarm
PRG
PC3R
Out 1
Out 2
Out 3
ON OFF
ON OFF
ON OFF
Reset
Alarm
PRG
PC3R
Out 1
Out 2
Out 3
ON OFF
ON OFF
ON OFF
Reset
Alarm
PRG
PC3R
Out 1
Out 2
Out 3
ON OFF
ON OFF
ON OFF
Reset
Alarm
PRG
PC3R
Out 1
Out 2
Out 3
ON OFF
ON OFF
ON OFF
Reset
Alarm
PRG
PC3R
Out 1
Out 2
Out 3
ON OFF
ON OFF
ON OFF
Reset
Alarm
PRG
PC3R
Out 1
Out 2
Out 3
ON OFF
ON OFF
ON OFF
Reset
Alarm
PRG
PC3R
Out 1
Out 2
Out 3
ON OFF
ON OFF
ON OFF
Reset
Alarm
PRG
PC3R
Out 1
Out 2
Out 3
ON OFF
ON OFF
ON OFF
Reset
Alarm
PRG
PC3R
Out 1
Out 2
Out 3
ON OFF
ON OFF
ON OFF
Reset
PRG
PRG
> 3s
C
NC
NA
C
NC
NA
PRG
ON OFF
PRG
ON OFF
C
NC
NA
C
NC
NA
PRG
ON OFF
PRG
ON OFF
Alarm
Reset
Alarm
Reset
Alarm
Reset
Alarm
Reset
PRG
PRG
PRG
PRG
PRG
PRG
PRG
PRG
PRG
PRG
PRG
PRG
PRG
PRG
PRG
PRG
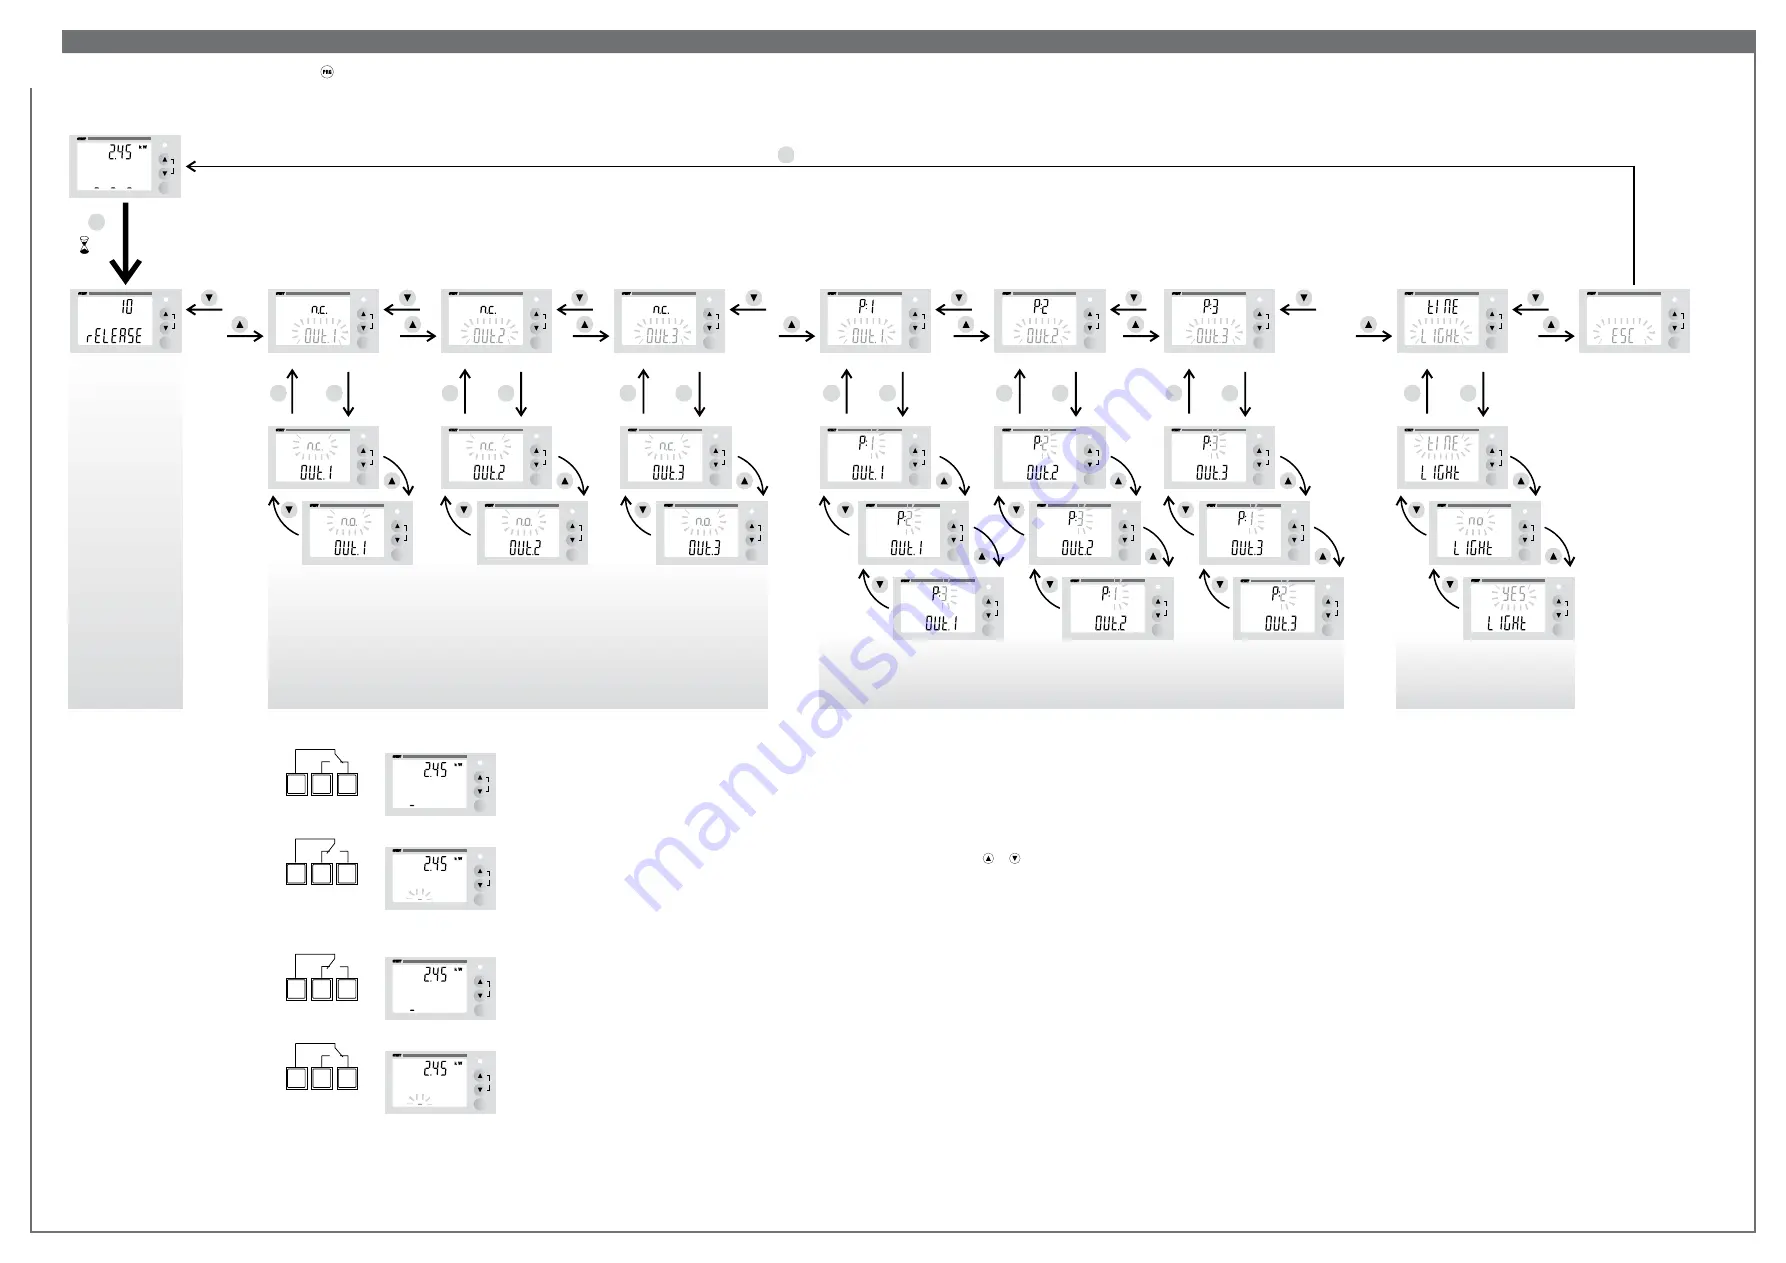
To access the advanced programming press the key for
3 seconds
at least.
This menu allows: the firmware version display, the modification of the logic of relays operation, the modification of relays priority, the setting of the instrument backlighting.
The output from the menu of advanced programming restarts the microcontroller. This means that the loads are disconnected and then reconnected one at time every
delay.ON
seconds (only if the absorption conditions allow this).
It displays the firmware
version of the instrument.
Not modifiable field.
Normally closed (N.C.) (default setting)
deenergized relay,
connected load (used contacts: C, NC)
excited relay,
disconnected load (used contacts: C, NC)
Normally open (N.O.)
excited relay,
connected load (used contacts: C, NA)
deenergized relay,
disconnected load (used contacts: C, NA)
It allows to change the priority of relays outputs, that is to say the order with whom the loads are disconnected
and connected in case of alarm.
If not modified the priority is the following:
• OUT1 = P1 (the most priority output , that is to say the one which will be disconnected for last if the
absorbed power is higher than the Setpoint).
• OUT2 = P2
• OUT3 = P3
Attention:
if by pressing the keys or you can’t go to the next menu (backlighting) or to the previous
menu (relays logic) it’s probable that the same priority P has been assigned to two different outputs OUT.
Correct by assigning a different priority for each output.
It allows to set the backlighting:
• TIME = backlighting on for 60
seconds from the pressure
of one key
• NO = backlighting
always off
• YES = backlighting
always on
Versione FW
Logic of relays operation
Relays priority
Backlighting


