BIG MOUTH Installation
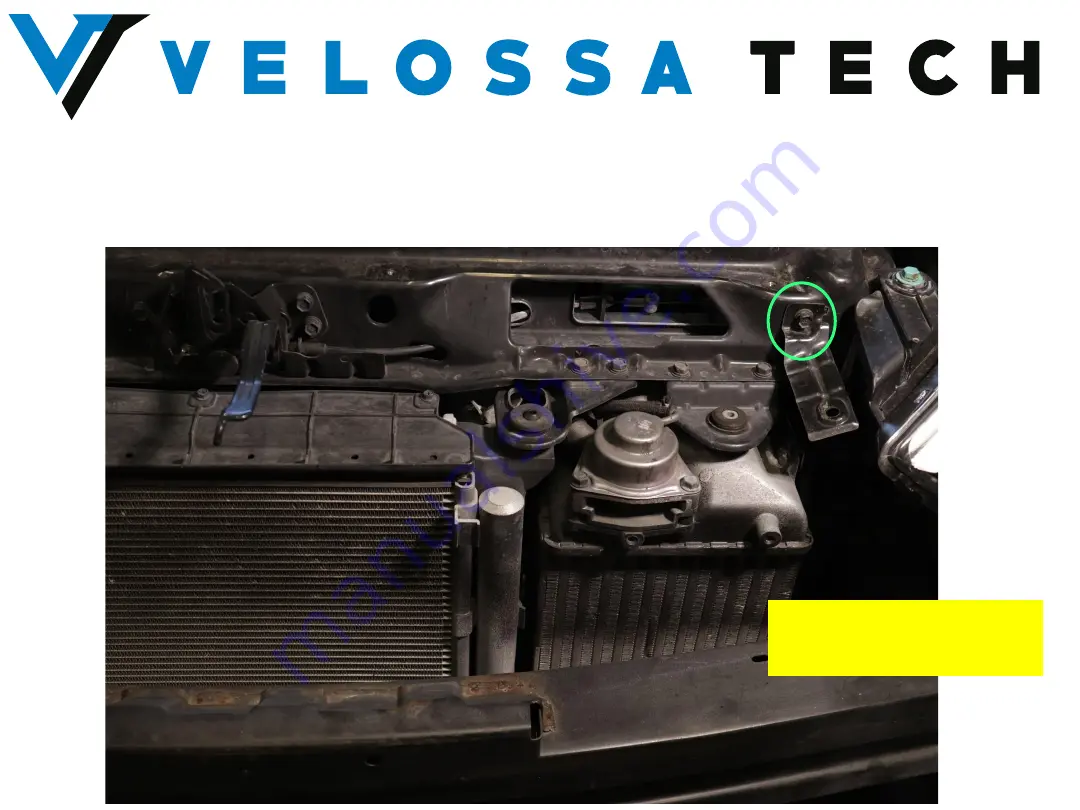
Remove the OEM bolt located here. Keep the metal tab in place, the bolt will be replaced with the M6 bolt found in the kit.
Remove the bolt, keep bracket.
Страница 1: ...2013 2017 Hyundai Veloster Turbo BIG MOUTH LIT KIT Ram Air Installation Guide...
Страница 2: ...lation time Kit Contents Full Kit Qty M6 x 25mm Cap Screw 2 1 3 Diode Dynamics RGBW Controller 1 Positive Cable w In Line Fuse 1 Power Cable w Pigtail Connector 1 Switch 1 Switch Ground Cable w Crimpe...
Страница 3: ...you already own the Velossa Tech Veloster Turbo BIG MOUTH skip to slide XX to see install and wiring instructions Qty 1 1 Power Cable w Pigtail Connector 1 1 Switch Ground Cable w Crimped Connector 1...
Страница 4: ...Stock Components Removal It is best to google how to remove bumper for your particular trim after the bumper is removed you will see the following...
Страница 5: ...enough slack to not strain the cable Install the LIT BIG MOUTH Flare SKIP THIS SLIDE IF YOU PURCHASED A FULL LIT KIT Attach the 3M cable clip here If you purchased a LIT flare only and already have a...
Страница 6: ...BIG MOUTH Installation Remove the OEM bolt located here Keep the metal tab in place the bolt will be replaced with the M6 bolt found in the kit Remove the bolt keep bracket...
Страница 7: ...tallation Fasten the M6 bolt with washer through this mounting point on the BIG MOUTH the mounting point goes OVER the OEM bracket Ensure the top of edge of the BIG MOUTH sits parallel to the cowl edg...
Страница 8: ...mark the hole for drilling through the sheet metal Ensure the drill bit is centered in the hole ensure the drill bit does not walk start with a small bit for a pilot hole Final hole should be or 5 16...
Страница 9: ...nstallation Install the second bolt from the back side of the sheet metal there is an opening and clearance for the Allen key Fasten with washer and nut on both sides do not over torque hand tight is...
Страница 10: ...Big Mouth Wiring Begin by snaking the LED wire that is clipped to the side of the BIG MOUTH as shown Snake it through behind the headlight there is a gap...
Страница 11: ...sided tape Clean the surface with a clean cloth prior and press firmly in place as shown Plug in the LED cable into one of the four ports it does not matter which one The other three ports can accept...
Страница 12: ...Wiring Harness Crimped connectors Power terminal In line fuse Toggle switch Ground terminal Switch ground wire Crimped connector Power connector Positive wire Ground wire...
Страница 13: ...itch terminal Gold terminal can be grounded using the wire shown below to allow switch LED to light up when in use Crimped connector to switch terminal A Power connector There is an extra black wire i...
Страница 14: ...h Wiring Use the wiring diagram and zip ties to wire the system up as shown Ground the two black wires as shown Plug in the grey main power connector and install the blade connectors to the main power...
Страница 15: ...template as shown measure 4 inches from this edge and line up the line with the corner in the shroud You can use tape to hold it down for marking Trimming Line up this line with this corner Line up t...
Страница 16: ...If a new template is needed print this sheet on standard paper and cut it out Ensure the printer settings DO NOT scale the sheet as this will affect the accuracy of the template dimensions Trimming...
Страница 17: ...und the template cut the cover using a cut off wheel or router bit Trimming There is another plastic shroud underneath the top cover it is shown in the next slide You will need to cut through it as we...
Страница 18: ...from the top side of the bumper cover you should see cut marks on the shroud Remove the shroud and continue cutting it Trimming Cut these 2 bumps and ensure this shroud is cut all the way through the...
Страница 19: ...Trim bosses that interfere with the BIG MOUTH Trimming This boss must be trimmed...
Страница 20: ...d fasten the shroud back underneath the bumper cover The bumper cover should seat back properly with no serious binding if not go back and continue to trim ribs bosses until the BIG MOUTH and cover ar...
Страница 21: ...Final trimming should look like this Remove ribs bumps and bosses Trimming Using sandpaper can finish the edges for a clean look...
Страница 22: ...Before fastening the bumper back on the car permanently inspect the levelness of the BIG MOUTH use the oversized hole that was drilled as an adjustment method Big Mouth Adjustment...
Страница 23: ...ad on any parts once fitment is confirmed ensure that screws are tight and that your hood can close properly If there is any hard binding remove more material in any of these places underneath the bum...
Страница 24: ...urn it back on 3 Wait for the app to detect the controller it will pop up on the app screen as a Bluetooth controller If necessary cycle the power once more to refresh the controller 4 Once the contro...