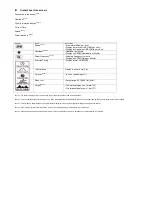


Specifications
•Product:
Cyclaid 10
, Bluetooth Cycling Computer
•Model: CB300
•Operation temperature: -10°C to 60°C (14°F to 140°F )
•Water proof grade: IPX7
•Battery type: CR2032
•Battery life: Around one year on average (on the basis of exercise seven days per week and one hour per day)
•Battery low indicator
•Backlight: EL
•Transmission technology: Bluetooth 4.0 (Bluetooth
®
Smart)
•Receiving transmission distance: around 10 meters (light of sight)
•Compatible accessories:
VELOMANN Bluetooth 4.0 Heart Rate Strap (Optional)
VELOMANN Bluetooth 4.0 Speed and Cadence Sensor (Optional)
•Compatible mobile devices with:
iOS 5.0 or later system version (iPhone 4S or later)
Android 4.3 or later system version and featuring Bluetooth 4.0
•Dimension: L60.5×W37.5×D13.5mm
•Weight: 27.8g
•Material employed: ABS case
Appendix
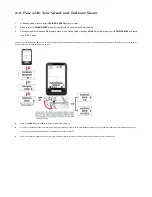
Precautions for use with
VDOUBLE 10
•Due to we cannot guarantee compatibility with other manufacturer's sensors, we sincerely recommend you use VELOMANN Bluetooth sensors with
your Cyclaid 10 for bicycle activity tracking. Recommend compatible sensors as below:
VELOMANN Heart Rate Strap (MODEL VD10BELT )
VELOMANN Speed and Cadence Sensor (MODEL VD10SPEED)
•To ensure sufficient transmission range from your heart rate strap to your smartphone, keep your smartphone in front of you. We recommend you do
not put it in a back pocket or backpack during iPhone Exercise Sync.
Take Care of your VDOUBLE 10
•DO NOT drop or hit your Cycling Computer.
•DO NOT expose your Cycling Computer to extreme temperature or humidity.
•DO NOT use general purpose non-adhesive screen sheet to protect the poanel from scratching.
•DO NOT try to disassemble, repair or modify your Cycling Computer. Fail to do so may void the warranty.