background image

34

FIRST USE

Before first use, it is recommended to make some adjustments in order to

adapt the scooter to your driving style.

Adjusting the brake levers position

It is possible to loosen the fixing nuts of the brake levers and then change

their position, so that they are comfortable and safe for use.

Once the adjustment has been made, properly tighten the nuts.

Disc brakes

Disc  brakes  are  adjusted  at  the  factory,  but  it  is  advisable  to  have  them 

checked before first use.

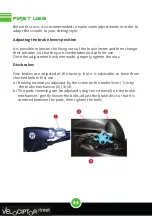
a / Braking intensity is adjusted by the screw on the brake lever (1) or by

      the brake mechanism (2) (3) (4).

b / The pads centering can be adjusted using the screws (4) on the brake

     mechanism - gently loosen the bolts, adjust the brake disc so that it is   

     centered between the pads, then tighten the bolts.

Содержание ES 120EW STREET

Страница 1: ...manuale utente ES 120EW STREET user guide MANUEL DE L UTILISATEUR...

Страница 2: ...OCIPTOR ES 120EW STREET Vi preghiamo di leggere il manuale prima dell utilizzo del prodotto e di mantenerlo in un luogo sicuro per future consultazioni pittogramMi Leggere le istruzioni prima dell uso...

Страница 3: ...11 Aprire e ripiegare il monopattino 12 Come ricaricare la batteria 14 Autonomia 14 Display 15 Controllo frecce direzionali 16 Cruise control 16 Utilizzo APP 16 Applicazione per il controllo dello sco...

Страница 4: ...zhen hyleton Technology Co Ltd Modello HLT 180 4201500 Tensione corrente e frequenza di ingresso AC100 240V 50 60Hz Max 2A Tensione e corrente di uscita 42V 1 5A Potenza di uscita 63W Rendimento medio...

Страница 5: ...minando Parcheggia il monopattino solo su una superficie piana e non scivolosa utiliz zando l apposito cavalletto Non parcheggiare il monopattino su superfici con un inclinazione maggiore di 6 Il parc...

Страница 6: ...elocit e lasciare un adeguata distanza di sicurezza con i pedoni o altri mezzi di trasporto E necessario valutare la superficie che si sta percorrendo piana pulita asciut ta pianeggiante bagnata sporc...

Страница 7: ...ni per l utente o per le persone intorno a seguito di cadute o urti acciden tali quindi necessario indossare sempre dispositivi di protezione come ca sco da bicicletta ginocchiere gomitiere e fare mol...

Страница 8: ...minazione E vietato trasportare altre persone oggetti o animali n trainare veicoli tra sportare animali ed essere trainati da un altro veicolo Il monopattino non deve essere dotato di sedile per l ute...

Страница 9: ...smo di chiusura del piantone con gancio di sicurezza 8 Parafango anteriore 9 Ruota anteriore 10 Pedana 11 Ruota posteriore con motore 12 Ammortizzatore 13 Parafango posteriore 14 Luce posteriore 15 Fr...

Страница 10: ...il manubrio nel telaio del veicolo 2 Dopo aver fatto combaciare i fori nel manubrio con quelli del telaio inserire le viti e stringerle bene ripetere l operazione anche nel lato opposto del manubrio...

Страница 11: ...ni I freni a disco sono regolati in fabbrica ma necessario verificarli al primo utilizzo ed in caso regolarli a L intensit della frenata viene regolata dalla vite sulla leva del freno 1 o dal meccanis...

Страница 12: ...o la ruota posteriore 4 Il manubrio dotato di un gancio agganciare quindi il manubrio sull ap posito sostegno situato sul parafango posteriore 5 ora possibile trasportare il monopattino afferrando il...

Страница 13: ...13 Aprire e ripiegare il monopattino...

Страница 14: ...siderato indicativo poich pu essere influenzato da numerosi fattori Tra i fattori che maggiormente possono incidere sull autonomia della batteria sono inclusi i seguenti Peso trasportato a parit di al...

Страница 15: ...a fissa Premere il freno per far lampeggiare la luce posteriore a LED Selezione livello di velocit Per selezionare il livello di velocit massima ECO 6Km h D 20Km h S 25Km h premere rapidamente due vol...

Страница 16: ...i Il cruise control mantiene la potenza del motore costante la velocit pu variare a seconda della pendenza del terreno anche se non si preme l ac celeratore La funzione di controllo della velocit di c...

Страница 17: ...ontrollo dello scooter Una volta scaricata l applicaziione aprirla e registrarsi un account persona le in modo da non perdere i dati in caso di cambio di telefono Se non si vuole registrarsi premere s...

Страница 18: ...precedentemente scaricata registrarsi oppure saltare l iscrizione 3 Accendere lo scooter la applicazione cercher i dispositivi Bluetooth disponibili nelle vicinanze 4 Se necessario scegliere il codice...

Страница 19: ...lta connesso apparir la pagina principale di controllo dello scooter Impostazioni Ricerca bluetooth Azionamento luci Scelta marcia Livello batteria Spegnere lo scooter Bloccare Sbloccare lo scooter an...

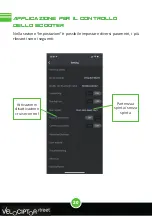
Страница 20: ...cazione per il controllo dello scooter Nella sezione Impostazioni possibile impostare diversi parametri i pi rilevanti sono i seguenti Partenza a spinta senza spinta Attivazione disattivazione cruise...

Страница 21: ...alle condizioni della strada Grado di protezione IPX4 Rumore aereo 70dB A Peso di circa 21 Kg Alimentatore incluso 100 240V 50 60Hz Uscita 42V 1 5A Frequenza BT a 2 4 GHz Potenza 2 4 mW Specifiche te...

Страница 22: ...a dimessa al riciclaggio al trattamento e allo smaltimento ambientale compatibile contribuisce ad evitare possibili effetti negativi sull ambiente e sulla salute e favorisce il riciclo dei materiali d...

Страница 23: ...sempio cavi d alimentazione alimentatori caricabatteria batterie ruote custodie ecc La garanzia non copre i danni diretti e indiretti subiti dall utilizzatore o da terzi derivanti da urti e cadute anc...

Страница 24: ...perti da garan zia Al cliente verranno addebitate altres tutte le spese di trasporto 6 Qualora si proceda alla sostituzione di parti o componenti in garanzia le parti rimosse e sostituite diverranno p...

Страница 25: ...e electric scooter VELOCIPTOR ES 120EW Please read the manual before using the product and keep it in a safe place for future reference pictograms Read the instructions before use Obligation to wear a...

Страница 26: ...tallation of the handlebar 33 First use 34 Open and fold the scooter 35 How to charge battery 37 Autonomy 37 Display 38 Turning lights 39 Cruise control 39 App 39 Scooter control app 40 How to use the...

Страница 27: ...tice Charger specification Manufacturer Shenzhen hyleton Technology Co Ltd Model HLT 180 4201500 Input Voltage 100 240V 50 60Hz Max 2A Output Voltage 42V 1 5A Output power 63W Average efficiency in ac...

Страница 28: ...nclination greater than 6 Parking uphill or downhill involves the risk of loss of stability and falling or overturning Either way take care of yourself and others Do not modify the vehicle from its or...

Страница 29: ...rians or other means of transport Restrict driving in poorly lit areas in the dark or at night In this case always use the lighting devices on the vehicle and use clothing equipped with high visibilit...

Страница 30: ...to the motor and electrical circuits Do not attempt to disassemble the product or its parts Any repairs must be carried out by authorized personnel according to the warranty conditions Disconnect the...

Страница 31: ...ng up The scooter is equipped with a bell for all beeps Only adults or people over the age of 14 can ride the scooter Do not press the accelerator when walking next to the device The manufacturer decl...

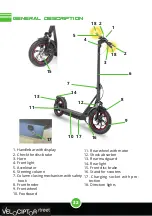
Страница 32: ...column 7 Column closing mechanism with safety hook 8 Front fender 9 Front wheel 10 Footboard 11 Rear wheel with motor 12 Shock absorber 13 Rear mudguard 14 Rear light 15 Front disc brake 16 Stand for...

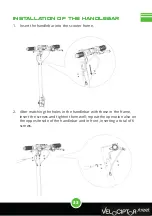
Страница 33: ...andlebar into the scooter frame 2 After matching the holes in the handlebar with those in the frame insert the screws and tighten them well repeat the operation also on the opposite side of the handle...

Страница 34: ...able and safe for use Once the adjustment has been made properly tighten the nuts Disc brakes Disc brakes are adjusted at the factory but it is advisable to have them checked before first use a Brakin...

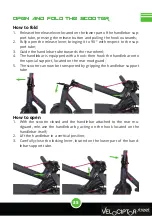
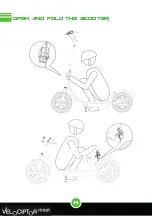
Страница 35: ...rear wheel 4 The handlebar is equipped with a hook then hook the handlebar onto the special support located on the rear mudguard 5 The scooter can now be transported by gripping the handlebar support...

Страница 36: ...36 OPEN AND FOLD THE SCOOTER...

Страница 37: ...However this value must be considered indicative since it can be influenced by numerous factors Among the factors that can most affect battery life are the following Transported weight other condition...

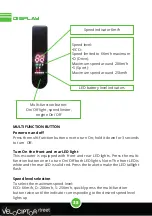
Страница 38: ...and the rear LED is solid red Press the brake to make the LED taillight flash Speed level selection To select the maximum speed level ECO 6Km h D 20Km h S 25Km h quickly press the multi function butto...

Страница 39: ...or about 5 seconds Cruise control maintains engine power speed may vary depending on the slope of the terrain even if the accelerator is not pressed The cruise control function is interrupted by press...

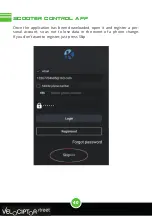
Страница 40: ...Scooter control app Once the application has been downloaded open it and register a per sonal account so as not to lose data in the event of a phone change If you don t want to register just press Sk...

Страница 41: ...cooter application register or skip the registration 3 Turn on the scooter the application on your phone will search for avai lable Bluetooth devices nearby 4 If necessary choose the scooter code in t...

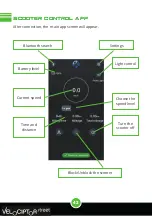
Страница 42: ...trol app After connection the main app screen will appear Settings Bluetooth search Light control Choose the speed level Battery level Turn the scooter off Block Unblock the scooter Time and distance...

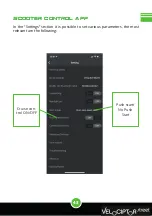
Страница 43: ...43 Scooter control app In the Settings section it is possible to set various parameters the most relevant are the following Push start No Push Start Cruise con trol ON OFF...

Страница 44: ...ns Waterproof IPX4 Airborne noise 70dB A Weight about 21 Kg Power supply included 100 240V 50 60Hz 42V 1 5A output BT frequency 2 4GHz Power 2 4mW TECHNICAL SPECIFICATIONS HOW TO USE THE SCOOTER First...

Страница 45: ...nd limits negative effects on the environment and on health caused by improper handling of waste Illegal disposal of the product leads to the enforcement of administrative penalties Information to use...

Страница 46: ...battery charger batteries wheels cases etc The guarantee does not cover direct and indirect damages suffered by the user or by third parties deriving from knocks and falls even accidental misuse by t...

Страница 47: ...The customer will also be charged for all transportation costs 6 If parts or components under warranty are replaced the parts removed and re placed will become the property of the service center In t...

Страница 48: ...e VELOCIPTOR ES 120EW STREET Veuillez lire le manuel avant toute utilisation du produit et le conserver dans un endroit s r pour toute consulta tion ult rieure pictogramme Lire la notice avant utilisa...

Страница 49: ...tinette 58 Comment recharger la batterie 60 Autonomie de la trottinette 61 Afficheur 62 Contr le des fl ches de direction 63 R gulateur de vitesse Cruise control 63 Utilisation de l APP 63 Application...

Страница 50: ...s du chargeur Fabricant SHENZHEN HYLETON TECHNOLOGY CO LTD Mod le HLT 180 4201500 Tension et fr quence d entr e AC100 240V 50 60Hz Max 2A Tension et courant de sortie 42V 1 5A Puissance de sortie 63 0...

Страница 51: ...arez le scooter uniquement sur une surface plane et non glissante l aide de la b quille sp ciale Ne garez pas le scooter sur des surfaces avec une inclinai son sup rieure 6 Le stationnement en mont e...

Страница 52: ...aille maximale limite pour l utilisation de la trottinette Attention le frein peut chauffer en cours d utilisation Ne pas toucher apr s utilisation Quand vous utilisez la trottinette veuillez porter o...

Страница 53: ...u et de la poussi re Le cable souple externe de ce transformateur ne peut pas etre remplace en cas d endommagement du cordon il convient de mettre le trasformateur au rebut Les mineurs qui utilisent l...

Страница 54: ...e la mani re correcte L utilisateur doit pouvoir utiliser librement ses bras et ses mains et tenir toujours le guidon deux mains sauf s il est n cessaire de signaler la man uvre de vi rage A tout mome...

Страница 55: ...nt 5 Acc l rateur 6 Colonne de ch ssis 7 Crochet de s curit et m canisme de verrouillage 8 Garde boue avant 9 Roue avant 10 Plate forme 11 Roue arri re com moteur 12 Amortisseur 13 Garde boue arri re...

Страница 56: ...que le chargeur soit d branch et que la trottinette soit hors tension teinte 1 Sortez la trottinette du carton Bloquez la colonne et ouvrez la b quille de stationnement 2 Installez le guidon panneau d...

Страница 57: ...de la mani re correcte Freins Les freins disque sont r gl s l usine mais il est conseill de les v rifier avant la premi re utilisation a L intensit du freinage est r gl e par la vis sur le levier du...

Страница 58: ...er le tube du guidon vers la roue arri re 4 Le guidon est quip d un crochet accrocher le guidon sur son support situ sur le garde boue arri re 5 Vous pouvez maintenant transporter la trottinette en sa...

Страница 59: ...59 OUVRIR ET PLIER LA TROTTINETTE...

Страница 60: ...que la charge est pleine ou d connect e REMARQUE labatteriedoit trecharg etousles30jours m meencasdenon uti lisationdelatrottinette silabatterien estpascharg er guli rement ellevaperdre son rendement...

Страница 61: ...ce les surfaces planes et lisses sont moins co teuses pour la batterie que les terrains irr guliers en pente ou avec un frottement consid rable Vitesse et fa on de conduire des acc l rations et des fr...

Страница 62: ...st rouge fixe Appuyer sur le frein pour faire clignoter le feu LED arri re S lection du niveau de vitesse Pour s lectionner le niveau de vitesse maximale ECO 6 Km h D 20 Km h S 25 Km h appuyer rapidem...

Страница 63: ...r de vitesse cruise control garde la puissance du moteur la vi tesse peut varier en fonction de la pente du terrain m me si vous n appuyez pas sur l acc l rateur La fonction du r gulateur de vitesse e...

Страница 64: ...LA TROTTINETTE Une fois l application t l charg e l ouvrir et enregistrer un compte person nel afin de ne pas perdre les donn es si vous changez de t l phone Si vous ne voulez pas vous enregistrer ap...

Страница 65: ...demment t l charg e s enregi strer ou ignorer l enregistrement 3 Allumer la trottinette l application va alors chercher les dispositifs Blue tooth disponibles proximit 4 Le cas ch ant s lectionner le...

Страница 66: ...r alis e la page principale de contr le de la trottinet te s affiche R glages Recherche Bluetooth Commande des feux Choisir la vitesse Niveau de la batterie teindre la trottinette Bloquer D bloquer l...

Страница 67: ...LA TROTTINETTE Dans la section R glages vous pouvez r gler de diff rents param tres dont les plus significatifs sont indiqu s ci dessous D marrage pouss e sans pouss e Activation d sactivation du r g...

Страница 68: ...dre arr tez compl tement le mouvement du scooter COMMENT UTILISER LA TROTTINETTE Ch ssis en aluminium d une capacit maximale de 120 kg pilote bagages Pliable Pneus tout terrain sans chambre air de 12...

Страница 69: ...n gatifs sur l environnement et sur la sant des personnes suite une gestion impropre du d chet Toute limination abusive du produit entra ne l application de sanctions ad ministratives INFORMATIONS DE...

Страница 70: ...geurs les batteries les roues les bo tiers etc La garantie ne couvre pas les dommages directs ou indirects subis par l utilisateur ou par des tiers r sultant de chocs et de chutes m me accidentelles d...

Страница 71: ...les frais de transport seront galement factur s au client 6 Si des pi ces ou des composants sont remplac s sous garantie les pi ces retir es et remplac es deviennent de propri t du centre d assistance...

Страница 72: ...72 Trevi S p A Strada Consolare Rimini San Marino 62 47924 Rimini RN Italia Made In China...

Отзывы: