background image


LEDC09 

V. 01 – 12/09/2013 

12 

©Velleman nv 

Gebruik dit toestel enkel met originele accessoires. Velleman 

nv is niet aansprakelijk voor schade of kwetsuren bij 
(verkeerd) gebruik van dit toestel. Voor meer informatie over 

dit product en de laatste versie van deze handleiding, zie 
www.velleman.eu. De informatie in deze handleiding kan te 
allen tijde worden gewijzigd zonder voorafgaande 

kennisgeving. 


© AUTEURSRECHT – Velleman nv heeft het auteursrecht voor 

deze handleiding. Alle wereldwijde rechten voorbehouden. 

Het 

is niet toegestaan om deze handleiding of gedeelten ervan over te 
nemen, te kopiëren, te vertalen, te bewerken en op te slaan op een 

elektronisch medium zonder voorafgaande schriftelijke toestemming 
van de rechthebbende.  
 

MODE D'EMPLOI 

1.


Introduction 

Aux résidents de l'Union européenne 

Informations environnementales importantes concernant ce 
produit 

Ce symbole sur l'appareil ou l'emballage indique que 

l’élimination d’un appareil en fin de vie peut polluer 
l'environnement. Ne pas jeter un appareil électrique ou 
électronique (et des piles éventuelles) parmi les déchets 

municipaux non sujets au tri sélectif ; une déchèterie 

traitera l’appareil en question. Renvoyer cet appareil à votre 

fournisseur ou à un service de recyclage local. Il convient de 
respecter la réglementation locale relative à la protection de 
l’environnement. 

En cas de questions, contacter les autorités locales pour 
élimination. 

Nous vous remercions de votre achat ! Lire la présente notice 

attentivement avant la mise en service de l’appareil. Si l’appareil a 
été endommagé pendant le transport, ne pas l’installer et consulter 
votre revendeur. 

Содержание LEDC09

Страница 1: ... 4 CANAUX CONTROLADOR DMX PARA CINTAS DE LEDs 4 CANALES DMX CONTROLLER FÜR LED LEISTEN 4 KANÄLE CONTROLADOR DMX PARA FAIXAS LED 4 CANAIS STEROWNIK DMX DO TAŚM LED 4 KANAŁOWY USER MANUAL 3 GEBRUIKERSHANDLEIDING 7 MODE D EMPLOI 12 MANUAL DEL USUARIO 17 BEDIENUNGSANLEITUNG 22 MANUAL DO UTILIZADOR 27 INSTRUKCJA OBSŁUGI 32 ...

Страница 2: ...LEDC09 V 01 12 09 2013 2 Velleman nv ...

Страница 3: ...in transit don t install or use it and contact your dealer 2 Safety Instructions Be very careful during the installation touching live wires can cause life threatening electroshocks Always disconnect mains power when device not in use or when servicing or maintenance activities are performed Handle the power cord by the plug only Keep this device away from rain moisture splashing and dripping liqu...

Страница 4: ...ual is not covered by the warranty and the dealer will not accept responsibility for any ensuing defects or problems Keep this manual for future reference 4 Installation Refer to the illustrations on page 2 4 of this manual 1 DIP switches to select the operating mode 2 DMX input 8P8C RJ45 input from external DMX controller 3 DMX output 8P8C RJ45 output to next LEDC09 device in daisy chain connecti...

Страница 5: ... 8 9 Red 1 0 0 0 0 0 0 0 0 Green x 1 0 0 0 0 0 0 0 Blue x x 1 0 0 0 0 0 0 Yellow x x x 1 0 0 0 0 0 Purple x x x x 1 0 0 0 0 Cyan x x x x x 1 0 0 0 White x x x x x x 1 0 0 0 off 1 on x can be either on or off Changing Colours To use changing colours 1 Set DIP switch 10 to ON 2 Choose the desired dynamic mode o For switching colours set DIP switch 8 to on and DIP switch 9 to off o For fading colours...

Страница 6: ...roller to the DMX input Caution Use either 8P8C connectors or 3 pin XLR connectors Do not use both 3 Use DIP switches 1 9 to specify the DMX address Address DIP switches Switch Represents 5 1 1 2 2 3 4 19 4 8 5 16 6 32 40 7 64 8 128 9 256 Set more than one DIP switch on and add their corresponding values to obtain the desired DMX address For example if only DIP switch 8 is on the DMX address is 12...

Страница 7: ... worldwide rights reserved No part of this manual may be copied reproduced translated or reduced to any electronic medium or otherwise without the prior written consent of the copyright holder GEBRUIKERSHANDLEIDING 1 Inleiding Aan alle ingezetenen van de Europese Unie Belangrijke milieu informatie betreffende dit product Dit symbool op het toestel of de verpakking geeft aan dat als het na zijn lev...

Страница 8: ...Er zijn geen door de gebruiker vervangbare onderdelen in dit toestel Voor onderhoud of reserveonderdelen contacteer uw dealer Laat dit toestel installeren en onderhouden door een geschoolde technicus De beschikbare netspanning mag niet hoger zijn dan de spanning in de specificaties achteraan de handleiding 3 Algemene richtlijnen Raadpleeg de Velleman service en kwaliteitsgarantie achteraan deze ha...

Страница 9: ...LR ingang van externe DMX controller 5 DMX uitgang 3 polige XLR uitgang naar het volgende LEDC09 toestel dat in serie aangesloten is 6 aansluitingen V naar voeding 12 24 VDC V naar voeding 12 24 VDC COM naar ledstrip voeding CH1 naar ledstrip rood kanaal 1 CH2 naar ledstrip groen kanaal 2 CH3 naar ledstrip blauw kanaal 3 CH4 naar ledstrip wit kanaal 4 Opgelet Gebruik 8P8C aansluitingen of 3 polige...

Страница 10: ...kelaar 10 op ON 2 Selecteer de gewenste dynamische modus o Voor kleurovergang zet DIP schakelaar 8 op ON en DIP schakelaar 9 op OFF o Voor kleurfading zet DIP schakelaar 9 op ON DIP schakelaar 8 kan op ON of OFF staan 3 Zet de overeenkomstige DIP schakelaar 1 7 op ON om de snelheid van de kleurwisseling in te stellen Alle DIP schakelaars op OFF minimumsnelheid DIP schakelaar 7 op ON maximumsnelhei...

Страница 11: ...aire waarde 5 1 1 2 2 3 4 19 4 8 5 16 6 32 40 7 64 8 128 9 256 Zet meerdere DIP schakelaars op ON en tel hun overeenkomstige waarden op om het gewenste DMX adres in te stellen Bijvoorbeeld staat alleen DIP schakelaar 8 op ON dan is het DMX adres 128 Zet DIP schakelaars 1 2 en 5 op ON 1 2 16 19 om DMX adres 19 te verkrijgen 7 Technische specificaties DMX kanalen 4 voeding 12 24 VDC niet meegelev vo...

Страница 12: ...de rechthebbende MODE D EMPLOI 1 Introduction Aux résidents de l Union européenne Informations environnementales importantes concernant ce produit Ce symbole sur l appareil ou l emballage indique que l élimination d un appareil en fin de vie peut polluer l environnement Ne pas jeter un appareil électrique ou électronique et des piles éventuelles parmi les déchets municipaux non sujets au tri sélec...

Страница 13: ...ntionnée dans les spécifications à la fin de cette notice 3 Directives générales Se référer à la garantie de service et de qualité Velleman en fin de notice Protéger contre la poussière et les températures extrêmes Veiller à ce que les fentes de ventilation ne soient pas bloquées Protéger l appareil des chocs Traiter l appareil avec circonspection pendant l opération Se familiariser avec le foncti...

Страница 14: ...nal 1 CH2 vers ruban LED vert canal 2 CH3 vers ruban LED bleu canal 3 CH4 vers ruban LED blanc canal 4 Attention Utiliser des connecteurs 8P8C ou des connecteurs XLR à 3 broches Ne jamais utiliser les deux connecteurs en même temps 5 Mode de test En mode de test il est possible de régler une couleur statique ou d utiliser le changement de couleur avec vitesse réglable Couleur statique Pour régler ...

Страница 15: ...r 8 sur ON et l interrupteur 9 sur OFF o Pour le fondu de couleur régler l interrupteur 9 sur ON interrupteur DIP 8 peut être mis sur ON ou OFF 3 Mettre l interrupteur DIP correspondant 1 7 sur ON pour régler la vitesse du changement de couleur Tous les interrupteurs DIP sont en position OFF vitesse minimale interrupteur DIP 7 est réglé sur ON vitesse maximale Si plusieurs interrupteurs DIP sont r...

Страница 16: ...errupteurs DIP Interrupteur Valeur binaire 5 1 1 2 2 3 4 19 4 8 5 16 6 32 40 7 64 8 128 9 256 Régler plusieurs interrupteurs DIP sur ON et additionner leurs valeurs correspondantes pour obtenir l adresse DMX souhaitée Par exemple si seulement l interrupteur DIP 8 est réglé sur ON l adresse DMX est 128 Régler les interrupteurs DIP 1 2 et 5 sur ON 1 2 16 19 pour obtenir l adresse DMX 19 7 Spécificat...

Страница 17: ... du contenu de cette notice par quelque procédé ou sur tout support électronique que ce soit est interdite sans l accord préalable écrit de l ayant droit MANUAL DEL USUARIO 1 Introducción A los ciudadanos de la Unión Europea Importantes informaciones sobre el medio ambiente concerniente a este producto Este símbolo en este aparato o el embalaje indica que si tira las muestras inservibles podrían d...

Страница 18: ...por un técnico cualificado Asegúrese de que la tensión de red no sea mayor que la tensión indicada en las especificaciones 3 Normas generales Véase la Garantía de servicio y calidad Velleman al final de este manual del usuario No exponga este equipo a polvo ni temperaturas extremas Asegúrese de que los orificios de ventilación no estén bloqueados Proteja el aparato contra choques Evite usar excesi...

Страница 19: ...ión CH1 hacia la cinta de LEDs color rojo canal 1 CH2 hacia la cinta de LEDs color verde canal 2 CH3 hacia la cinta de LEDs color azul canal 3 CH4 hacia la cinta de LEDs color blanco canal 4 Advertencia Utilice conectores 8P8C o conectores XLR de 3 polos No utilice ambos 5 Modo de prueba En el modo de prueba usted puede seleccionar un color estático o cambiar los colores utilizando diferentes velo...

Страница 20: ...l interruptor 9 en la posición OFF o Para una transición de colores ponga el interruptor 9 en la posición ON ponga interruptor 8 en la posición ON u OFF 3 Ajuste la velocidad del cambio de color al poner el interruptor DIP correspondiente 1 7 en la posición ON Todos los interruptores DIP desactivados velocidad mínima interruptor DIP 7 activado velocidad máxima El interruptor DIP con el valor más e...

Страница 21: ...nario 5 1 1 2 2 3 4 19 4 8 5 16 6 32 40 7 64 8 128 9 256 Ponga varios interruptores DIP en la posición ON y añada los valores correspondientes para obtener la dirección DMX deseado Por ejemplo La dirección DMX es 128 si sólo el interruptor 8 está en la posición ON Para obtener la dirección DMX 19 ponga el interruptor DIP 1 2 y 5 en la posición ON 1 2 16 19 7 Especificaciones canales DMX 4 alimenta...

Страница 22: ...EITUNG 1 Einführung An alle Einwohner der Europäischen Union Wichtige Umweltinformationen über dieses Produkt Dieses Symbol auf dem Produkt oder der Verpackung zeigt an dass die Entsorgung dieses Produktes nach seinem Lebenszyklus der Umwelt Schaden zufügen kann Entsorgen Sie die Einheit oder verwendeten Batterien nicht als unsortiertes Hausmüll die Einheit oder verwendeten Batterien müssen von ei...

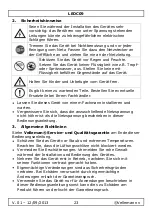
Страница 23: ... dieses Gerät von einem Fachmann installieren und warten Vergewissern Sie sich dass die anzuschließende Netzspannung nicht höher ist als die Netzspannung beschrieben in dieser Bedienungsanleitung 3 Allgemeine Richtlinien Siehe Velleman Service und Qualitätsgarantie am Ende dieser Bedienungsanleitung Schützen Sie das Gerät vor Staub und extremen Temperaturen Beachten Sie dass die Lüftungsschlitze n...

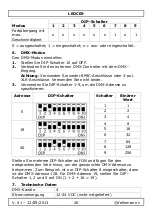
Страница 24: ...indung 4 DMX Eingang 3 pol XLR Eingang vom externen DMX Controller 5 DMX Ausgang 3 pol XLR Ausgang zum nächsten LEDC09 Gerät der Daisy Chain Verbindung 6 Anschlüsse V zur 12 24 VDC Stromversorgung V zur 12 24 VDC Stromversorgung COM zur LED Leiste Stromversorgung CH1 zur LED Leiste rot Kanal 1 CH2 zur LED Leiste grün Kanal 2 CH3 zur LED Leiste blau Kanal 3 CH4 zur LED Leiste weiß Kanal 4 Achtung V...

Страница 25: ...et Farbwechsel Um den Farbwechsel Modus zu verwenden 1 Stellen Sie DIP Schalter 10 auf ON 2 Wählen Sie den gewünschten dynamischen Modus aus o Für den Farbwechsel Modus stellen Sie DIP Schalter 8 auf ON und DIP Schalter 9 auf OFF o Für den Farbübergang Modus stellen Sie DIP Schalter 9 auf ON DIP Schalter 8 ist weder ein oder ausgeschaltet 3 Stellen Sie die Geschwindigkeit des Farbwechsels ein inde...

Страница 26: ...e oder 3 pol XLR Anschlüsse Verwenden Sie nicht beide 3 Verwenden Sie DIP Schalter 1 9 um die DMX Adresse zu spezifizieren Adresse DIP Schalter Schalter Binärer Wert 5 1 1 2 2 3 4 19 4 8 5 16 6 32 40 7 64 8 128 9 256 Stellen Sie mehrere DIP Schalter auf ON und fügen Sie den entsprechenden Wert hinzu um die gewünschte DMX Adresse zu bekommen Zum Beispiel ist nur DIP Schalter 8 eingeschaltet dann is...

Страница 27: ... das Urheberrecht für diese Bedienungsanleitung Alle weltweiten Rechte vorbehalten Ohne vorherige schriftliche Genehmigung des Urhebers ist es nicht gestattet diese Bedienungsanleitung ganz oder in Teilen zu reproduzieren zu kopieren zu übersetzen zu bearbeiten oder zu speichern MANUAL DO UTILIZADOR 1 Introdução Aos cidadãos da União Europeia Importantes informações sobre o meio ambiente no que re...

Страница 28: ...r o aparelho contra a chuva e humidade ou qualquer tipo de salpicos ou gotas Nunca coloque recipientes com líquidos em cima do aparelho Mantenha o aparelho fora do alcance de crianças e pessoas não qualificadas O utilizador não terá de fazer a manutenção das peças Contacte o seu distribuidor caso necessite de peças de substituição A instalação e a manutenção devem ser feitas por pessoal especializ...

Страница 29: ...rve as figuras da página 2 4 do manual 1 interruptores dip para seleccionar o modo de funcionamento 2 entrada DMX entrada 8P8C RJ45 para controlador DMX externo 3 saída DMX saída 8P8C RJ45 para o próximo LEDC09 dispositivo de ligação em cadeia 4 entrada DMX entrada XLR 3 pinos para controlador DMX externo 5 saída DMX saída XLR 3 pinos para o próximo LEDC09 dispositivo de ligação em cadeia 6 termin...

Страница 30: ... 0 0 0 0 0 0 Amarelo x x x 1 0 0 0 0 0 Púrpura x x x x 1 0 0 0 0 Cião x x x x x 1 0 0 0 Branco x x x x x x 1 0 0 0 off 1 on x pode estar ligado ou desligado Cores alternadas Para usar cores alternadas 1 Coloque o interruptor DIP 10 na posição ON 2 Escolha o modo dinâmico desejado o Para cores intermitentes coloque o interruptor DIP 8 em on e o interruptor DIP 9 em off o Para dissipação de cores co...

Страница 31: ...2 Ligue o controlador DMX externo à entrada DMX Atenção Tanto pode usar conectores 8P8C como conectores XLR 3 pinos Não use ambos 3 Use os interruptores DIP 1 9 para especificar o endereço DMX Endereço Interruptores dip Interruptor Representa 5 1 1 2 2 3 4 19 4 8 5 16 6 32 40 7 64 8 128 9 256 Ligue mais do que um interruptor DIP e adicione os seus valores correspondentes para obter o endereço DMX ...

Страница 32: ...sa página www velleman eu Podem alterar se as especificações e o conteúdo deste manual sem aviso prévio DIREITOS DE AUTOR A Velleman NV detém os direitos de autor deste manual do utilizador Todos os direitos mundiais reservados É estritamente proibido reproduzir traduzir copiar editar e gravar este manual do utilizador ou partes deste sem prévia autorização escrita por parte da detentora dos direi...

Страница 33: ... gdy przeprowadzane są prace serwisowe lub konserwacyjne należy odłączyć urządzenie od zasilania sieciowego Kabel zasilający należy trzymać tylko za wtyczkę Chronić urządzenie przed deszczem wilgocią rozpryskami i ściekającymi cieczami Nigdy nie stawiać przedmiotów wypełnionych cieczą na urządzeniu Chronić urządzenie przed dziećmi i nieupoważnionymi użytkownikami W urządzeniu nie występują części ...

Страница 34: ...dowanych w wyniku nieprzestrzegania niniejszej instrukcji a sprzedawca nie ponosi odpowiedzialności za wynikłe uszkodzenia lub problemy Zachować niniejszą instrukcję na przyszłość 4 Montaż Patrz rysunki na stronie 2 4 niniejszej instrukcji 1 przełącznik DIP aby wybrać tryb pracy 2 wejście DMX wejście 8P8C RJ45 z zewnętrznego sterownika DMX 3 wyjście DMX wyjście 8P8C RJ45 do kolejnego urządzenia LE...

Страница 35: ...działa ten o wyższej wartości Kolor Przełącznik DIP 1 2 3 4 5 6 7 8 9 Czerwony 1 0 0 0 0 0 0 0 0 Zielony x 1 0 0 0 0 0 0 0 Niebieski x x 1 0 0 0 0 0 0 Żółty x x x 1 0 0 0 0 0 Fioletowy x x x x 1 0 0 0 0 Cyjan x x x x x 1 0 0 0 Biały x x x x x x 1 0 0 0 wyłączony 1 włączony x może być włączony lub wyłączony Zmienne kolory Aby uruchomić zmienne kolory 1 Ustawić przełącznik DIP 10 na ON 2 Wybrać żąda...

Страница 36: ...ządzenie do współpracy ze sterownikiem DMX 1 Ustawić przełącznik DIP 10 na OFF 2 Podłączyć zewnętrzny sterownik DMX do wejścia DMX Uwaga Należy używać albo złączy 8P8C albo 3 pinowych złączy XLR Nie używać obydwu naraz 3 Za pomocą przełączników DIP 1 9 ustawić adres DMX Adres Przełącznik DIP Przełącznik Oznacza 5 1 1 2 2 3 4 19 4 8 5 16 6 32 40 7 64 8 128 9 256 Ustawić kilka przełączników DIP na O...

Страница 37: ...ego korzystania z urządzenia Aby uzyskać więcej informacji dotyczących produktu i najnowszą wersję niniejszej instrukcji odwiedź naszą stronę internetową www velleman eu Informacje zawarte w niniejszej instrukcji obsługi mogą ulec zmianie bez wcześniejszego powiadomienia INFORMACJA O PRAWACH WŁASNOŚCI Instrukcja ta jest własnością firmy Velleman NV i jest chroniona prawami autorskimi Wszystkie pra...

Страница 38: ...or replaceable lamps rubber parts drive belts unlimited list flaws resulting from fire water damage lightning accident natural disaster etc flaws caused deliberately negligently or resulting from improper handling negligent maintenance abusive use or use contrary to the manufacturer s instructions damage caused by a commercial professional or collective use of the article the warranty validity wil...

Страница 39: ...e bescherming bij transport van het apparaat alle schade door wijzigingen reparaties of modificaties uitgevoerd door derden zonder toestemming van Velleman Toestellen dienen ter reparatie aangeboden te worden bij uw Velleman verdeler Het toestel dient vergezeld te zijn van het oorspronkelijke aankoopbewijs Zorg voor een degelijke verpakking bij voorkeur de originele verpakking en voeg een duidelij...

Страница 40: ...on sera fournie par l endroit de l achat L appareil doit nécessairement être accompagné du bon d achat d origine et être dûment conditionné de préférence dans l emballage d origine avec mention du défaut tuyau il est conseillé de consulter la notice et de contrôler câbles piles etc avant de retourner l appareil Un appareil retourné jugé défectueux qui s avère en bon état de marche pourra faire l o...

Страница 41: ...cluya también una buena descripción del fallo Consejo Lea el manual del usuario y controle los cables las pilas etc antes de devolver el aparato Si no se encuentra un defecto en el artículo los gastos podrían correr a cargo del cliente Los gastos de transporte correrán a carga del cliente para una reparación efectuada fuera del período de garantía Cualquier gesto comercial no disminuye estos derec...

Страница 42: ...tes heraus dass kein Geräteschaden vorliegt könnte dem Kunden eine Untersuchungspauschale berechnet Für Reparaturen nach Ablauf der Garantiefrist werden Transportkosten berechnet Jede kommerzielle Garantie lässt diese Rechte unberührt Die oben stehende Aufzählung kann eventuell angepasst werden gemäß der Art des Produktes siehe Bedienungsanleitung des Gerätes Velleman usługi i gwarancja jakości Od...

Страница 43: ... z nieznajomości obsługi produktu W przypadku wysyłki sprawnego produktu do serwisu nabywca może zostać obciążony kosztmi obsługi oraz transportu W przypadku napraw pogwarancyjnych lub odpłatnych klient ponosi dodatkowo koszt wysyłki produktu do i z serwisu wymienione wyżej warunki są bez uszczerbku dla wszystkich komercyjnych gwarancji Powyższe postanowienia mogą podlegać modyfikacji w zależności...

Страница 44: ...nte prevista e descrita no manual de utilização todos os danos depois de uma devolução não embalada ou mal protegida ao nível do acondicionamento todas as reparações ou modificações efectuadas por terceiros sem a autorização de SA Velleman despesas de transporte de e para Velleman se o aparelho não estiver coberto pela garantia qualquer reparação será fornecida pelo local de compra O aparelho será...

Отзывы: