background image


VMM501 

V. 01 – 17/01/2019 

©Velleman nv 

USER MANUAL 

1.


Introduction 

To all residents of the European Union 
Important environmental information about this product 

This symbol on the device or the package indicates that disposal of the device after its lifecycle could 
harm the environment. Do not dispose of the unit (or batteries) as unsorted municipal waste; it 
should be taken to a specialized company for recycling. This device should be returned to your 
distributor or to a local recycling service. Respect the local environmental rules. 

If


in doubt, contact your local waste disposal authorities. 

Thank you for choosing Velleman

®

! Please read the manual thoroughly before bringing this device into service. 

If the device was damaged in transit, do not install or use it and contact your dealer. 
 

2.


Safety Instructions 


This device can be used by children aged from 8 years and above, and persons with 
reduced physical, sensory or mental capabilities or lack of experience and knowledge if 
they have been given supervision or instruction concerning the use of the device in a 
safe way and understand the hazards involved. Children shall not play with the device. 
Cleaning and user maintenance shall not be made by children without supervision. 


Indoor use only. 
Keep away from rain, moisture, splashing and dripping liquids. 


3.


General Guidelines 


Refer to the Velleman

®

 Service and Quality Warranty on the last pages of this manual. 


Familiarise yourself with the functions of the device before actually using it. 


All modifications of the device are forbidden for safety reasons. Damage caused by user 
modifications to the device is not covered by the warranty. 


Only use the device for its intended purpose. Using the device in an unauthorised way 
will void the warranty. 


Damage caused by disregard of certain guidelines in this manual is not covered by the 
warranty and the dealer will not accept responsibility for any ensuing defects or 
problems. 


Nor Velleman nv nor its dealers can be held responsible for any damage (extraordinary, 
incidental or indirect) – of any nature (financial, physical…) arising from the possession, 
use or failure of this product.  


Due to constant product improvements, the actual product appearance might differ from 
the shown images.  


Product images are for illustrative purposes only. 


Do not switch the device on immediately after it has been exposed to changes in 
temperature. Protect the device against damage by leaving it switched off until it has 
reached room temperature. 


Keep this manual for future reference. 


Содержание VMM501

Страница 1: ...VMM501 MOTOR SHIELD FOR MICRO BIT USER MANUAL 2 HANDLEIDING 27 MODE D EMPLOI 53 MANUAL DEL USUARIO 79 BEDIENUNGSANLEITUNG 107 INSTRUKCJA OBSŁUGI 136 MANUAL DO UTILIZADOR 162 ...

Страница 2: ...aning and user maintenance shall not be made by children without supervision Indoor use only Keep away from rain moisture splashing and dripping liquids 3 General Guidelines Refer to the Velleman Service and Quality Warranty on the last pages of this manual Familiarise yourself with the functions of the device before actually using it All modifications of the device are forbidden for safety reason...

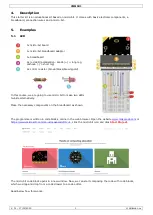
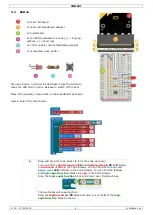
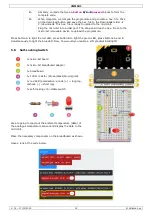
Страница 3: ...istor brown black brown gold In this course we are going to use micro bit to make two LEDs twinkle alternatively Place the necessary components on the breadboard as shown The programme is written in code blocks online in the web browser Open the website www makecode com or https www microsoft com en us makecode rtc 1 click the micro bit icon and click Start Project The micro bit code block opens i...

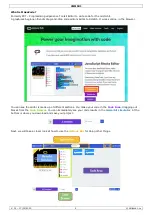
Страница 4: ...similar to Scratch It works online in the browser You can see the editor is made up of different sections You make your code in the Code Area dragging out blocks from the Code Drawer You can immediately see your code results in the micro bit simulator At the bottom is where you download and save your project Next we will take a closer look at how to use the Options Bar for doing other things ...

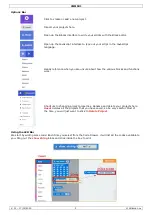
Страница 5: ...ence when you are unsure about how the various blocks and functions work Shortcuts to changing project properties Rename and delete your projects here Reset deletes all the projects that you have saved so be very careful Most of the time you will just want to stick to Delete Project Using the LED Bar We start by writing some code Each time you select from the Code Drawer it will list all the codes...

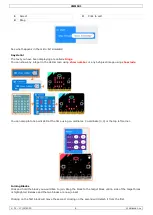
Страница 6: ...ber or any 5x5 pixel image using show leds You can also plot one point LED at the time using co ordinates Co ordinate 0 0 is the top left corner Joining Blocks Click and hold the block you would like to join Drag the block to the target block until a side of the target block is highlighted Release and the two blocks are now joined Clicking on the first block will move the second clicking on the se...

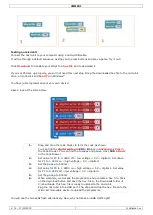
Страница 7: ... to 0 block in Advanced Pins in the Code Drawer You can find the forever and pause ms 100 in Basic in the Code Drawer 2 Set value for P0 to 0 LED0 off low voltage 0 V digital 0 Set value for P1 to 1 LED1 on high voltage 5 V digital 1 3 Set the pause to 500 ms 4 Set value for P0 to 1 LED0 on high voltage 5 V digital 1 Set value for P1 to 0 LED1 off low voltage 0 V digital 0 5 Set the pause to 500 m...

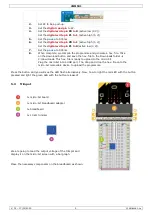
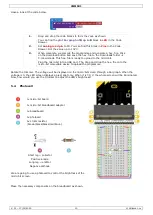
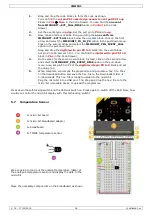
Страница 8: ...ts on the breadboard as shown Have a look at the code below 1 Drag and drop the code blocks to form the code as shown You can find the digital read pin P0 and digital write pin P0 to 0 blocks in Advanced Pins in the Code Drawer You can find the forever and pause ms 100 in Basic in the Code Drawer You can find the if then and logic equal function blocks in Logic in the Code Drawer Drag the logic eq...

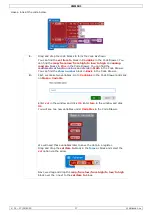
Страница 9: ... the hex file to the Downloads folder C downloads This hex file is ready to upload to the micro bit Plug the micro bit into a USB port The drag and drop the hex file onto the micro bit removable device to upload the programme Press the button and you will see the LED flash alternatively Now how to light the red LED with the button pressed and light the green LED with the button released 5 3 Trimpo...

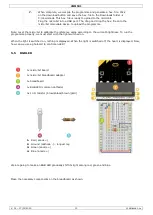
Страница 10: ...into a USB port The drag and drop the hex file onto the micro bit removable device to upload the programme Rotate the trimmer The voltage will be displayed on the micro bit screen through a bar graph When the voltage is 0 the LED screen displays a pixel spot only When it is 3 3 V the whole screen will be illuminated Now how would you use the trimmer to adjust the LED s brightness 5 4 Photocell 1x ...

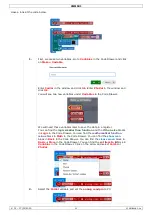
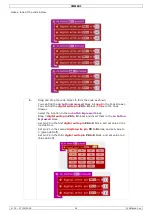
Страница 11: ...iables later to save the data in a register You can find the logic smaller than function and the if then else blocks in Logic in the Code Drawer You can find the mathematical function minus block in Math in the Code Drawer You can find the show icon block in Basic in the Code Drawer You can find the clear screen block in Basic More in the Code Drawer You can find the set item to 0 block in Variabl...

Страница 12: ...an function Drag the mathematical function minus block and drop it over the second 0 of the logic smaller than function Next we drag and drop the CalVal variable from Variables in the Code Drawer and drop it over the first 0 of the mathematical function minus block Set the second 0 of the mathematical function minus block to 2 5 Drag and drop the show icon block next to the then block Drag and dro...

Страница 13: ... value according to the current brightness To run the programme properly we must start with the light switched on When the light is switched on nothing is displayed When the light is switched off the heart is displayed Now how can we use a photocell to control an LED 5 5 RGB LED 1x micro bit board 1x micro bit breadboard adapter 1x breadboard 1x RGB LED common cathode 3x 10 Ω resistor brown black ...

Страница 14: ... block in Pins in the Code Drawer Select the A option in the on button A pressed block Drag 3 digital write pin P0 to 0 blocks and insert them in the on button A pressed block Set pin P0 in the first digital write pin P0 to 0 block and set value 0 to 1 red LED on Set pin P1 in the second digital write pin P0 to 0 block and set value to 0 green LED off Set pin P2 in the third digital write pin P0 t...

Страница 15: ... the programme Press button A to light the red LED press button B to light the green LED press buttons A and B simultaneously to light the blue LED Now how would you realize a soft gradient RGB light 5 6 Self Locking Switch 1x micro bit board 1x micro bit breadboard adapter 1x breadboard 1x 100 Ω resistor brown black brown gold 1x red LED polarisation anode long leg cathode short leg 1x self locki...

Страница 16: ... 4 Do the same for the second event block Instead click on the second arrow and select the MICROBIT_PIN_EVENT_RISE option in the pull down menu Also set pin P0 to P2 of the digital write pin P0 to 0 block and set the value to 0 5 When complete we compile the programme and generate a hex file Click on the download button and save the hex file to the Downloads folder C downloads This hex file is rea...

Страница 17: ... Drawer You can find the show number block in Basic in the Code Drawer 2 First we make two variables Go to Variables in the Code Drawer and click on Make a Variable Enter vol in the window and click Ok Enter tem in the window and click Ok You will see two new variables under Variables in the Code Drawer We will need these variables later to save the data in a register Drag and drop the set item to...

Страница 18: ...bit value of 0 1023 0 3 3 V and is mapped from a low value 0 or 0 V to a high value 3300 mV or 3 3 V The measured voltage mV is saved in the vol variable Now we write a formula to convert the measured voltage into a temperature 𝑇𝑒𝑚𝑝𝑒𝑟𝑎𝑡𝑢𝑟𝑒 𝐶 Output voltage mV 500 10 In this formula the output voltage is the vol variable measured through the TMP36 sensor The result of the formula will be saved in t...

Страница 19: ... variable from vol to tem and drag and drop the vol variable over the first 0 of the mathematical function minus The variable vol can be found in Variables in the Code Drawer Set the value 0 of the mathematical function minus to 500 Also Set the value of the mathematical function divide to 10 Drag and drop the show number block under the set tem to block ...

Страница 20: ...cro bit Plug the micro bit into a USB port The drag and drop the hex file onto the micro bit removable device to upload the programme You will see the LED beads flash alternatively Now how would you display the temperature in degrees Fahrenheit 5 8 Servo 1x micro bit board 1x micro bit breadboard adapter 1x breadboard 1x mini servo 1x battery holder with 2x AA 1 5 V battery We are going to make a ...

Страница 21: ...file Click on the download button and save the hex file to the Downloads folder C downloads This hex file is ready to upload to the micro bit Plug the micro bit into a USB port The drag and drop the hex file onto the micro bit removable device to upload the programme We can see the servo rotating from 0 to 180 degrees Now how would you make a dial thermometer with a temperature sensor and servo 5 ...

Страница 22: ...nding piano key You will also hear the corresponding tone 3 Set the pause to 100 ms 4 Do so for the rest of the ring tones and pauses 5 When complete we compile the programme and generate a hex file Click on the download button and save the hex file to the Downloads folder C downloads This hex file is ready to upload to the micro bit Plug the micro bit into a USB port The drag and drop the hex fil...

Страница 23: ...annel MOSFET 1x mini motor 1x battery holder with 2x AA 1 5 V battery We are going to use a switch to control the start and stop of a motor Place the necessary components on the breadboard as shown Have a look at the code below 1 Drag and drop the code blocks to form the code as shown 2 The on start block runs only once to start the programme 3 Set the value of P0 to 0 4 Set the pull pin block to ...

Страница 24: ...rate a hex file Click on the download button and save the hex file to the Downloads folder C downloads This hex file is ready to upload to the micro bit Plug the micro bit into a USB port The drag and drop the hex file onto the micro bit removable device to upload the programme Press the switch to run the motor and release it to stop Now how would you use a trimpot to control the motor speed Note ...

Страница 25: ...e code below 1 Drag and drop the code blocks to form the code as shown 2 Search and add the NeoPixel library Go to Advanced Add Package Extensions and enter NeoPixel Next select the NeoPixel library Now the library is downloaded and added to the Code Drawer ...

Страница 26: ...his hex file is ready to upload to the micro bit Plug the micro bit into a USB port The drag and drop the hex file onto the micro bit removable device to upload the programme We can see rainbow rotating on the LED ring Now how would you make the ring blink like an eye Use this device with original accessories only Velleman nv cannot be held responsible in the event of damage or injury resulting fr...

Страница 27: ...et met het toestel spelen De reiniging en het onderhoud van het toestel mogen niet worden uitgevoerd door kinderen tenzij ze onder toezicht staan Uitsluitend voor gebruik binnenshuis Bescherm tegen regen vochtigheid en opspattende vloeistoffen 3 Algemene richtlijnen Raadpleeg de Velleman service en kwaliteitsgarantie achteraan deze handleiding Leer eerst de functies van het toestel kennen voor u h...

Страница 28: ...eerstand bruin zwart bruin goud In deze tutorial gebruiken we de micro bit om de twee leds afwisselend te laten knipperen Plaats de nodige componenten op het breadboard zie afb Het programma is geschreven in blokken online in de webbrowser Ga naar de website www makecode com of https www microsoft com en us makecode rtc 1 en klik op de knop micro bit en vervolgens op Start Project De micro bit wor...

Страница 29: ...lijkbaar met Scratch die online werkt in de browser U kunt zien dat de editor uit verschillende secties bestaat Maak uw code in het codeveld door blokken te slepen uit het menu Code Drawer Het resultaat van de code verschijnt onmiddellijk in de micro bit simulator Met de knop Download onderaan de pagina kunt u de code downloaden en naar de micro bit uploaden Vervolgens gaan we dieper in op het geb...

Страница 30: ... Javascript om uw script om te zetten in Javascript Klik op het vraagteken voor meer informatie over de verschillende blokken en functies Klik op het tandwielicoontje om projectinstellingen te bewerken Via dit menu kunt u uw projecten een andere naam geven en verwijderen Reset verwijdert alle opgeslagen projecten wees dus voorzichtig Het is meestal het best om Project verwijderen te gebruiken ...

Страница 31: ...ing uit het menu en klik in het blok om te bewerken 1 Selecteren 3 Klik om te bewerken 2 Slepen Test de code in de simulator Say Hello De stukjes tekst die verschijnen zijn strings U kunt een willekeurig getal weergeven met show number of een 5x5 pixel afbeelding op het scherm weergeven met show leds U kunt ook coördinaten gebruiken om een specifieke led te gebruiken De coördinaten 0 0 bevinden zi...

Страница 32: ...ekoppeld Op de micro bit testen Sluit de micro bit aan op de computer met een micro USB kabel Een testroutine verschijnt op de micro bit waarbij u wordt gevraagd om op knoppen te drukken en een spel te spelen Probeer het uit Klik op Download om uw script naar een hex bestand om te zetten en te downloaden Als Chrome correct is ingesteld dan kunt u de volgende stap overslaan Sleep het gedownloade he...

Страница 33: ...pauze in op 500 ms 4 Stel de waarde voor P0 in op 1 LED0 on high voltage 5 V digital 1 Stel de waarde voor P1 in op 0 LED1 off low voltage 0 V digital 0 5 Stel de pauze in op 500 ms 6 Compileer het programma en sla het op als een hex bestand Klik op de knop Download en sla het hex bestand op in de map Downloads C downloads Dit hex bestand kan naar de micro bit geüpload worden Sluit de micro bit aa...

Страница 34: ... de led uit te schakelen Plaats de nodige componenten op het breadboard zie afb Bekijk de onderstaande code 1 Sleep de blokken om de code te maken zie afb De blokken digital read pin P0 en digital write pin P0 to 0 bevinden zich in het menu onder Advanced Pins De blokken forever en pause ms 100 bevinden zich in het menu onder Basic De blokken if then en logic equal function bevinden zich in het me...

Страница 35: ... map Downloads C downloads Dit hex bestand kan naar de micro bit geüpload worden Sluit de micro bit aan op een USB poort Sleep het hex bestand naar de micro bit removable device om het programma te uploaden Druk op de knop en de leds knipperen afwisselend Hoe zou u de rode led inschakelen door de knop in te drukken en de groene led inschakelen door de knop los te laten 5 3 Trimpotentiometer 1x mic...

Страница 36: ...icro bit removable device om het programma te uploaden Draai de trimpotentiometer De spanning wordt weergegeven op het micro bit scherm in de vorm van een staafdiagram Als de spanning gelijk is aan 0 verschijnt slechts één enkele pixel op het ledscherm Bij een waarde van 3 3 V licht het volledige scherm op Hoe zou u de trimpotentiometer gebruiken om de helderheid van de led aan te passen 5 4 Fotoc...

Страница 37: ...n later nodig om de gegevens in het register op te slaan De blokken logic smaller than function en if then else bevinden zich in het menu onder Logic Het blok mathematical function minus bevindt zich in het menu onder Math Het blok show icon bevindt zich in het menu onder Basic Het blok clear screen bevindt zich in het menu onder Basic More Het blok set item to 0 bevindt zich in het menu onder Var...

Страница 38: ...gic smaller than function Sleep het blok mathematical function minus over de tweede 0 van logic smaller than function Sleep de variabele CalVal vanaf het menu onder Variables over de eerste 0 van het blok mathematical function minus Stel de tweede 0 van demathematical function minus in op 2 5 Sleep het blok show icon naast het blok then Sleep het blok clear screen naast het blok else 6 Als PhoVal ...

Страница 39: ...reren volgens het huidige helderheidsniveau Schakel het licht in om het programma correct te starten Als het licht aan is wordt niets weergegeven Als het licht uit is wordt het hart weergegeven Hoe kunnen we de fotocel gebruiken om een led aan te sturen 5 5 RGB led 1x micro bit board 1x micro bit breadboard adapter 1 x breadboard 1x RGB led gemeenschappelijke kathode 3x 10 Ω weerstand bruin zwart ...

Страница 40: ...sed Sleep 3 blokken digital write pin P0 to 0 en plaats deze in het blok on button A pressed Stel pin P0 in het eerste blok digital write pin P0 in op 0 en verander de waarde 0 naar 1 rode led aan Stel pin P1 in het tweede blok digital write pin P0 in op0 en stel de waarde in op 0 groene led uit Stel pin P2 in het derde blok digital write pin P0 in op 0 en stel de waarde in op 0 blauwe led uit 2 O...

Страница 41: ...groene led in te schakelen druk de knoppen A en B gelijktijdig in om de blauwe led in te schakelen Hoe zou u een geleidelijke RGB kleurenovergang creëren 5 6 Zelfvergrendelende schakelaar 1x micro bit board 1x micro bit breadboard adapter 1 x breadboard 1x 100 Ω weerstand bruin zwart bruin goud 1x rode led polarisatie anode lang pootje kathode kort pootje 1x zelfvergrendelende of bistabiele schake...

Страница 42: ...voor het tweede event blok Klik vervolgens op de tweede pijl en selecteer de optie MICROBIT_PIN_EVENT_RISE in het keuzemenu Stel pin P0 in op P2 van het blok digital write pin P0 to 0 en stel de waarde in op 0 5 Compileer het programma en sla het op als een hex bestand Klik op de knop Download en sla het hex bestand op in de map Downloads C downloads Dit hex bestand kan naar de micro bit geüpload ...

Страница 43: ... onder Math Het blok show number bevindt zich in het menu onder Basic 2 Eerst maken we twee variabelen Ga naar Variables in het menu en klik op Make a Variable Voer vol in het venster in en klik op Ok Voer tem in het venster in en klik op Ok Twee nieuwe variabelen verschijnen in het menu onder Variables Deze variabelen zijn later nodig om de gegevens in het register op te slaan Sleep het blok set ...

Страница 44: ... 0 3 3 V en wordt weergegeven van laag 0 of 0 V naar hoog 3300 mV of 3 3 V De gemeten spanning mV wordt opgeslagen in de variabele vol Nu schrijven we een formule om de gemeten spanning om te zetten in temperatuur 𝑇𝑒𝑚𝑝𝑒𝑟𝑎𝑡𝑢𝑟𝑒 𝐶 Output voltage mV 500 10 In deze formule is de uitgangsspanning een variabele vol gemeten met de TMP36 sensor Het resultaat van de formule wordt opgeslagen als variabele te...

Страница 45: ... en sleep de variabele vol over de eerste waarde 0 van de wiskundige functie minus De variabele vol bevindt zich in het menu onder Variables Stel de waarde 0 van de mathematical function minus in op 500 Stel de waarde van de mathematical function device in op 10 Sleep het blok show number onder het blok set tem to Sleep de variabele tem over de waarde 0 van het blok show number ...

Страница 46: ...B poort Sleep het hex bestand naar de micro bit removable device om het programma te uploaden De twee leds knipperen afwisselend Hoe zou u de temperatuur in graden Fahrenheit weergeven 5 8 Servo 1x micro bit board 1x micro bit breadboard adapter 1 x breadboard 1x mini servo 1x batterijhouder met 2x AA 1 5 V batterij In het voorbeeld hieronder laten we de servo continu draaien binnen een bewegingsb...

Страница 47: ... de knop Download en sla het hex bestand op in de map Downloads C downloads Dit hex bestand kan naar de micro bit geüpload worden Sluit de micro bit aan op een USB poort Sleep het hex bestand naar de micro bit removable device om het programma te uploaden U kunt zien dat de servo van 0 tot 180 graden draait Hoe zou u een klokthermometer met een temperatuursensor en een servo maken 5 9 Zoemer 1x mi...

Страница 48: ...mstige pianotoets U hoort ook het overeenkomstige geluid 3 Stel de pauze in op 100 ms 4 Voer de bovenstaande stappen uit voor de resterende belsignalen en pauzes 5 Compileer het programma en sla het op als een hex bestand Klik op de knop Download en sla het hex bestand op in de map Downloads C downloads Dit hex bestand kan naar de micro bit geüpload worden Sluit de micro bit aan op een USB poort S...

Страница 49: ...1x mini motor 1x batterijhouder met 2x AA 1 5 V batterij In het voorbeeld hieronder gebruiken we een schakelaar om de motor aan te sturen starten stoppen Plaats de nodige componenten op het breadboard zie afb Bekijk de onderstaande code 1 Sleep de blokken om de code te maken zie afb 2 Het blok on start wordt maar één keer uitgevoerd om het programma te starten 3 Stel de waarde voor P0 in op 0 4 St...

Страница 50: ...stand Klik op de knop Download en sla het hex bestand op in de map Downloads C downloads Dit hex bestand kan naar de micro bit geüpload worden Sluit de micro bit aan op een USB poort Sleep het hex bestand naar de micro bit removable device om het programma te uploaden Druk op de schakelaar om de motor te starten en laat los om te stoppen Hoe zou u een trimpotentiometer gebruiken om het motortoeren...

Страница 51: ...rstaande code 1 Sleep de blokken om de code te maken zie afb 2 Zoek en voeg de NeoPixel bibliotheek toe Ga naar Advanced Add Package Extensions en geef NeoPixel in Selecteer de NeoPixel bibliotheek De bibliotheek is gedownload en aan het menu toegevoegd ...

Страница 52: ...n Sluit de micro bit aan op een USB poort Sleep het hex bestand naar de micro bit removable device om het programma te uploaden De leds creëren een regenboogeffect op de ledring Hoe zou u de ring nu als een oog laten knipperen Gebruik dit toestel enkel met originele accessoires Velleman nv is niet aansprakelijk voor schade of kwetsuren bij verkeerd gebruik van dit toestel Voor meer informatie over...

Страница 53: ...ttoyage et l entretien ne doivent pas être effectués par des enfants sans surveillance Utiliser cet appareil uniquement à l intérieur Protéger l appareil contre la pluie l humidité et les éclaboussures 3 Directives générales Se référer à la garantie de service et de qualité Velleman en fin de ce mode d emploi Se familiariser avec le fonctionnement de l appareil avant de l utiliser Toute modificati...

Страница 54: ...cathode patte courte 1x résistance 100 Ω marron noir marron or Dans ce tutoriel nous utiliserons le micro bit pour faire clignoter deux LED en alternance Poser les composants requis sur la platine d expérimentation voir ill Le programme est écrit en blocs en ligne dans le navigateur Web Accéder au site www makecode com ou https www microsoft com en us makecode rtc 1 et cliquer sur micro bit et ens...

Страница 55: ...e à Scratch qui fonctionne en ligne dans le navigateur L éditeur se compose en différent volets Le code est créé dans la zone de code en faisant glisser des blocs depuis le menu Le résultat du code s affiche immédiatement dans le simulateur micro bit En bas se trouve un bouton pour télécharger et sauvegarder le projet Regardons tout d abord comment utiliser la Options Bar Barre d options ...

Страница 56: ...de Cliquer sur l icône d engrenage pour modifier les paramètres du projet Depuis ce menu il est possible de renommer et supprimer vos projets Reset Remise à zéro supprimera tous les projets enregistrés Faire attention Il est généralement préférable d utiliser Supprimer le projet Utiliser la matrice LED Commençons par écrire le code Chaque fois que vous sélectionnez un bloc depuis le menu une liste...

Страница 57: ...ay Hello Les caractères affichés sont des chaînes de caractères Vous pouvez afficher du texte et des numéros en utilisant la fonction show number ou une image de 5x5 pixels avec show leds Vous pouvez également allumer et éteindre une seule LED en utilisant des coordonnées Les coordonnées 0 0 se trouvent en haut à gauche de l écran ...

Страница 58: ...e décomposer du premier bloc Tester sur le micro bit Connecter le micro bit à votre PC avec un câble micro USB Une routine de test s affiche sur le micro bit vous demandant d appuyer sur des boutons et de jouer un jeu Tester le Cliquer sur Download pour convertir le script en un fichier hex et le télécharger Si Chrome est configuré correctement vous pouvez ignorer l étape suivante Glisser déposer ...

Страница 59: ...la valeur pour P0 sur 1 LED0 on high voltage 5 V digital 1 Régler la valeur pour P1 sur 0 LED1 off low voltage 0 V digital 0 5 Régler la pause sur 500 ms 6 Une fois terminé compiler le programme pour générer un fichier hex Cliquer sur le bouton Download Télécharger et sauvegarder le fichier hex dans le dossier Downloads C downloads Ce fichier hex peut être téléversé vers le micro bit Connecter le ...

Страница 60: ... pour faire clignoter la LED en alternance Relâcher pour éteindre la LED Poser les composants requis sur la platine d expérimentation voir ill Regarder le code ci dessous 1 Glisser déposer les blocs pour former le code comme indiqué Les blocs digital read pin P0 et digital write pin P0 to 0 se trouvent dans le menu sous Advanced Pins Les blocs forever et pause ms 100 se trouvent dans le menu sous ...

Страница 61: ...ger et sauvegarder le fichier hex dans le dossier Downloads C downloads Ce fichier hex peut être téléversé vers le micro bit Connecter le micro bit à un port USB Glisser déposer le fichier hex sur le micro bit Removable device pour téléverser le programme Appuyer sur le bouton pour faire clignoter la LED en alternance Comment allumer la LED rouge en appuyant sur le bouton et allumer la LED verte e...

Страница 62: ...emovable device pour téléverser le programme Faire tourner le potentiomètre ajustable La tension est affichée sur l écran micro bit par un graphique à barres Lorsque la tension est égale à 0 un seul pixel apparaîtra à l écran LED Quand la tension est de 3 3 V tout l écran s illuminera Comment utiliser le potentiomètre ajustable pour régler l intensité lumineuse de la LED 5 4 Photocellule 1x carte ...

Страница 63: ... variables plus tard pour sauvegarder les données dans un registre Les blocs logic smaller than function et if then else se trouvent dans le menu sous Logic Le bloc mathematical function minus se trouve dans le menu sous Math Le bloc show icon se trouve dans le menu sous block in Basic in the Code Drawer Le bloc clear screen se trouve dans le menu sous Basic More Le bloc set item to 0 se trouve da...

Страница 64: ...ler than function Faire glisser le bloc mathematical function minus et déposer le sur le deuxième 0 du bloc logic smaller than function Faire glisser la variable CalVal depuis le menu sous Variables et déposer le sur le premier 0 du bloc mathematical function minus Régler le deuxième 0 sur le bloc mathematical function minus sur 2 5 Glisser déposer le bloc show icon à côté du bloc then Glisser dép...

Страница 65: ... fonction de la luminosité actuelle Pour exécuter le programme correctement commençons avec la lumière allumée Lorsque la lumière est allumée rien ne s affiche Lorsque la lumière est éteinte le cœur apparaît Comment utiliser une photocellule pour contrôler une LED 5 5 LED RGB 1x carte micro bit 1x adaptateur pour platine d expérimentation micro bit 1x platine d expérimentation 1x LED RGB cathode c...

Страница 66: ...A pressed Faire glisser 3 blocs digital write pin P0 to 0 et déposer les dans le bloc on button A pressed Régler la broche P0 dans le premier bloc digital write pin P0 sur 0 et régler la valeur 0 sur 1 LED rouge allumée Régler la broche P1 dans le premier bloc digital write pin P0 sur 0 et régler la valeur sur 0 LED verte éteinte Régler la broche P2 dans le bloc digital write pin P0 sur 0 et régle...

Страница 67: ... B pour allumer la LED verte appuyer simultanément sur les boutons A et B pour allumer la LED bleue Comment réaliser une transition RGB aisée 5 6 Commutateur autobloquant 1x carte micro bit 1x adaptateur pour platine d expérimentation micro bit 1x platine d expérimentation 1x résistance 100 Ω marron noir marron or 1x LED rouge polarisation anode patte longue cathode patte courte 1x commutateur aut...

Страница 68: ...vénement Cliquer sur la deuxième flèche et sélectionner l option MICROBIT_PIN_EVENT_RISE dans le menu déroulant Régler P0 sur P2 pour le bloc digital write pin P0 to 0 et régler la valeur sur 0 5 Une fois terminé compiler le programme pour générer un fichier hex Cliquer sur le bouton Download Télécharger et sauvegarder le fichier hex dans le dossier Downloads C downloads Ce fichier hex peut être t...

Страница 69: ...r se trouve dans le menu sous Basic 2 Tout d abord créons deux variables Aller à Variables dans le menu et cliquer sur Make a Variable Entrer vol dans la fenêtre et cliquer sur Ok Entrer tem dans la fenêtre et cliquer sur Ok Deux nouvelles variables s affichent dans le menu sous Variables Nous aurons besoin de ces variables plus tard pour sauvegarder les données dans un registre Glisser déposer le...

Страница 70: ... une valeur 8 bits de 0 1023 0 3 3 V et est affichée de bas 0 ou 0 V en haut 3300 mV ou 3 3 V La tension mesurée mV est sauvegardée dans la variable vol Maintenant créons une formule pour convertir la tension mesurée en température 𝑇𝑒𝑚𝑝𝑒𝑟𝑎𝑡𝑢𝑟𝑒 𝐶 Output voltage mV 500 10 Dans cette formule la tension de sortie est la variable vol mesurée avec le capteur TMP36 Le résultat de la formule est sauvegard...

Страница 71: ...oser la variable vol sur le premier 0 du bloc mathematical function minus La variable vol se trouve dans le menu sous Variables Régler la valeur 0 du bloc mathematical function minus sur 500 Régler la valeur du bloc mathematical function divide sur 10 Glisser déposer le bloc show number sous le bloc set tem to Glisser déposer la variable tem sur la valeur 0 du bloc show number ...

Страница 72: ...sser déposer le fichier hex sur le micro bit Removable device pour téléverser le programme Deux LED clignoteront alternativement Comment afficher la température en degrés Fahrenheit 5 8 Servo 1x carte micro bit 1x adaptateur pour platine d expérimentation micro bit 1x platine d expérimentation 1x mini servo 1x support de pile avec 2x pile AA de 1 5 V Dans l exemple ci dessous nous ferons tourner u...

Страница 73: ...ger et sauvegarder le fichier hex dans le dossier Downloads C downloads Ce fichier hex peut être téléversé vers le micro bit Connecter le micro bit à un port USB Glisser déposer le fichier hex sur le micro bit Removable device pour téléverser le programme Le servo tourne de 0 à 180 degrés Comment créer un thermomètre à cadran avec capteur de température et servo 5 9 Ronfleur 1x carte micro bit 1x ...

Страница 74: ...rrespondante Le son correspondant retentit 3 Régler la pause sur 100 ms 4 Procéder de la même manière pour le reste des tonalités et pauses 5 Une fois terminé compiler le programme pour générer un fichier hex Cliquer sur le bouton Download Télécharger et sauvegarder le fichier hex dans le dossier Downloads C downloads Ce fichier hex peut être téléversé vers le micro bit Connecter le micro bit à un...

Страница 75: ... N 1x mini moteur 1x support de pile avec 2x pile AA de 1 5 V Dans l exemple ci dessous nous utiliserons un interrupteur pour contrôler le démarrage et l arrêt du moteur Poser les composants requis sur la platine d expérimentation voir ill Regarder le code ci dessous 1 Glisser déposer les blocs pour former le code comme indiqué 2 Le bloc on start est exécuté une seule fois pour lancer le programme...

Страница 76: ...dans le dossier Downloads C downloads Ce fichier hex peut être téléversé vers le micro bit Connecter le micro bit à un port USB Glisser déposer le fichier hex sur le micro bit Removable device pour téléverser le programme Appuyer sur le commutateur pour faire tourner le moteur et relâcher pour l arrêter Comment utiliser un potentiomètre ajustable pour contrôler la vitesse du moteur Note La tension...

Страница 77: ...ssous 1 Glisser déposer les blocs pour former le code comme indiqué 2 Chercher et ajouter la bibliothèque NeoPixel Aller à Advanced Add Package Extensions et entrer NeoPixel Sélectionner la bibliothèque NeoPixel La bibliothèque est téléchargée et ajoutée au menu ...

Страница 78: ...époser le fichier hex sur le micro bit Removable device pour téléverser le programme Les LED créent un effet arc en ciel sur l anneau LED Comment faire clignoter l anneau comme un œil N employer cet appareil qu avec des accessoires d origine Velleman SA ne peut dans la mesure conforme au droit applicable être tenue responsable des dommages ou lésions directs ou indirects pouvant résulter de l util...

Страница 79: ...ositivo Nunca deje que los niños limpien o manipulen el aparato sin supervisión Utilice el aparato sólo en interiores No exponga este equipo a lluvia humedad ni a ningún tipo de salpicadura o goteo 3 Normas generales Véase la Garantía de servicio y calidad Velleman al final de este manual del usuario Familiarícese con el funcionamiento del aparato antes de utilizarlo Por razones de seguridad las m...

Страница 80: ...o En este manual del usuario utilizaremos un micro bit para hacer parpadear dos LEDs alternativamente Coloque los componentes necesarios en la placa de pruebas véase fig El programa lleva bloques de programación y se puede ejecutar en línea Introduzca en el navegador la dirección www makecode com o https www microsoft com en us makecode rtc 1 y haga clic en el icono de micro bit y luego en Start P...

Страница 81: ...orma intuitiva a través de un lenguaje de programación visual basado en bloques Todo se ejecuta desde la web es decir desde el navegador El editor lleva diferentes secciones Puede crear su código en el área de programación arrastrando los bloques desde el menú de bloques En el simulador micro bit podrá comprobar el funcionamiento del programa En la parte inferior puede descargar y almacenar el pro...

Страница 82: ...lización mediante bloques Ver el código escrito en JavaScript Sección de ayuda Sección de configuración Aquí es posible cambiar el nombre del proyecto y borrarlo Reset Restablecer con esta opción borrará todos los proyectos guardados Tenga cuidado La mayoría de las veces sólo necesitará la opción Delete Project Eliminar proyecto ...

Страница 83: ...itar 1 Seleccionar 3 Hacer clic para editar 2 Arrastrar Se puede ver la ejecución del programa en el simulador Say Hello El texto visualizado se llama string cadena Con la función show number mostrar número se visualizarán números enteros en la pantalla LED Con la función show leds mostrar LEDs se visualizará una imagen de 5x5 píxeles También puede iluminar un punto LED con coordenadas La Coordena...

Страница 84: ...eparará del primero micro bit Conecte la micro bit al ordenador con el cable micro USB Se ejecutará una secuencia por defecto Se le pedirá que pulse botones y juegue un juego Pruébelo Haga clic en Download Descargar para convertir su texto en un fichero hex y descargarlo No necesitará seguir el siguiente paso si Chrome está configurado correctamente Arrastre el fichero hex descargado en el lector ...

Страница 85: ...l 1 3 Coloque el bloque pause pausa en 500 ms 4 Coloque el valor para P0 en 1 LED0 encendido alta tensión 5 V digital 1 Coloque el valor para P1 en 0 LED1 apagado baja tensión 0 V digital 0 5 Coloque el bloque pause pausa en 500 ms 6 Luego compile el programa para generar un fichero hex Haga clic en el botón Download descargar y almacene el fichero hex file en la carpeta Downloads C Downloads Este...

Страница 86: ... para desactivar el LED Coloque los componentes necesarios en la placa de pruebas véase fig Crear el código 1 Arrastre y suelte los bloques como se indica en la figura El bloque digital read pin P0 lectura digital pin P0 y el bloque digital write pin P0 to 0 escritura digital pin P0 a 0 se sitúan en el menú bajo Advanced Avanzado Pins Pines El bloque forever para siempre y el bloque pause pausa ms...

Страница 87: ...0 escritura digital pin P0 en 1 activo alto 5 V Coloque digital write pinP1 escritura digital pin P1 en 0 activo bajo 0 V 7 Coloque el bloque pause pausa en 500 ms 8 Luego compile el programa para generar un fichero hex Haga clic en el botón Download descargar y almacene el fichero hex file en la carpeta Downloads C Downloads Este fichero hex está listo para su subida a la micro bit Conecte micro ...

Страница 88: ...r micro bit para placa de pruebas 1x placa de pruebas 1x potenciómetro de ajuste 10 kΩ Vamos a leer la tensión de salida del potenciómetro de ajuste y la visualizaremos con un diagrama de barras en la pantalla del micro bit Coloque los componentes necesarios en la placa de pruebas véase fig ...

Страница 89: ...uelte el fichero hex en la micro bit removable device para subir el programa Gire el potenciómetro de ajuste La tensión se visualizará con un diagrama de barras en la pantalla del micro bit Si la tensión es 0 la pantalla LED visualizará sólo un punto pixel Si la tensión es de 3 3 V la pantalla entera se iluminará Ahora cómo utilizaría el potenciómetro de ajuste para regular el brillo de los LEDs 5...

Страница 90: ...estos variables para almacenar los datos en el registro El bloque con el símbolo para indicar más pequeño que y el bloque if then else si entonces si nose sitúan en el menú bajo Logic Lógico El bloque con el signo de menos se sitúa en el menú bajo Math Matemática El bloque show icon mostrar ícono se sitúa en el menú bajo Basic Básico El bloque con el clear screen borrar la pantallase sitúa en el m...

Страница 91: ... al bloque if si y colóquelo sobre el bloque true verdadero Luego arrastre y suelte el variable PhoVal bajo Variables en el menú sobre el bloque del primer 0 del bloque con el símbolo para indicar más pequeño que Arrastre y suelte el bloque con el signo de menos sobre el segundo 0 del bloque con el símbolo para indicar más pequeño que Luego arrastre y suelte el variable CalVal de Variables en el m...

Страница 92: ...fichero hex en la micro bit removable device para subir el programa Observación Vuelva a la configuración de fábrica para calibrar el valor de referencia según el brillo actual Para ejecutar el programa de forma correcta inícielo con la luz encendida Si la luz está encendida no se visualizará nada en la pantalla Si la luz está apagada se visualizará un corazón en la pantalla Ahora cómo podemos uti...

Страница 93: ...l presionarse el botón A Coloque 3 bloques digital write pin P0 to 0 escritura digital pin P0 a 0 e introdúzcalos en el bloque on button A pressed al presionarse el botón A Seleccione el pin P0 en el primer bloque digital write pin P0 to 0 escritura digital pin P0 a 0 y coloque el valor en 1 LED rojo encendido Seleccione el pin P1 en el segundo bloque digital write pin P0 to 0 escritura digital pi...

Страница 94: ...ara subir el programa Pulse el botón A para encender el LED rojo Pulse botón B para encender el LED verde Pulse botón A y B simultáneamente para encender el LED azul Ahora cómo crearía una luz RGB suave y gradual 5 6 Interruptor de cierre automático 1x micro bit 1x conector micro bit para placa de pruebas 1x placa de pruebas 1x resistencia 100 Ω marrón negro marrón dorado 1x LED rojo polarización ...

Страница 95: ...desplegable Arrastre y suelte el bloque digital write pin P0 to 0 escritura digital pin P0 a 0 en el bloque on event from MICROBIT EVT FALL Coloque pin P0 en P2 y coloque 0 en 1 El bloque digital write pin P0 to 0 escritura digital pin P0 a 0 se sitúa en el menú bajo Advanced Avanzado Pins Pines 4 Repita estos pasos para el segundo bloque Sin embargo haga clic en la segunda flecha y seleccione la ...

Страница 96: ...elte los bloques como se indica en la figura El bloque set item to establecer item para se sitúa en el menú bajo Variables El bloque map from low from high to low to high mapear desde menor desde mayor a menor a mayor y el bloque analog read pin lectura analógica pin se sitúan en el menú bajo Pins Pines El bloque con el signo de menos y el bloque con el signo de división se sitúan en el menú bajo ...

Страница 97: ...e map from low from high to low to high mapear desde menor desde mayor a menor a mayor sobre el 0 junto al bloque set item to establecer item para Arrastre y suelte el bloque analog read pin lectura analógica pin junto al bloque map from low from high to low to high mapear desde menor desde mayor a menor a mayor y coloque el valor to high a mayor 4 a 3300 Ahora arrastre y suelte el bloque set item...

Страница 98: ... se almacenará en el variable tem Vamos a escribir el código con bloques Arrastre y suelte el bloque con el signo de división sobre el 0 del bloque set vol to establecer vol para Arrastre y suelte el bloque con el signo de menos sobre el primer 0 del bloque con el signo de división Ahora cambie el segundo variable vol en temy arrastre y suelte el variable vol sobre el primer 0 del signo de menos E...

Страница 99: ... Luego compile el programa para generar un fichero hex Haga clic en el botón Download descargar y almacene el fichero hex file en la carpeta Downloads C Downloads Este fichero hex está listo para su subida a la micro bit Conecte micro bit a un puerto USB Ahora arrastre y suelte el fichero hex en la micro bit removable device para subir el programa Los dos LEDs parpadearán alternativamente Ahora có...

Страница 100: ... bajo Advanced Avanzado Pins Pines El bloque forever para siempre y el bloque pause pausa ms 100 se sitúan en el menú bajo Basic Básico 2 Coloque P0 en P1 y coloque el valor en 0 3 Coloque el bloque pause pausa en 2000 ms 4 Coloque P0 en P1 Coloque el valor 0 en 180 5 Coloque el bloque pause pausa en 2000 ms 6 Luego compile el programa para generar un fichero hex Haga clic en el botón Download des...

Страница 101: ...uebas 1x mini altavoz 1x MOSFET de canal N 1x resistencia 100 Ω marrón negro marrón dorado Vamos a controlar un zumbador Coloque los componentes necesarios en la placa de pruebas véase fig Crear el código 1 Arrastre y suelte los bloques como se indica en la figura El bloque forever para siempre y el bloque pause pausa ms 100 se sitúan en el menú bajo Basic Básico El bloque ring tone Hz tono de tim...

Страница 102: ...to para su subida a la micro bit Conecte micro bit a un puerto USB Ahora arrastre y suelte el fichero hex en la micro bit removable device para subir el programa El zumbador emitirá una señal acústica Ahora cómo programaría su nana favorita 5 10 Motor 1x micro bit 1x conector micro bit para placa de pruebas 1x placa de pruebas 1x diodo 1x resistencia 100 Ω marrón negro marrón dorado 1x interruptor...

Страница 103: ... haber pulsado el botón coloque la tensión alta en P0 Coloque el valor 0 en 1 5 V El motor arranca 7 Después de haber soltado el botón coloque la tensión baja en P0 Coloque el valor en 0 El motor para 8 Luego compile el programa para generar un fichero hex Haga clic en el botón Download descargar y almacene el fichero hex file en la carpeta Downloads C Downloads Este fichero hex está listo para su...

Страница 104: ...lo LED RGB Vamos a controlar 8 LEDs RGB en un anillo y realizar un arco iris gradual Coloque los componentes necesarios en la placa de pruebas véase fig Crear el código 1 Arrastre y suelte los bloques como se indica en la figura 2 Busque y añada la biblioteca NeoPixel Seleccione Advanced Avanzado Extensions Extensionses e introduzca NeoPixel ...

Страница 105: ...eccione la bliblioteca NeoPixel La biblioteca está descargada y añadida al menú de bloques Los bloques NeoPixel at pin P0 with 24 leds item show rainbow from 1 to 360 item show y items rotate pixels by 1 se sitúan en el menú de bloques bajo NeoPixel ...

Страница 106: ...ichero hex en la micro bit removable device para subir el programa En el anillo LED se visualizará un arco iris que gira Ahora cómo crearía un ojo parpadeante con el anillo LED Utilice este aparato sólo con los accesorios originales Velleman NV no será responsable de daños ni lesiones causados por un uso indebido de este aparato Para más información sobre este producto y la versión más reciente de...

Страница 107: ...n Kinder sollten nicht mit dem Gerät spielen Beachten Sie dass Kinder das Gerät nicht reinigen oder bedienen Das Gerät eignet sich nur für die Anwendung im Innenbereich Schützen Sie das Gerät vor Regen und Feuchte Setzen Sie das Gerät keiner Flüssigkeit wie z B Tropf oder Spritzwasser aus 3 Allgemeine Richtlinien Siehe Velleman Service und Qualitätsgarantie am Ende dieser Bedienungsanleitung Nehme...

Страница 108: ...wechselnd blinken zu lassen Befestigen Sie die benötigten Komponenten an der Steckplatine siehe Abb Die Programmierumgebung MakeCode ist online verfügbar und bietet eine leicht verständliche Oberfläche die visuell unterstützte Blockprogrammierung verwendet Öffnen Sie in einem Browser die folgende URL www makecode com oder https www microsoft com en us makecode rtc 1 und klicken Sie auf die Ikone m...

Страница 109: ...llen Browsern Es wird nur einen Computer mit Internetverbindung benötigt Block Editor Um einen Code zu kreieren müssen Sie die Blöcke aus dem Blockmenü in der Mitte auf die Programmieroberfläche links ziehen Links oben gibt es den micro bit Simulator wo Sie sofort das Ergebnis sehen können Unten befindet sich den Button zum Herunterladen und Speichern des Projekts Der folgende Screenshot zeigt die...

Страница 110: ...Projekte einen Namen geben und löschen Reset mit dieser Option löschen Sie alle gespeicherten Projekte Seien Sie vorsichtig Sie benötigen meistens nur die Option Delete Project Projekt löschen Die LED Leiste Lassen wir einen Code schreiben Im Block Menü finden Sie alle zur Verfügung stehenden Blöcke Verschieben Sie den Block show string Zeige Zeichenfolge in die Programmieroberfläche und klicken S...

Страница 111: ...n Say Hello Der angezeigte Text nennt man string Zeichenfolge Mit der Funktion show number zeige Nummer werden Ganzzahlen im LED Bilschirm angezeigt Mit der Funktion show leds zeige LEDs wird ein Bild 5x5 Pixel angezeigt Sie können auch einen LED Punkt leuchten lassen indem Sie Koordinaten verwenden Die Koordinate 0 0 befindet sich links oben ...

Страница 112: ...n Block micro bit Verbinden Sie den micro bit über das mitgelieferte mit Micro USB Kabel Ihrem Rechner Standardmäßig wird eine Sequenz wiedergegeben Es wird Ihn gefragt Tasten zu drücken und ein Spiel zu spielen Versuchen Sie Klicken Sie auf Download Herunterladen um para convertir su texto en un fichero hex y descargarlo Sie benötigen den nächsten Schritt nicht wenn Chrome korrekt konfiguriert is...

Страница 113: ...Block pause pausiere auf 500 ms 4 Stellen Sie den Wert für P0 auf 1 LED0 ein hohe Spannung 5 V digital 1 Stellen Sie den Wert für P1 auf 0 LED1 aus niedrige Spannung 0 V digital 0 5 Stellen Sie den Block pause pausiere auf 500 ms 6 Kompilieren Sie das Programm und speichern Sie es als Hex Datei Klicken Sie danach auf Download Herunterladen und speichern Sie die hex Datei im Ordner Downloads C down...

Страница 114: ...efestigen Sie die benötigten Komponenten an der Steckplatine siehe Abb Einen Code erstellen 1 Verschieben Sie die Blöcke per Drag and Drop siehe Abb Den Block digital read pin P0 digitale Werte von Pin P0 und den Blockdigital write pin P0 schreibe digitalen Wert von Pin P0 auf 0 finden Sie im Blockmenü unter Advanced Fortgeschritten Pins Den Block forever dauerhaft und den Block pause pausiere ms ...

Страница 115: ...gitalen Wert von Pin P0 auf 1 aktiv hoch 5 V Stellen Sie digital write pin P1 schreibe digitalen Wert von Pin P1 auf 0 aktiv niedrig 0 V 7 Stellen Sie den Block pause pausiere auf 500 ms 8 Kompilieren Sie das Programm und speichern Sie es als Hex Datei Klicken Sie danach auf Download Herunterladen und speichern Sie die hex Datei im Ordner Downloads C downloads Diese hex Datei kann nun auf das micr...

Страница 116: ...cro bit Anschluss für Steckplatine 1x Steckplatine 1x 10 kΩ Trimmptentiometer Wir werden die Ausgangsspannung vom Trimmpotentiometer lesen und mit einem Säulendiagramm auf dem Bildschirm des micro bit anzeigen Befestigen Sie die benötigten Komponenten an der Steckplatine siehe Abb ...

Страница 117: ...ie die hex Datei nun per Drag and Drop in micro bit removable device um das Programm hochzuladen Drehen Sie das Trimmpotentiometer Die Spannung wird mit einem Säulendiagramm auf dem Bildschirm des micro bit angezeigt Ist die Spannung 0 dann zeigt das LED Display nur einen Pixelpunkt an Ist die Spannung 3 3 V dann leuchtet das ganze Display Wie werden Sie nun das Trimmpotentiometer verwenden um die...

Страница 118: ... Variablen später brauchen um die Daten in einem Register zu speichern Den Block mit dem Symbol für kleiner als und den Block if then else wenn dann ansonsten finden Sie im Blockmenü unter Logic Logik Den Block mit dem Minuszeichen finden Sie im Blockmenü unter Math Mathematik Den Block show icon zeige Symbol finden Sie im Blockmenü unter Basic Grundlagen Den Block clear screen Bildschirminhalt lö...

Страница 119: ...en dem Block if wenn und stellen Sie es über den Block true wahr Verschieben Sie nun die Variable PhoVal unter Variables Variablen im Blockmenü über die erste 0 vom Block mit dem Symbol für kleiner als Verschieben Sie den Block mit dem Minuszeichen per Drag and Drop über die zweite 0 vom Block mit dem Symbol für kleiner als Verschieben Sie danach die Variable CalVal unter Variables Variablen im Bl...

Страница 120: ...ie hex Datei nun per Drag and Drop in micro bit removable device um das Programm hochzuladen Bemerkung Setzen Sie den micro bit auf Werkseinstellungen zurück um den Referenzwert gemäß der aktuellen Helligkeit zu justieren Um das Programm korrekt laufen zu lassen müssen wir mit eingeschaltetem Licht starten Ist das Licht eingeschaltet dann wird sehen Sie nichts im Display Ist das Licht ausgeschalte...

Страница 121: ...opf A gedrückt Verschieben Sie drei Blöcke digital write pin P0 to 0 schreibe digitalen Wert von Pin P0 auf 0 per Drag und Drop in den Block on button A pressed wenn Knopf A gedrückt Wählen Sie Pin P0 im ersten Block digital write pin P0 to 0 schreibe digitalen Wert von Pin P0 auf 0 und stellen Sie ihn auf 1 rote LED ein Wählen Sie Pin P1 im zweiten Block digital write pin P0 to 0 schreibe digital...

Страница 122: ...vice um das Programm hochzuladen Drücken Sie Taste A um die rote LED einzuschalten Drücken Sie Taste B um die grüne LED einzuschalten Drücken Sie Taste A B um die blaue LED einzuschalten Wie werden Sie nun einen sanften Farbverlauf mit dem RGB LED kreieren 5 6 Selbstschließender Schalter 1x micro bit 1x micro bit Anschluss für Steckplatine 1x Steckplatine 1x Widerstand100 Ω braun schwarz braun ver...

Страница 123: ... den Block digital write pin P0 to 0 schreibe digitalen Wert von Pin P0 auf 0 per Drag and Drop in den Block on event from MICROBIT EVT FALL Stellen Sie Pin P0 auf P2 und stellen Sie 0 auf 1 Den Block digital write pin P0 to 0 schreibe digitalen Wert von Pin P0 auf 0 finden Sie im Blockmenü unter Advanced Fortgeschritten Pins 4 Wiederholen Sie diese Schritte für den zweiten Block Klicken Sie den z...

Страница 124: ...rop siehe Abb Den Block set item to ändere item auf finden Sie im Blockmenü unter Variables Variablen Den Block map from low from high to low to high verteile von niedrig von hoch bis niedrig bis hoch und den Block analog read pin analoge Werte von Pin finden Sie im Blockmenü unter Pins Den Block mit dem Minuszeichen und den Block mit dem Teilungszeichen finden Sie im Blockmenü unter Math Mathemat...

Страница 125: ...wählen Sie die Option vol mit dem Pfeil Verschieben Sie nun den Block map from low from high to low to high verteile von niedrig von hoch bis niedrig bis hoch per Drag and Drop über die 0 neben Block set item to ändere item auf Verschieben Sie nun den Block analog read pin analoge Werte von Pin per Drag and Drop neben Block map from low from high to low to high verteile von niedrig von hoch bis ni...

Страница 126: ...In dieser Formel ist die Ausgangsspannung die Variable vol wird mit TMP36 Sensor gemessen Das Formel Ergebnis wird in Variable tem gespeichert Wir werden nun den Code mit Blöcken schreiben Verschieben Sie den Block mit dem Teilungszeichen per Drag and Drop über die 0 vom Block set vol to ändere vol auf Verschieben Sie den Block mit dem Minuszeichen per Drag and Drop über die erste 0 vom Block mit ...

Страница 127: ...ariable tem per Drag and Drop über die 0 vom Block show number Zeige Nummer Sie haben den Code nun geschrieben 3 Kompilieren Sie das Programm und speichern Sie es als Hex Datei Klicken Sie danach auf Download Herunterladen und speichern Sie die hex Datei im Ordner Downloads C downloads Diese hex Datei kann nun auf das micro bit übertragen werden Verbinden Sie den micro bit mit einem USB Port Versc...

Страница 128: ... Blöcke per Drag and Drop siehe Abb Den Block digital write pin P0 to 180 finden Sie im Blockmenü unter Advanced Fortgeschritten Pins Den Block forever dauerhaft und den Block pause pausiere ms 100 finden Sie im Blockmenü unter Basic Grundlagen 2 Stellen Sie P0 auf P1 und stellen Sie den Wert auf 0 3 Stellen Sie den Block pause pausiere auf 2000 ms 4 Stellen Sie P0 auf P1 Stellen Sie die 0 auf 180...

Страница 129: ...omotor dreht nun von 0 bis 180 Wie möchten Sie nun einen Zeigerthermometer mit einem Temperatursensor und einen Servomotor kreieren 5 9 Summer 1x micro bit 1x micro bit Anschluss für Steckplatine 1x Steckplatine 1x Mini Lautsprecher 1x N Kanal MOSFET 1x Widerstand100 Ω braun schwarz braun vergoldet Wir werden einen Summer ansteuern Befestigen Sie die benötigten Komponenten an der Steckplatine sieh...

Страница 130: ...aviertaste Sie werden den entsprechenden Ton hören 3 Stellen Sie den Block pause pausiere auf 100 ms 4 Wiederholen Sie diese Schritte für die anderen Ringtöne und Pausen 5 Kompilieren Sie das Programm und speichern Sie es als Hex Datei Klicken Sie danach auf Download Herunterladen und speichern Sie die hex Datei im Ordner Downloads C downloads Diese hex Datei kann nun auf das micro bit übertragen ...

Страница 131: ...r mit 2x AA Batterie 1 5 V Wir werden einen Schalter verwenden um den Start und den Stopp eines Motors anzusteuern Befestigen Sie die benötigten Komponenten an der Steckplatine siehe Abb Einen Code erstellen 1 Verschieben Sie die Blöcke per Drag and Drop siehe Abb 2 Der Block on start beim Start wird nur einmal ausgeführt um das Programm zu starten 3 Stellen Sie P0 auf 0 4 Stellen Sie den Block se...

Страница 132: ...en Sie die niedrige Spannung auf P0 Stellen Sie den Wert auf 0 Der Motor hört auf zu drehen 8 Kompilieren Sie das Programm und speichern Sie es als Hex Datei Klicken Sie danach auf Download Herunterladen und speichern Sie die hex Datei im Ordner Downloads C downloads Diese hex Datei kann nun auf das micro bit übertragen werden Verbinden Sie den micro bit mit einem USB Port Verschieben Sie die hex ...

Страница 133: ... LEDs in einem Ring ansteuern und eine stufenweise Regenbogen kreieren Befestigen Sie die benötigten Komponenten an der Steckplatine siehe Abb Einen Code erstellen 1 Verschieben Sie die Blöcke per Drag and Drop siehe Abb 2 Suchen und fügen Sie die Bibliothek NeoPixel hinzu Wählen Sie Advanced Fortgeschritten Extensions Erweiterungen und geben Sie NeoPixel ein ...

Страница 134: ...anach die Bibliothek NeoPixel Die Bibliothek wird heruntergeladen und befindet sich nun im Blockmenü Die Blöcke NeoPixel at pin P0 with 24 leds item show rainbow from 1 to 360 item show und items rotate pixels by 1 finden Sie im Blockmenü unter NeoPixel ...

Страница 135: ...em USB Port Verschieben Sie die hex Datei nun per Drag and Drop in micro bit removable device um das Programm hochzuladen Sie werden nun einen drehenden Regenbogen am LED Ring sehen Wie werden Sie nun ein blinkendes Auge mit dem LED Ring kreieren Verwenden Sie dieses Gerät nur mit originellen Zubehörteilen Velleman NV übernimmt keine Haftung für Schaden oder Verletzungen bei falscher Anwendung die...

Страница 136: ... nie mogą używać urządzenia do zabawy Prace związane z czyszczeniem i konserwacją nie mogą być wykonywane przez dzieci pozostawione bez nadzoru Wyłącznie do użytku wewnątrz pomieszczeń Chronić uchwyt przed deszczem wilgocią rozpryskami i ściekającymi cieczami 3 Informacje ogólne Proszę zapoznać się z informacjami w części Usługi i gwarancja jakości Velleman na końcu niniejszej instrukcji Przed roz...

Страница 137: ...00 Ω brązowy czarny brązowy złoty Podczas tego kursu wykorzystamy micro bit aby dwie diody LED migały naprzemiennie Umieścić niezbędne elementy na płytce prototypowej jak pokazano Program jest napisany w blokach kodu online w przeglądarce internetowej Otworzyć stronę www makecode com lub https www microsoft com en us makecode rtc 1 kliknąć ikonę micro bit i kliknąć Start Project Blok kodu micro bi...

Страница 138: ...uść podobny do Scratch który pracuje online w przeglądarce Można zauważyć że edytor składa się z różnych sekcji Kod tworzy się w obszarze Code Area przeciągając bloki z szuflady kodów Code Drawer Można od razu zobaczyć wynik działania kodu w symulatorze micro bit simulator Na dole znajduje się miejsce pobrania i zapisania projektu Następnie przyjrzymy się dokładniej jak używać paska Options Bar do...

Страница 139: ...sienia przy zapoznawaniu się z działaniem różnych bloków i funkcji Skróty do zmiany właściwości projektu Tutaj można zmienić nazwę oraz usunąć projekt Reset kasuje wszystkie zapisane projekty dlatego należy zachować szczególną ostrożność Zazwyczaj najlepiej używać Delete Project Używanie paska LED Rozpoczniemy od napisania kodu Przy każdym kliknięciu szuflady kodów rozwinie się lista wszystkich do...

Страница 140: ...tlić dowolną liczbę całkowitą przy użyciu show number lub dowolny obraz 5x5 px przy użyciu show leds W tym samym czasie można również nanieść jeden punkt LED za pomocą współrzędnych Współrzędna 0 0 to lewy górny róg Łączenie bloków Kliknąć i przytrzymać blok który ma być połączony Przeciągnąć blok do bloku docelowego aż do momentu podświetlenia się bocznej części bloku docelowego Puścić dwa bloki ...

Страница 141: ...nąć bloki kodu i upuścić aby stworzyć kod jak pokazano Blok digital write pin P0 to 0 znajduje się w pozycji Advanced Pins w szufladzie kodów forever i pause ms 100 znajdują się w pozycji Basic w szufladzie kodów 2 Ustawić wartość P0 na 0 LED0 wył niskie napięcie 0 V cyfrowe 0 Ustawić wartość P1 na 1 LED1 wł wysokie napięcie 5 V cyfrowe 1 3 Ustawić przerwę pause na 500 ms 4 Ustawić wartość P0 na 1...

Страница 142: ...nia sekwencją migania diod LED Po naciśnięciu przycisku diody LED zaczną migać na przemian Puścić przycisk aby wyłączyć LED Umieścić niezbędne elementy na płytce prototypowej jak pokazano Spójrz na poniższy kod 1 Przeciągnąć bloki kodu i upuścić aby stworzyć kod jak pokazano Bloki digital read pin P0 i digital write pin P0 to 0 znajdują się w pozycji Advanced Pins w szufladzie kodów forever i paus...

Страница 143: ...ex Kliknąć przycisk download i zapisać plik hex w folderze pobierania C Pobrane Plik hex jest gotowy do załadowania na micro bit Podłączyć micro bit do portu USB Następnie przeciągnąć plik hex na urządzenie wymienne micro bit removable device aby załadować program Po naciśnięciu przycisku diody LED zaczną migać naprzemiennie W jaki sposób teraz włączyć czerwoną diodę LED naciskając przycisk a ziel...

Страница 144: ... Następnie przeciągnąć plik hex na urządzenie wymienne micro bit removable device aby załadować program Obrócić trymer Napięcie wyświetli się na ekranie micro bit w postaci wykresu słupkowego Jeśli napięcie jest równe 0 na ekranie LED ukaże się jedynie pojedynczy piksel Przy wartości równej 3 3 V podświetli się cały ekran W jaki sposób teraz użyć trymera aby wyregulować jasność LED 5 4 Fotokomórka...

Страница 145: ...zebne później w celu zapisania danych w rejestrze Bloki logic smaller than function oraz if then else znajdują się w pozycji Logic w szufladzie kodów Blok mathematical function minus można znaleźć w pozycji Math w szufladzie kodów Blok show icon znajduje się w pozycji Basic w szufladzie kodów Blok clear screen znajduje się w pozycji Basic More w szufladzie kodów Blok set item to 0 znajduje się w p...

Страница 146: ...tion Przeciągnąć blok mathematical function minus i upuścić na drugą wartość 0 bloku logic smaller than function Następnie przeciągnąć zmienną CalVal z Variables w szufladzie kodów i upuścić na pierwszą wartość 0 bloku mathematical function minus Ustawić drugą wartość 0 bloku mathematical function minus na 2 5 Przeciągnąć blok show icon i upuścić obok bloku then Przeciągnąć blok clear screen i upu...

Страница 147: ...ności Aby właściwie uruchomić program należy rozpocząć od włączenia oświetlenia Gdy oświetlenie jest włączone nic się nie wyświetli Gdy oświetlenie jest wyłączone wyświetli się serce W jaki sposób teraz można wykorzystać fotokomórkę do sterowania LED 5 5 LED RGB 1x płytka micro bit 1x adapter płytki prototypowej micro bit 1x płytka prototypowa 1x LED RGB wspólna katoda 3x 10 Ω rezystor brązowy cza...

Страница 148: ...i Pins w szufladzie kodów Wybrać opcję A w bloku on button A pressed Przeciągnąć 3 bloki digital write pin P0 to 0 i wstawić w blok on button A pressed Ustawić pin P0 w pierwszym bloku digital write pin P0 to 0 i zmienić wartość 0 na 1 czerwona dioda LED wł Ustawić pin P1 w drugim bloku digital write pin P0 to 0 i ustawić wartość na 0 zielona dioda LED wył Ustawić pin P2 w trzecim bloku digital wr...

Страница 149: ...rwoną diodę LED nacisnąć przycisk B aby zaświecić zieloną diodę LED nacisnąć jednocześnie przyciski A i B aby zaświecić niebieską diodę LED W jaki sposób stworzyć teraz łagodne gradientowe oświetlenie RGB 5 6 Przełącznik samo blokujący 1x płytka micro bit 1x adapter płytki prototypowej micro bit 1x płytka prototypowa 1x rezystor 100 Ω brązowy czarny brązowy złoty 1x czerwona dioda LED polaryzacja ...

Страница 150: ...upuścić w bloku zdarzeń Ustawić pin P0 na P2 i zmienić wartość 0 na 1 Blok digital write pin P0 to 0 znajduje się w pozycji Pins w szufladzie kodów 4 Wykonać te same kroki dla drugiego bloku zdarzeń Wtedy wystarczy kliknąć drugą strzałkę i wybrać opcję MICROBIT_PIN_EVENT_RISE w menu rozwijanym Ustawić również pin P0 na P2 bloku digital write pin P0 to 0 i ustawić wartość na 0 5 Po ukończeniu skomp...

Страница 151: ...ić niezbędne elementy na płytce prototypowej jak pokazano Spójrz na poniższy kod 1 Przeciągnąć bloki kodu i upuścić aby stworzyć kod jak pokazano Blok set item to znajduje się w pozycji Variables w szufladzie kodów Bloki map from low from high to low to high i analog read pin znajdują się w pozycji Pins w szufladzie kodów Funkcje matematyczne mathematical function minus i divide znajdują się w poz...

Страница 152: ...będą potrzebne później w celu zapisania danych w rejestrze Przeciągnąć i upuścić blok set item to w bloku forever i wybrać opcję vol przy użyciu strzałki Następnie przeciągnąć blokmap from low from high to low to high i upuścić na 0 obok bloku set item to Przeciągnąć i upuścić blok analog read pin obok bloku map from low from high to low to high i ustawić wartość to high w zakresie od 4 do 3300 Te...

Страница 153: ... mV 500 10 W tym wzorze napięcie wyjściowe jest zmienną vol zamierzoną przez czujnik TMP36 Wynik wzoru zostanie zapisany w formie zmiennej tem Napiszmy teraz wzór za pomocą bloków Przeciągnąć mathematical function divide i upuścić na wartości 0 bloku set vol to Przeciągnąć mathematical function minus i upuścić na pierwszej wartości 0 mathematical function divide Teraz ustawić drugą zmienną od vol ...

Страница 154: ... show number Właśnie napisałeś kod 3 Po ukończeniu skompilujemy program i wygenerujemy plik hex Kliknąć przycisk download i zapisać plik hex w folderze pobierania C Pobrane Plik hex jest gotowy do załadowania na micro bit Podłączyć micro bit do portu USB Następnie przeciągnąć plik hex na urządzenie wymienne micro bit removable device aby załadować program Zobaczysz teraz diody LED migające naprzem...

Страница 155: ...lok servo write pin P0 to 180 znajduje się w pozycji Pins w szufladzie kodów forever i pause ms 100 znajdują się w pozycji Basic w szufladzie kodów 2 Zmienić P0 na P1 i ustawić wartość 0 3 Ustawić przerwę pause na 2000 ms 4 Zmienić P0 na P1 Zmienić również wartość z 0 na 180 5 Ustawić przerwę pause na 2000 ms 6 Po ukończeniu skompilujemy program i wygenerujemy plik hex Kliknąć przycisk download i ...

Страница 156: ...j micro bit 1x płytka prototypowa 1x mini głośnik 1x N kanałowy MOSFET 1x rezystor 100 brązowy czarny brązowy złoty Teraz zajmiemy się uruchomieniem brzęczyka Umieścić niezbędne elementy na płytce prototypowej jak pokazano Spójrz na poniższy kod 1 Przeciągnąć bloki kodu i upuścić aby stworzyć kod jak pokazano forever i pause ms 100 znajdują się w pozycji Basic w szufladzie kodów Blok ring tone Hz ...

Страница 157: ...jest gotowy do załadowania na micro bit Podłączyć micro bit do portu USB Następnie przeciągnąć plik hex na urządzenie wymienne micro bit removable device aby załadować program Rozlegnie się dźwięk brzęczyka W jaki sposób zaprogramować teraz ulubioną wyliczankę 5 10 Silnik 1x płytka micro bit 1x adapter płytki prototypowej micro bit 1x płytka prototypowa 1x dioda 1x rezystor 100 brązowy czarny brąz...

Страница 158: ...ęcie na P0 Zmienić wartość 0 na 1 5 V Silnik zaczyna pracować 7 Po zwolnieniu przycisku ustawić niskie napięcie na P0 Ustawić wartość na 0 Silnik przestaje pracować 8 Po ukończeniu skompilujemy program i wygenerujemy plik hex Kliknąć przycisk download i zapisać plik hex w folderze pobierania C Pobrane Plik hex jest gotowy do załadowania na micro bit Podłączyć micro bit do portu USB Następnie przec...

Страница 159: ... 1x pierścień LED RGB Teraz zrobimy tęczę z ośmiu diod RGB ustawionych w pierścień Umieścić niezbędne elementy na płytce prototypowej jak pokazano Spójrz na poniższy kod 1 Przeciągnąć bloki kodu i upuścić aby stworzyć kod jak pokazano 2 Wyszukać i dodać bibliotekę NeoPixel Przejść do Advanced Add Package Extensions i wprowadzić NeoPixel ...

Страница 160: ... NeoPixel at pin P0 with 24 leds item show rainbow from 1 to 360 item show oraz items rotate pixels by 1 znajdują się w pozycji NeoPixel w szufladzie kodów 3 Przeciągnąć blok set strip to NeoPixel at pin P0 with 24 leds as RGB GRB format i upuścić w bloku on start Ustawić pin na P0 a wartość 24 zmienić na 8 8 diod LED w pierścieniu LED ...

Страница 161: ...ał jak oko Należy używać wyłącznie oryginalnych akcesoriów Firma Velleman nv nie ponosi odpowiedzialności za uszkodzenia lub urazy wynikające z niewłaściwego korzystania z niniejszego urządzenia Aby uzyskać więcej informacji dotyczących produktu oraz najnowszą wersję niniejszej instrukcji należy odwiedzić naszą stronę internetową www velleman eu Informacje zawarte w niniejszej instrukcji obsługi m...

Страница 162: ...utenção não devem ser feitas por crianças sem a devida supervisão Usar apenas em interiores Proteger o aparelho contra a chuva e humidade ou qualquer tipo de salpicos ou gotas 3 Normas gerais Consulte a Garantia de Serviço e Qualidade Velleman na parte final deste manual do utilizador Familiarize se com o funcionamento do aparelho antes de o utilizar Por razões de segurança estão proibidas quaisqu...

Страница 163: ...o preto castanho dourado Neste curso vamos utilizar o micro bit para fazer dois LEDs brilharem alternadamente Disponha os componentes necessários na placa de ensaio conforme indicado O programa é escrito em blocos de códigos online no navegador da web Aceda ao website www makecode com o https www microsoft com en us makecode rtc 1 clique no ícone micro bit e depois clique em Start Project O bloco ...

Страница 164: ...principiantes semelhante ao Scratch Funciona online no navegador Pode verificar que o editor é composto de diferentes seções Você cria o seu código na Code Area arrastando os blocos a partir do Code Drawer Pode ver o resultado de imediato no micro bit simulator Na parte inferior pode fazer o download e salvar o seu projeto Em seguida vamos ver mais em pormenor como pode usar a Options Bar para faz...

Страница 165: ...ão tem a certeza sobre como os vários blocos e funções funcionam Atalhos para alterar as propriedades do projeto Altere o nome e apague os seus projetos aqui Reset apaga todos os projetos que tenha guardado por isso seja muito cuidadoso Muitas vezes apenas procura a opção Delete Project Usar a Barra LED Começamos por escrever um código Sempre que seleciona a partir do Desenhador de Código serão ap...

Страница 166: ...ir um número inteiro no ecrã LED usando show number ou qualquer imagem de 5x5 pixeis usandoshow leds Também pode traçar um LED de ponto de cada vez usando coordenadas Coordenar 0 0 é o canto superior esquerdo Juntar Blocos Clique e segure o bloco que gostaria de juntar Arraste o bloco para o bloco alvo até que um dos lados do bloco alvo fique iluminado Liberte e agora os dois blocos já estão junto...

Страница 167: ...seu próprio dispositivo Dê uma olhadela no código abaixo 1 Arraste e largue os blocos de código para formar o código conforme indicado Pode encontrar o bloco de digital write pin P0 a 0 em Advanced Pins no Code Drawer Pode encontrar forever e pause ms 100 em Basic no Code Drawer 2 Defina o valor de P0 para 0 LED0 desligado baixa tensão 0 V digital 0 Defina o valor de P1 para 1 LED1 ligado alta ten...

Страница 168: ...Ω castanho preto castanho dourado 1x botão de pressão momentânea Usamos um botão para controlar o piscar do LED Pressione o botão para fazer o LED piscar por turnos Liberte o botão para desligar o LED Disponha os componentes necessários na placa de ensaio conforme indicado Dê uma olhadela no código abaixo 1 Arraste e largue os blocos de código para formar o código conforme indicado Pode encontrar ...

Страница 169: ...s 8 Quando terminado compilamos o programa e geramos o ficheiro hex Clique no botão de download e guarde o ficheiro hex na pasta Downloads C downloads Este ficheiro hex está pronto a ser carregado para o micro bit Ligue o micro bit a uma porta USB Em seguida arraste e largue o ficheiro hex no dispositivo amovível do micro bit para carregar o programa Pressione o botão e verá o LED piscar alternada...

Страница 170: ...t a uma porta USB Em seguida arraste e largue o ficheiro hex no dispositivo amovível do micro bit para carregar o programa Gire o trimmer A tensão será apresentada no ecrã do micro bit através de um gráfico de barras Quando a tensão é 0 o ecrã LED exibe apenas um ponto de pixel Quando é de 3 3 V todo o ecrã ficará iluminado E agora como usaria o trimmer para ajustar o brilho do LED 5 4 Fotocélula ...

Страница 171: ...r destas variáveis mais tarde para salvar os dados num registo Pode encontrar os blocos logic smaller than function eif then else em Logic no Code Drawer Pode encontrar o bloco da mathematical function minus em Math no Code Drawer Pode encontrar o bloco show icon em Basic no Code Drawer Pode encontrar o bloco clear screen em Basic More no Code Drawer Pode encontrar o bloco set item to 0 em Variabl...

Страница 172: ...han function Arraste o bloco mathematical function minus e largue a sobre o segundo 0 de logic smaller than function Em seguida arrastamos e largamos a variável CalVal a partir de Variables no Code Drawer e largamos em cima do primeiro 0 do bloco mathematical function minus Configure o segundo 0 do bloco de mathematical function minus para 2 5 Arraste e solte o bloco show icon para junto do bloco ...

Страница 173: ...ferência de acordo com o brilho atual Para executar o programa devidamente temos de iniciar com a luz ligada Quando a luz está ligada não aparece nada Quando a luz está desligada aparece o coração Agora como podemos usar a fotocélula para controlar um LED 5 5 LED RGB 1x placa micro bit 1x adaptador de placa de ensaio micro bit 1x placa de ensaio 1x LED RGB cátodo comum 3x resistor 10 Ω castanho pr...

Страница 174: ... Pins no Code Drawer Selecione a opção A no bloco do botão A pressionado Arraste 3 blocos digital write pin P0 to 0 i insira os no bloco on button A pressed Coloque o pino P0 no primeiro bloco digital write pin P0 to 0 e coloque o valor 0 em 1 LED vermelho ligado Coloque pino P1 no segundo bloco digital write pin P0 to 0 e coloque o valor em 0 LED verde desligado Coloque o pino P2 no terceiro bloc...

Страница 175: ... botão A para acender o LED vermelho pressione o botão B para acender o LED verde pressione os botão A e B em simultâneo para acender o LED azul Agora como criaria um luz RGB de gradiente suave 5 6 Interruptor de Travamento Automático 1x placa micro bit 1x adaptador placa de ensaio micro bit 1x placa de ensaio 1x resistor de 100 Ω castanho preto castanho dourado 1x LED vermelho polarização ânodo p...

Страница 176: ...to 0 no bloco de evento Defina P0 para P2 e o 0 para 1 Pode encontrar o bloco digital write pin P0 to 0 em Pins no Code Drawer 4 Faça o mesmo para o segundo bloco de eventos Em vez disso clique na segunda seta e selecione a opção MICROBIT_PIN_EVENT_RISE a partir do menu Do mesmo modo defina o pino P0 para P2 do bloco digital write pin P0 to 0 e defina o valor para 0 5 Quando terminado compilamos o...

Страница 177: ...cro bit 1x adaptador de placa de ensaio micro bit 1x placa de ensaio 1x sensor de temperatura TMP26 Vamos ler a temperatura ambiente dados do sensor de temperatura analógico e exibir os dados no micro bit Disponha os componentes necessários na placa de ensaio conforme indicado ...

Страница 178: ...rawer Pode encontrar o bloco show number em Basic no Code Drawer 2 Primeiro criamos duas variáveis Vá a Variáveis no Desenhador de Código e clique em Criar Variável Insira vol na janela e clique em Ok Insira tem na janela e clique em Ok Poderá ver as duas novas variáveis em Variables no Code Drawer Vamos precisar destas variáveis mais tarde para salvar os dados no registo Arraste e largue o bloco ...

Страница 179: ...é um valor de 8 bit de 0 1023 0 3 3 V e é mapeado a partir de um valor baixo 0 ou 0 V para um valor alto 3300 mV ou 3 3 V A tensão medida mV é guardada na variável vol Agora criamos uma fórmula para converter a tensão medida em temperatura 𝑇𝑒𝑚𝑝𝑒𝑟𝑎𝑡𝑢𝑟𝑒 𝐶 Output voltage mV 500 10 Nesta fórmula a tensão de saída é a variável vol medida através do sensor TMP36 O resultado da fórmula será guardado na v...

Страница 180: ... variável de vol para tem arraste e largue a variável vol para cima do primeiro 0 de mathematical function minus A variável vol pode ser encontrada em Variables no Code Drawer Defina o valor 0 de mathematical function minus para 500 Do mesmo modo defina o valor de mathematical function divide para 10 Arraste e largue o bloco show number sob o bloco set tem to ...

Страница 181: ... o micro bit a uma porta USB Em seguida arraste e largue o ficheiro hex no dispositivo amovível do micro bit para carregar o programa Verá as bolinhas LED piscarem alternadamente Agora como indicaria a temperatura em graus Fahrenheit 5 8 Servo 1x placa micro bit 1x adaptador placa de ensaio micro bit 1x placa de ensaio 1x mini servo 1x suporte com 2 pilhas AA de 1 5 V Vamos fazer um servo girar co...

Страница 182: ...lor para 0 3 Configure pause para 2000 ms 4 Coloque P0 em P1 Configure também o valor de 0 para 180 5 Configure pause para 2000 ms 6 Quando terminado compilamos o programa e geramos o ficheiro hex Clique no botão de download e guarde o ficheiro hex na pasta Downloads C downloads Este ficheiro hex está pronto a ser carregado para o micro bit Ligue o micro bit a uma porta USB Em seguida arraste e la...

Страница 183: ...om sensor de temperatura e servo 5 9 Campainha 1x placa micro bit 1x adaptador de palca de ensaio micro bit 1x placa de ensaio 1x mini coluna de som 1x MOSFET canal N 1x resistor de 100 Ω castanho preto castanho dourado Vamos agora controlar uma campainha Disponha os componentes necessários na placa de ensaio conforme indicado ...

Страница 184: ... correspondente Irá também ouvir o toque correspondente 3 Defina a pause para 100 ms 4 Proceda da mesma forma para o resto dos toques e pausas 5 Quando terminado compilamos o programa e geramos o ficheiro hex Clique no botão de download e guarde o ficheiro hex na pasta Downloads C downloads Este ficheiro hex está pronto a ser carregado para o micro bit Ligue o micro bit a uma porta USB Em seguida ...

Страница 185: ...1x mini motor 1x suporte de pilhas com 2 pilhas AA de 1 5 V Vamos usar um interruptor para controlar o arranque e paragem de um motor Disponha os componentes necessários na placa de ensaio conforme indicado Dê uma espreitadela ao código abaixo 1 Arraste e solte os blocos de código para formar o código conforme indicado 2 O bloco on start é executado apenas uma vez para iniciar o programa 3 Defina ...

Страница 186: ...e no botão de download e guarde o ficheiro hex na pasta Downloads C downloads Este ficheiro hex está pronto a ser carregado para o micro bit Ligue o micro bit a uma porta USB Em seguida arraste e largue o ficheiro hex no dispositivo amovível do micro bit para carregar o programa Pressione o interruptor para fazer funcionar o motor e liberte o para parar Agora como usaria um trimpot para controlar ...

Страница 187: ...rraste e solte os blocos de código para formar o código conforme indicado 2 Procure e adicione a biblioteca NeoPixel Vá para Advanced Add Package Extensions e digite NeoPixel Em seguida selecione a biblioteca NeoPixel Agora a biblioteca foi descarregada e adicionada ao Code Drawer ...

Страница 188: ...micro bit Ligue o micro bit a uma porta USB Em seguida arraste e largue o ficheiro hex no dispositivo amovível do micro bit para carregar o programa Podemos ver o arco íris girar no anel LED Agora como faria o anel piscar como se fosse um olho Utilize este aparelho apenas com acessórios originais A Velleman NV não será responsável por quaisquer danos ou lesões causados pelo uso indevido do aparelh...

Страница 189: ...s dispositions légales en vigueur dans l UE Afin de garantir la qualité nous soumettons régulièrement nos produits à des contrôles de qualité supplémentaires tant par notre propre service qualité que par un service qualité externe Dans le cas improbable d un défaut malgré toutes les précautions il est possible d invoquer notre garantie voir les conditions de garantie Conditions générales concernan...

Страница 190: ...tkowania np baterie ładowalne nieładowalne wbudowane lub wymienne żarówki paski napędowe gumowe elementy napędowe nieograniczona lista usterka wynika z działania pożaru zalania wszelkimi cieczami uderzenia pioruna upadku lub klęski żywiołowej itp usterka wynika z zaniedbań eksploatacyjnych tj umyślne bądź nieumyślne zaniechanie czyszczenia konserwacji wymiany materiałów ekspolatacyjnych niedbalstw...

Отзывы: