


MB02C
00 (27/11/2008)
4
Velleman
®
6.
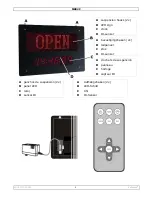
Operation
•
Mount the LED sign on a wall or ceiling using the suspension hooks [A] and. Note that a
mains outlet is required at ±1.5m distance.
•
Plug the DC plug of the included adaptor in the back of the LED sign (see illustration on
page 2 of this manual). Plug the power adaptor in the mains.
•
The clock lights up. If this is not the case, press the on/off button
on the remote
control. Aim the remote control at the front of the LED sign.
•
To display the OPEN message, press the ‘OPEN’ button
.
•
To display the CLOSED message, press the ‘CLOSED’ button
.
•
To hide the message, press the ‘HIDDEN’ button
.
•
The clock format is HH:MM:SS (24h format only).
•
To set the time, press the clock button
.
•
Use the left
or right
button to select the digit. Selected digit flashes.
•
Use the up
or down
button to change the digits value.
•
Press the ‘ENTER’ button
to save the set time and exit time set mode.
•
The time will be memorized when the LED sign is switched off or the power adaptor is
unplugged.
•
Note that the ‘USER’ button
has no functionality.
7.
Cleaning and storage
•
Wipe the exterior of the LED sign regularly with a moist, lint-free cloth. Do not use
abrasive solutions or solvents.
•
There are no user-serviceable parts. Contact your dealer for spare parts if necessary.
8.
Battery
LED sign
•
The LED-sign contains an internal battery CR2032 to maintain the clock in memory.
•
To replace the battery, switch the LED sign off and unplug the adaptor from the mains.
•
Loosen the 4 screws on the front of the LED sign and remove the cover.
•
Gently take the battery out of the battery holder and place a new Lithium CR2032 battery in
the holder with the correct polarity.
•
Place the cover back – verify that the clock and LED sign are fully visible – and screw the 4
screws back in place.
•
Note that when the LED sign is end-of-life, the battery must be removed from the device.
remote control
•
The remote control uses 1 battery type 3V lithium CR2025 battery (incl.)
•
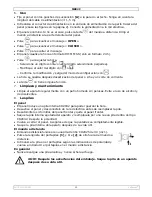
To (re)place the battery, press on the side of the battery cover [1] and
pull [2] to slide it open.
•
Insert the battery with the right polarity and close the battery
compartment by pushing it back into the housing of the remote control
until it snaps into place.
general
•
Do not recharge batteries and do not throw in fire as they may explode.
WARNING:
Handle Lithium batteries with care, keep batteries away from children.
All batteries MUST be removed when the device is end-of-life.
Dispose of batteries in accordance with local regulations.


