background image

10 

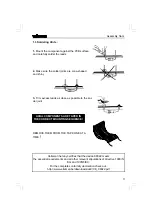
Adjustment & testing 

Inspect the complete assembly once more before applying 

power to the unit ! 

20.  Adjustment and testing 
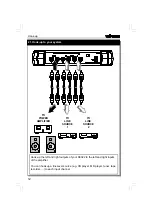
12VDC / 300mA 

An adaptor jack allows hook-up of a suitable 12VDC / 300mA wall adaptor. 
Make sure the input voltage matches your domestic AC voltage.  Mind the 
polarity ! 

Plug the adaptor into a wall outlet.  The left channel indicator lights and the 
volume control automatically turns to zero.  The ‘volume down’-led will also 
light until the volume control has reached it’s endpoint.  Press any button to 
stop this action. 

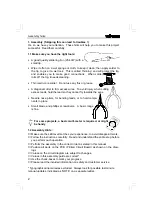
Now you can perform the adjustment of the RF receiver section.  Use the 
supplied plastic screwdriver to adjust the tuning coil L1.  Press and hold any 
button on the remote 
control and slowly adjust 
L1 until LD5 lights with 
maximum brightness.  
Next, call on some 
assistance and have 
somebody push the remote 
at a distance of a couple of 
meters/yards, while you 
slowly adjust L1 again for 
maximum brightness of 
LD5. 

Содержание High-Q Velleman-kit K8022

Страница 1: ...Range up to 15m yards depending on environment Manual operation possible Gold plated RCA connectors Relay controlled input section Totally passive Specifications Preamp Inputs 2 line level Outputs 1 l...

Страница 2: ...e eyes Needle nose pliers for bending leads or to hold compo nents in place Small blade and phillips screwdrivers A basic range is fine For some projects a basic multi meter is required or might be ha...

Страница 3: ...close as possible to the sol der joint REMOVE THEM FROM THE TAPE ONE AT A TIME Velleman hereby certifies that the device K8022 meets the essential requirements and all other relevant stipulations of...

Страница 4: ...do Oranssi Orange Orange Orange Orange Orange Orange Oranje 3 4 Giallo Amarelo Amarillo Keltainen Gul Gul Gul Gelb Yellow Jaune Geel 4 5 Verde Verde Verde Vihre Gr n Gr n Gr nn Gr n Green Vert Groen 5...

Страница 5: ...2 q R3 1K 1 0 2 q R4 1K 1 0 2 q R5 10K 1 0 3 q R6 10K 1 0 3 q R7 10K 1 0 3 q R8 10K 1 0 3 q R9 270 2 7 1 q R10 18K 1 8 3 q R11 33K 3 3 3 q R12 5K6 5 6 2 q R13 2K7 2 7 2 q R14 18K 1 8 3 q R15 6K8 6 8...

Страница 6: ...s C q T1 BC547C q T2 BC547C q T3 BC557C q T4 BC557C q T5 BF199 q T6 BC547C 8 Transistors q SW1 TS 04PV q SW2 TS 04PV 9 Push buttons Mount them straight against the PCB surface q SK1 DJ 005 10 Adaptor...

Страница 7: ...C7 1000 25V q C8 470 25V q C18 1 50V 14 Electrolytic capacitors Watch the polarity C q VR1 7809 q VR2 7806 15 Voltage regulators VR q RV1 16 Potentiometer Mount it straight and against the PCB Connect...

Страница 8: ...ring Last Solder the second connection q LD1 q LD2 q LD3 q LD4 q LD5 17 Mounting the LED s Check the polarity Short lead Cathode or IMPORTANT Mount these LED s exactly like in the drawing otherwise so...

Страница 9: ...C 12CE518 IC2 LM258 or eq 18 IC s Watch the position of the notch Make sure to remove the protective foil from the front and rear panel Stick the supplied rubber feet onto the bottom of the enclosure...

Страница 10: ...control automatically turns to zero The volume down led will also light until the volume control has reached it s endpoint Press any button to stop this action Now you can perform the adjustment of t...

Страница 11: ...Volume will now turn to zero Learning cycle is completed and the new code will be memorised Repeat this proce dure if code is not memorised correctly e g due to interference Code will be retained in...

Страница 12: ...Hook up the left and right outputs of your K8022 to the left and right inputs of the amplifier You can hook up a line level source e g CD player MD player tuner tape recorder to each input channel TO...

Страница 13: ...own is pressed on remote control Volume control Turn clockwise to increase volume Volume up indicator Lights when volume up is pressed on remote control 1 2 3 4 5 6 7 Remote control 1 2 Volume down pu...

Страница 14: ...annel indication will toggle briefly Press both remote buttons When learn cycle is completed volume will turn to 0 LD2 will turn on briefly to confirm Channel indication will toggle briefly to confirm...

Страница 15: ...GND R E LAY SW S K1 DCJAC K D1 1N4007 G ND C 1 1000 GND C 2 100n G ND I O GND VR1 UA7809 G ND C 3 100n G ND C 4 470 G ND C 5 100n G ND I O GND VR 2 UA7805 G ND C 6 100n G ND C 7 1000 G ND C8 470 GND D...

Страница 16: ...VELLEMAN COMPONENTS NV Legen Heirweg 33 9890 Gavere Belgium Europe Info support www velleman be Modifications and typographical errors reserved Velleman Components NV H8022IP 2002 ED2...

Отзывы: