background image

DVR4MQAEE_v5


VELLEMAN 

- 7 -


b.


Getting Started 


1.


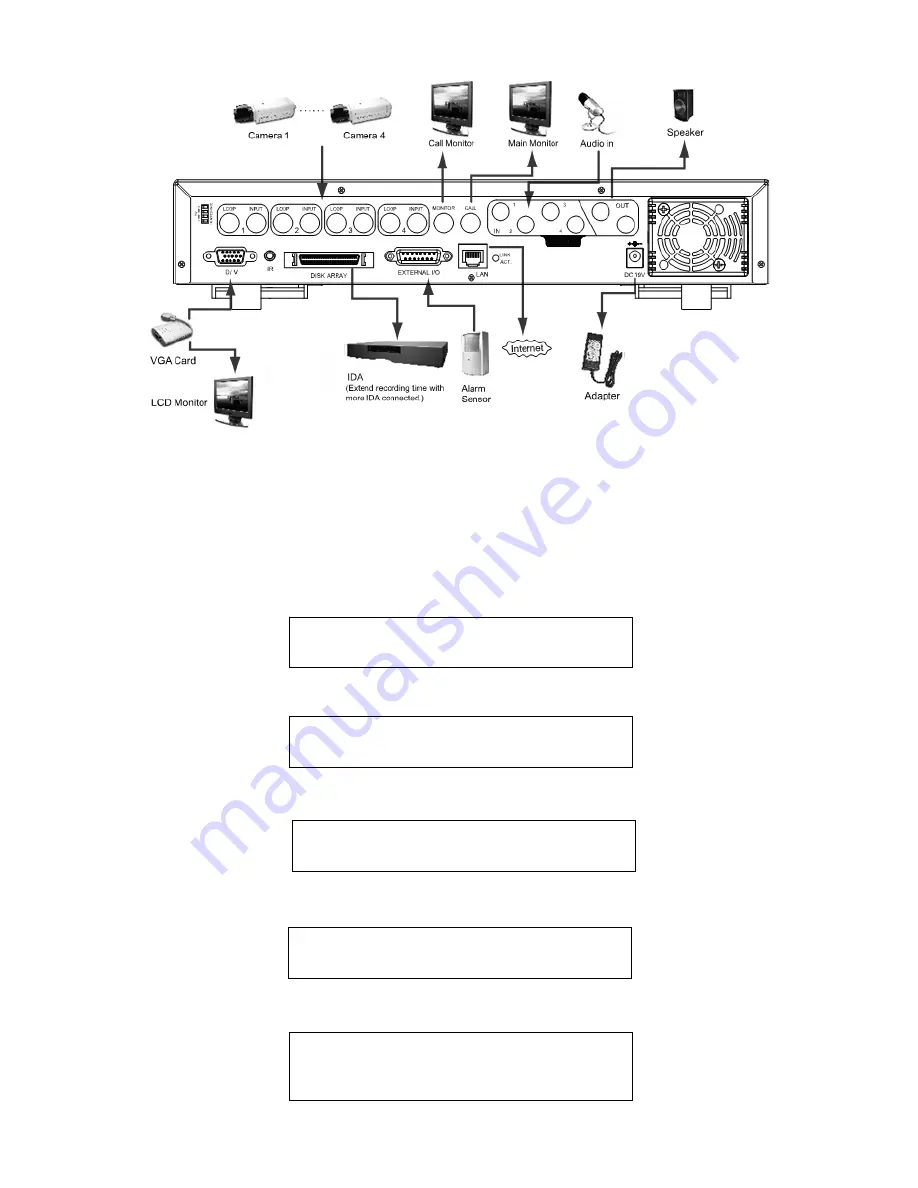
Before using the DVR, have the HDDs installed (refer to Appendix #1 for the installation of the HDDs). 

2.


Connect the AC power cord to the power adapter and plug into an electrical outlet. The standby LED light will turn 

to red. Press the POWER button. The power LED will be red. It takes approximately 10 to 15 seconds to boot the 

system. 

Hold the POWER button until the red POWER LED turns green. After some time the green turns red again. 

3.


Before operating the DVR, please set up the system time first (for setting system time, please refer to “

9.d. Date

” 

settings). 


SYSTEM INIT… 

1 2 3 4 

OK 

AUDIO 

OK 

AUDIO M 

OK 

DETECTING MASTER HDD 

OK 

DETECTING SLAVE HDD 

FAIL 

VERSION 1039-09-H6-04-AA-08 

SYSTEM NTSC 

- 783 - 

Содержание CCTVPROM4

Страница 1: ...DVR4MQAEE DIGITAL 4 CHANNEL MULTIPLEXER QUAD MPEG 4 RECORDER ETHERNET USER MANUAL ...

Страница 2: ...DVR4MQAEE_v5 VELLEMAN 2 ...

Страница 3: ...lity for any ensuing defects or problems 3 Features General o MPEG4 real time compression format o high resolution recording Frame 720 x 480 pixels 30 IPS NTSC 720 x 576 pixels 25 IPS PAL CIF 352 x 240 pixels 120 IPS NTSC 352 x 288 pixels 100 IPS PAL o 1 built in HDD base supporting 250GB more than 400GB o recording audio with 1 channel input and 1 channel output o image quality setting Best High ...

Страница 4: ... HDD capacity over 750GB HDD Quick Cleaning quickly clean up the index system of the recorded files 750GB under 2 secs Optional hard disks HD160GB HD250GB HD320GB recording mode manual timer motion alarm refresh rate 120 IPS for NTSC and 100 IPS for PAL multiplex operation pentaplex functions live display record playback backup and network audio I O 1 audio input 1 audio output mono motion detecti...

Страница 5: ...lected channel 2x digital zoom 8 Press to show the 4 channel display mode Press to change the setting in the menu 9 SEG Press SEQ to activate the call monitor function Press SEQ again to escape this mode Press to change the settings in the menu 10 POWER Turn the DVR4MQAEE on or off with this button In the recording mode stop the recording before switching off the device 11 CH1 CH2 CH3 CH4 Press on...

Страница 6: ... input will be recorded 6 AUDIO OUT Connect to the monitor or the speaker with 1 mono audio output 7 D V PORT Connect to a VGA card 8 EXTERNAL I O PORT Connect to an external device 9 LAN Connect to the internet by a LAN cable 10 LINK ACT LED Light When the internet is activated the LED will turn on 11 POWER Connect to the provided adapter 6 Installation and Connection a Connection Connect all the...

Страница 7: ... Press the POWER button The power LED will be red It takes approximately 10 to 15 seconds to boot the system Hold the POWER button until the red POWER LED turns green After some time the green turns red again 3 Before operating the DVR please set up the system time first for setting system time please refer to 9 d Date settings SYSTEM INIT 1 2 3 4 OK AUDIO OK AUDIO M OK DETECTING MASTER HDD OK DET...

Страница 8: ...flection 2 SS The sensitivity towards the size of the triggered object on the screen The smaller the value the more sensitive the detection will become Application Different size of the object on the screen 3 TS The sensitivity towards how long the object gets triggered The smaller the value the more sensitive the detection will become Application Different speed of the moving object 4 RE The valu...

Страница 9: ...DVR4MQAEE_v5 VELLEMAN 9 Pavement 5 2 2 10 Window 12 2 10 10 ...

Страница 10: ...nt recording and timer record If power is off accidentally recorded video files will still be stored in the HDDs The DVR will return to the original recording status after the power has been restored 1 MANUAL RECORDING continuous recording Recording is initiated by manually pressing the REC button indicated by 2 EVENT RECORDING triggered by motion or external alarm When this function is activated ...

Страница 11: ...de 4 CHANNEL SHIFT Display mode Press MODE button to display 4 channels Full Screen Switch Press or button to show the full screen channels Channel display switch Press SET to change channel display position Press to select the channel you would like to change Press or select the channel you would like show Press ENTER button to confirm Press MENU to quit 5 SLOW PLAYBACK Press SLOW button to get 1...

Страница 12: ...e event recording function When this function is activated the recording will be triggered by motion or external alarm 3 TIMER RECORD ENABLE Start stop the timer recording function 4 OVERWRITE Select to overwrite the previous recording video in the HDD When the HDD is full under O W recording mode previous recorded files will be overwritten without further warning notices 5 RECORD IMG SIZE There a...

Страница 13: ...Menu Options TIMER Move the cursor to TIMER and press ENTER The screen will show the following options 1 DATE A scheduled record date SUN MON TUE WED THU FRI SAT MON FRI SAT SUN DAILY OFF can be set to activate the timer recording NOTE 1 Specific date can be changed with the or buttons NOTE 2 If you plan to set the timer recording across midnight there are two ways for setting the timer recording ...

Страница 14: ...iod ON OFF Daylight saving time can be adjusted manually Enter the daylight saving menu mode to set start time end time and to adjust the hour of the daylight saving NOTE Press button to do the selections e Main Menu Options ADVANCE Move the cursor to the ADVANCE and press ENTER The screen will show the following options MENU RECORD TIMER DATE ADVANCE DATE DATE 2006 FEB 08 13 55 22 FORMAT Y M D DA...

Страница 15: ...d function 5 PRE NEXT Select PRE to go to the previous page Select NEXT to go the next page NOTE TITLE 6 characters letters or symbols BRIG from 0 255 the default value is 110 CONT from 0 255 the default value is 128 SATU from 0 255 the default value is 128 HUE from 0 255 the default value is 128 CONV YES or NO REC YES or NO g Advance Menu DETECTION Move the cursor to DETECTION and press ENTER The...

Страница 16: ...g is 00 and the lowest sensitivity setting is 15 The default setting is 03 NOTE The default setting of Spatial Sensitivity is 03 This means that when 3 grids are detected for motion at one time the system will get triggered The value of Spatial Sensitivity must be less than the number of grids which you set up to motion detection area 6 TS The sensitivity towards how long the object gets triggered...

Страница 17: ...he colour of video loss screen Blue or Black 5 PLAYBACK INFO Set the position where playback information will be indicated centre or normal on the button of left hand side of the screen 6 DWELL DURATION SEC Set the duration time of each channel for CALL MONITOR 2 4 8 16 sec 7 DE INTERLACE Set the DE INTERLACE function on off 8 WATERMARK This function stays always ON DISPLAY TITLE DISPLAY ON DATE D...

Страница 18: ... NEARLYFULL GB If HDD buzzer is on you can choose to have a buzzer notification when the HDD available capacity has only xxx GB left 9 ALARM DURATION SEC Press ENTER or or button to set the duration time of alarm recording 5 10 20 40 sec 10 PRE ALARM Set the pre alarm function on 8MB off When pre alarm and event record functions are activated the DVR will record 8MB file before alarm motion trigge...

Страница 19: ...tion you can press or to select the MASTER HDD SLAVE HDD or DISK ARRAY which you plan to clear 7 UPGRADE Press ENTER and select YES to confirm upgrade or NO to cancel 8 AUTO KEYLOCK Set the auto key lock function Never 10 sec 30 sec 60 sec 9 LANGUAGE English only 10 VERSION The firmware version information will be shown on the screen 11 VIDEO FORMAT The information of the DVR s video format will b...

Страница 20: ...name to correspond to dynamic IP address For detailed DDNS setting refer to 10 f Licensed Software AP DDNS l Advance Menu HDD INFO You can get all the capacity information of the connected HDD m Advance Menu EVENT LOG You can get all the information event type time and channel of the event list including video loss list net list other lists such as power on off key unlock reset to default Select t...

Страница 21: ...DVR4MQAEE_v5 VELLEMAN 21 4 CLEAR ALL Clear all the event log lists ...

Страница 22: ... hour 5 ALARM LIST List of alarm triggered recorded files 6 MOTION LIST List of motion triggered recorded files 7 TIME SEARCH Search by specific time period YEAR MONTH DAY HOUR MIN NOTE Move the cursor to the specific recorded file and press ENTER to play the video and press stop button to return the live display b 2x Digital Zoom Press the ZOOM button on the front panel of the DVR to enlarge the ...

Страница 23: ...he PC and DVR under the same domain 3 Click twice to enter login page Key in 192 168 1 10 admin admin into the login page After connecting the DVR with local LAN modify the network setting in the DVR or in the system configuration of the licensed software AP 4 Network Type Static IP Set the network information in the DVR menu see 9 l Advance Menu_Network Network Type Dynamic IP DHCP and PPPoE Set ...

Страница 24: ...o have a snapshot of the image which will be saved in the designated destination g Record press this button The video web server will start to record Press this button again to stop the recording The recorded files will be saved onto the PC Each recorded file can contain up to 18 000 frames When the recorded file capacity is full the new recorded file will be saved to the second file If the HDD sp...

Страница 25: ...how Press Enter button to confirm s Sequence press this button to enter the call monitor function and press again to exit from call monitor mode t Enter u PTZ Control Off On PTZ channel onto which the camera is connected When you turn the PTZ control on select the PTZ device and press OK button to enter the PTZ control AP screen press ESC to exit from PTZ control AP screen and back to DVR control ...

Страница 26: ...DVR4MQAEE_v5 VELLEMAN 26 ...

Страница 27: ...t right one mouse click will function as if you click 3 times 8 Playback Operation A Playback Information Information display such as Date Time Resolution Rewind Forward Speed Status and Functions etc B Time Progress Bar Show the playback progress status C Functions De interlace Reduce the vibration of the paused picture De blocking Reduce the video mosaic phenomenon OSD Display the OSD of the AP ...

Страница 28: ... ADVANCED SETTING Press the System Config button to enter the system setting page NETWORK The network configuration allows the DVR to connect to an Ethernet network or dial up 1 Static IP Enter the server IP gateway net mask and web port and press APPLY to confirm 2 PPPoE Enter the username and password provided by your ISP Internet Sever supplier and press APPLY to confirm 3 DHCP This DHCP functi...

Страница 29: ...in the password column Enter the Hostname in the Domain column Choose the DDNS system name After setting press APPLY to confirm DDNS APPLY EXAMPLE Go to a website providing free DDNS services Example http www dyndns org Create an account in DynDNS After having created your account you will receive a confirmation email within a few minutes To complete registration follow the instructions received C...

Страница 30: ...equires to verify the password Enter the user name and password 5 After setting press APPLY to confirm FTP Press the button to enter the system setting page 1 When alarm or motion is triggered a video copy file can be captured The DVR can upload the captured images to the assigned FTP site 2 Enter the detailed FTP information NOTE To activate the FTP notification function enable the function of th...

Страница 31: ...it to enter the motion detection sensitivity and area setting box 2 Motion Detection Sensitivity Set the detection sensitivity in 4 different adjustable factors LS The sensitivity of comparing two different images The smaller the value the higher sensitivity for motion detection SS The sensitivity towards the size of the triggered object on the screen the number of motion detection grids The small...

Страница 32: ...ion function When the motion is triggered the icon will appear on the screen The software AP will start recording automatically NETWORK BACKUP Press the button to enter the system setting page 1 Backup the recorded files to the PC from DVR via network 2 Enter the backup information Press Start Success Convert Play File 1 Playback Information 2 Time Progress Bar 3 Functions 1 De interlace 2 De bloc...

Страница 33: ...JPEG pictures will be made at your designated space set in File Path plus an email containing the MJPEG pictures 1 10 pictures will be sent to the address which is set under Mail FTP Notification MJPEG pictures will be made at your designated space set in File Path plus an FTP file containing the MJPEG pictures 1 10 pictures will be sent to the address which is set under FTP ALARM LIST Press the b...

Страница 34: ... clicking 5 times 3 Max Log List Set the maximum number of log list 4 Server Log Press Server Log button to enter the server log list window ACCOUNT 1 Set up the user s account max 5 accounts password life time and authority level max 5 users on line at the same time 2 User s level SUPERVISOR Control all the functions a b c d e and f HIGH Control only a b c d and e functions but cannot control f f...

Страница 35: ... default alarm audio sound is alarm wav You can have your own alarm sound file by entering the file path f AP Connection Via AP Browser The DVR can be viewed over the network with a web browser This function is suitable in both Windows 2000 and Windows XP Step 1 Type IP address into the URL address box and press ENTER NOTE If the TCP port number is not 80 see the example below IP address 192 168 1...

Страница 36: ...ement Step 4 Choose Windows Offline Installation or Windows Online Installation Step 5 Take Windows Offline Installation as an example Save the setup file jre 1_5_0_04 windows i586 p on the desktop of PC Click twice on the jre 1_5_0_04 windows i586 p to setup Download JRE 5 0 Update 4 Accept license agreement Windows Offline Installation Windows Online Installation ...

Страница 37: ...1 Troubleshooting PROBLEM SOLUTION No power Check the power cord Check the mains Not working when pressing any button Check if the device is under KEY LOCK mode Press any key and key in the password to exit the KEY LOCK mode No recorded video Check the connection TIMER RECORD is not working Check if the RECORD mode is enabled No live video Check the camera and monitor video cables and connections ...

Страница 38: ...back and lift it refer to figure 5 and 4 Step 2 Remove the HDD bracket by releasing the 4 screws Step 3 Get a suitable IDE HDD and set the HDD mode to master Note that an adapter is available not incl to enable the use of SATA disks with this DVR reference DVR SATA Step 4 Mount the HDD into the HDD cartridge Screw the HDD to the cartridge using 2 screws on each side refer to figure 1 and 2 Step 5 ...

Страница 39: ...d connects with NO PIN 8 EXTERNAL ALARM NO Under normal operation the COM disconnects from NO When the alarm is triggered the COM connects with NO PIN 9 GND Signal GND PIN 10 RS485 B The DVR can be remotely controlled by an external device or control system such as a control keyboard using RS485 serial communication signals PIN 11 RS485 A The DVR can be remotely controlled by an external device or...

Страница 40: ...ME BEST 30 127 78 5 3 15 236 11 9 8 7 511 11 21 3 3 980 65 40 9 HIGH 30 159 72 6 7 15 305 55 12 7 7 633 89 26 4 3 1209 72 50 4 NORMAL 30 179 17 7 5 15 352 78 14 7 7 626 11 28 6 3 1263 88 52 7 BASIC 30 222 22 9 3 15 405 56 16 9 7 927 78 38 7 3 1637 5 68 2 CIF BEST 120 763 89 31 8 60 1416 67 59 30 2156 94 89 9 15 4134 72 172 3 HIGH 120 965 28 40 2 60 1655 55 69 30 3398 61 141 6 15 4833 31 201 4 NORM...

Страница 41: ...10 160GB 7200 rpm Maxtor DiamondMax 10 200GB 7200 rpm Seagate Barracuda ATA IV ST380021A 80GB 7200 rpm Seagate Barracuda ATA V ST3120023A 120GB 7200 rpm Seagate Barracuda 7200 7 Plus ST3160023A 160GB 7200 rpm Seagate Barracuda 7200 8 ST3200826A 200GB 7200 rpm Seagate Barracuda 7200 8 ST3250826A 250GB 7200 rpm Western Digital Caviar WD1200BB 00CAA1 120GB 7200 rpm Western Digital Caviar WD2000BB 00D...

Отзывы: