Veigel eSlider Скачать руководство пользователя страница 8

2-2

Safety information

•  The red markings indicate the risk of injury when moving the 

eSlider

.

•  It is not permitted to operate the eSlider while driving.
•  On the whole, private individuals are not permitted to store airbags.

Foreseeable misuse

Содержание eSlider

Страница 1: ...Installation and Operating Instructions eSlider Electrical 8 way transfer seat console Left hand drive Art no S10003 Right hand drive Art no S10005 www veigel automotive de Rehamotive...

Страница 2: ...0 Created 2021 10 04 Name Schulz Revised 2022 01 26 Version 2 Subject to technical modifications without prior notification and to errors Reproduction even in part only permitted with permission from...

Страница 3: ...tivating the memory function 4 3 Operating the memory function 4 4 Using the memory function 4 5 Linear unit emergency release mechanism 4 6 Assembly 5 1 Safety information 5 1 Tightening torques 5 1...

Страница 4: ...1 2 Contents Revision history Edition Revisions Chapter 01 2021 10 04 Initial version 02 2014 03 26 Tilt graphic updated 3 7...

Страница 5: ...following symbols are used in these operating instructions Individual images contained in these instructions may deviate from the driving aid you received This symbol refers to information that if not...

Страница 6: ...1 4 Contents Blank page for your notes...

Страница 7: ...used with the eSlider Structural modifications to the eSlider may only be performed following con sultation with the manufacturer Comply with the operating instructions when using and operating the eS...

Страница 8: ...tion The red markings indicate the risk of injury when moving the eSlider It is not permitted to operate the eSlider while driving On the whole private individuals are not permitted to store airbags F...

Страница 9: ...and vice versa All the different directions of the eSlider can be programmed and operated with just one lever This facilitates the daily routine and can be easily operated even by users with limited h...

Страница 10: ...elivery 8 way eSlider Seat attach ment to lift unit Lift unit Linear unit Footrest Swivel unit Seat at tachment to vehicle Lift unit trim panel Linear unit front trim panel Lift unit trim panel Linear...

Страница 11: ...3 3 Product description Scope of delivery VEC control unit eSlider Clamp 30 Ground CAN high CAN low CAN BUS vehicle side...

Страница 12: ...3 4 Product description Structure of the 8 way eSlider Lift unit Swivel unit Linear unit...

Страница 13: ...3 5 Product description Movement range of lift and linear unit 235 mm 677 mm 1292 mm 354 mm Movement range of linear unit 615 mm 207 mm 310 mm Movement range of linear unit 119 mm...

Страница 14: ...3 6 Product description Swivel range 120 swivel position Drive position of Swivel unit...

Страница 15: ...3 7 Product description Tilt seat Front tilt seat Rear tilt seat 10 10...

Страница 16: ...3 8 Product description...

Страница 17: ...been produced with care Observe the information given above to make sure your eSlider keeps working properly for a long time to come Before setting off Keep the type approval the installation and ope...

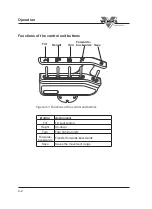
Страница 18: ...Save Functions of the control unit buttons Figure 4 1 Functions of the control unit buttons Button Assignment Tilt Tilt seat setting Height Up down Turn Turn right turn left Forwards backwards Transfe...

Страница 19: ...tion is activated and the eSlider stops automatically Move the eSlider s swivel unit by hand to the drive position until the power off function is activated and the eSlider stops automatically Move th...

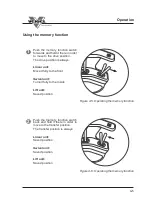
Страница 20: ...ress the switch briefly in order to save the position Figure 4 3 Saving the drive position Figure 4 4 Saving the transfer position Saving the drive position Saving the transfer position Move the eSlid...

Страница 21: ...in order to move to the drive position The drive position is always Linear unit Moved fully to the front Swivel unit Turned fully to the inside Lift unit Saved position Push the memory function switch...

Страница 22: ...ase mechanism art no S10003 Pull on the strap and pull out the button Keep hold of the button and press it until you reach the desired po sition Once you have finished using the emergency release mech...

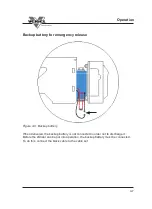
Страница 23: ...lease When delivered the backup battery is not connected in order not to discharge it Before the eSlider can be put into operation the backup battery must be connected To do this connect the black cab...

Страница 24: ...en you hand over the vehicle Observe the applicable accident prevention and safety provisions when install ing and maintaining the eSlider Only accessories obtained from us may be used with the eSlide...

Страница 25: ...nto the vehicle See the Figure for examples of these installation kits The installation kits are the inter face between the eSlider and the vehicle floor The points on the vehicle floor where the orig...

Страница 26: ...AN high CAN low CAN BUS vehicle side Seat attachment Unscrew all 4 screws on the trim panel of the linear unit Completely remove the trim panel Connect the control unit in accordance with the assembly...

Страница 27: ...y Overview of plug connections on the VEC control unit eSlider M1 M2 X7 X9 X11 X17 M3 X12 X14 X1 X2 X3 X4 X5 M4 M5 X6 X18 X15 X8 X10 X16 M1 M2 M3 X12 X14 X7 X9 X11 X17 M4 X6 X8 X10 X16 X2 X4 X5 X15 M5...

Страница 28: ...trol unit Assemble the control unit on the lift unit Use the relevant drill hole pattern depending on the position of the control unit For this purpose use the attachment set provided The hexagon nuts...

Страница 29: ...he control unit If all the control unit buttons are to be used we recommend a horizontal positioning of the control unit If only the control unit s memory function is to be used we recommend positioni...

Страница 30: ...one properly against the installation record Above all check the function of the eSlider see the Operation chapter Swivel positions eSlider must turn in such a way that it does not knock into anything...

Страница 31: ...nance care Action Parts These jobs can also be integrated into the vehicle customer service Adjust and tighten All screw connections All bearings Check for play and clearance Lubricate Arrange for fun...

Страница 32: ...6 2 Maintenance and care Lubrication points Only use Autol TOP 2000 Longtine grease...

Страница 33: ...6 3 Maintenance and care Only use Autol TOP 2000 Longtine grease Lubrication points...

Страница 34: ...ion bins in Germany In case of uncertainty please contact your county waste consultancy department Transport and storage Transport and storage are only permitted in the original packaging or other app...

Страница 35: ...led Do the indicator lights for the lat eral airbag go out Is there room to move freely at the door sill Trim panels have been installed where possible Is there sufficient room to move freely at the c...

Страница 36: ...FOR EVERY VEHICLE A SOLUTION Veigel GmbH Co KG Verrenberger Weg 36 74613 hringen Germany phone 49 0 7941 60585 0 fax 49 0 7941 60585 20 info veigel automotive de www veigel automotive de...

Отзывы: