


"RA10/4LV"
Recessed Axial Fan
Installation Instructions
IP57
ii
Fit internal clamp section 'd' over the fan spigot 'D' on the fan body, pushing this to
the rear part of 'B' of the fan, ensuring that the cable entry hole lines up with the knockout on
the fan body.
iii
Offer up this assembly to the hole in the glass from the inside of the room, ensuring that the
fixing clip for the front cover is in the 6 o'clock position.
iv
Slide the external clamp section 'c' over the fan spigot from the outside of the room and push
gently up to the glass, ensuring that the small fixing screw is on the lower side.
v
Screw the locking ring 'b' onto the fan spigot 'D' and tighten until the assembly is secure
against the window.
Do not over-tighten.
vi
Finally attach the external grille 'a' and secure with the small screw.
Note:
the internal clamp plate 'd' has 6 optional cable entry points. You should cut out the one you
wish to use before assembling the window kit.
Important:
if the fan is to be installed into double glazing the hole must be cut and sealed by the man-
ufacturer.
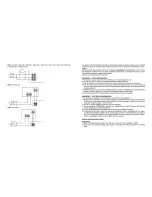
WIRING INSTRUCTIONS
1.
Ensure the mains electrical
supply is switched off during the
installation of the fixed wiring
spur.
2.
The fan must be connected
to a single phase mains power
supply network of the voltage
and frequency indicated on the
rating label.
3.
Loosen the screw (2) until
the cover (3) is free and connect
as shown in the Wiring Diagram.
4.
Replace cover (3) and front
cover (A).
CLEANING & MAINTENANCE
1. Disconnect mains electrical supply by means of double pole switch.
2. Remove front grille (A) as described above and wash with mild detergent.
3. To clean the inner part of the fan, use a soft brush taking care not to cause any damage or disturb
the electrical wiring.
Vectaire Ltd
Lincoln Road, Cressex Business Park, High Wycombe, Bucks, HP12 3RH, UK
Tel. +44 (0) 1494 522333 - Fax +44 (0) 1494 522337
RA10/4LV+DRHLV/Aug06 - E&O.E