Vdwall LVP909 Series Скачать руководство пользователя страница 3

1.2.


after  connecting    input  video  source,  you  need  LVP909  outputs  which  one 

press relative  signal  button, for  example we  need  HDMI  output,  press  HDMI 

button  LVP909  outputs  HDMI  video  source,  of  course  you  have  connected 

HDMI source to the input port;   


2.


Output channel selection buttons   


2.1.


LVP909 has 4 output ports

 Out1    Out2    Out3    Out4

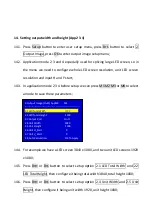
, when configure output 

port parameters in user menu press relative button to select output port then 

configure it; 

2.2.


LVP909  has  4  image  layers  (

which  in  application  mode  5  6  is  available

)  the 

image  layer  buttons  are  IMG1    IMAG2    IMAG  3    IMG4,  when  configure 

Содержание LVP909 Series

Страница 1: ...on instruction Contents 1 Signalswitch buttons 2 Outputchannelselection buttons 3 User setup buttons 4 Function buttons 5 Power switch and socket 6 Softwarecontrolport 7 Outputports 8 Inputports 9 Sen...

Страница 2: ...ration 13 Setting outputwidth and height App 1 14 Setting outputwidth and height App 2 3 4 15 Setting outputwidth and height App 5 6 16 Configuring inputsourcefor App5 6 17 Setting PIP POP 1 Signal sw...

Страница 3: ...course you have connected HDMI sourceto the input port 2 Output channel selectionbuttons 2 1 LVP909 has 4 output ports Out1 Out2 Out3 Out4 when configure output port parameters in user menu press rela...

Страница 4: ...ange or increase and decreaseparameter value 3 2 Brt after entering user setup menu press it to select next setup option when not in setup configuration statepress it to increase brightness 3 3 Brt af...

Страница 5: ...h 4 2 M1 M2 M3 M4 memory buttons LVP909 can save 4 modes in advanced when in application mode 1 save 4 mode for PIP when in another mode can save 4 modes for output port parameters 4 3 Take quick swit...

Страница 6: ...o on LED screen not in the correct location and has some display problem press the button to adjustVGA input sourcelet it OK 4 6 Lock press the button to open lock function after opening all the butto...

Страница 7: ...port on PC for example we connect control cable to PC s COM1 port in controlsoftwareyou mustselect COM1 port 6 3 Wifi antenna LVP909F has Wifi control function first install APP on mobile phone then...

Страница 8: ...at so you can use DVI to VGA cable to connect the port to a monitor with VGA input port 8 Input ports 8 1 LVP909 has 6 channels of input port SDI DVI HDMI VGA V1 V2 connect relative format video sourc...

Страница 9: ...n you can see the interfaceas below 10 2 Press Setup button to enter user setup menu press Brt button to select 6 language press OK to enter languagesetup menu 10 3 After entering language setup menu...

Страница 10: ...menu 11 2 Press Brt button to select 1 1 Resolution 1920 x 1080_60 rotate OK to select destination output resolution after selectin resolution press Brt button to select 1 3 Setup press OK to confirm...

Страница 11: ...elect 1 Output CFG press OK to enter configuration menu 12 2 Press Brt button to select 1 2 App Mode rotate OK to select the proper application mode you need after selectin resolution press Brt button...

Страница 12: ...12 3 Application mode 1 Out1 Out2 1 program switcher Out3 No Output Out4 Pre Sync Monitor 12 4 Application mode 2 Out1 Out2 2 program 2 Mosaic Out3 No output Out4 Pre Sync Monitor...

Страница 13: ...12 5 Application mode 3 Out1 Out2 Out3 3 program 3 Mosaic Out4 Sync Monitor 12 6 Application mode 4...

Страница 14: ...Out1 Out2 Out3 Out4 4 program 4 Mosaic No Monitor Output 12 7 Application mode 5 Out1 Out2 1 program 4 image Out3 No Output Out4 Sync Monitor...

Страница 15: ...12 8 Application mode 6 Out1 Out2 1 program 3 image Out3 No Output Out4 InputSync Monitor...

Страница 16: ...idth and height must be as same as the width and height of your actual LED screen 13 3 In the setup menu In width and height In H start and V Start used to crop the area of input video sourcethen outp...

Страница 17: ...to select a mode to savethese parameters 14 4 For example we have a LED screen 3840 x 1080 and two unit LED screens 1920 x 1080 14 5 Press Brt or Brt button to select setup option 2 1 LED Total Width...

Страница 18: ...onfigure it press Out 3 or Out4 button can select them then configurethem 15 Setting output widthand height App5 6 15 1 After LVP909 configuring App M5 then you can see the interface as below 2 Output...

Страница 19: ...press M1 M2 M3 or M4 to select a mode to save these parameters in one mode 16 Configuring input source for App5 6 16 1 Press Setup button to enter user setup menu press Brt button to select 3 Inputso...

Страница 20: ...p option D 1 Image_1 source or D 2 Image_2 source rotate OK to configureinput video source press OK to save 3 ImageSource AppM5 M1 3 1 Image_1Source V1 V2 VGA DVI HDMI SDI 3 2 Image_2Source V1 V2 VGA...

Страница 21: ...he PIP widow location 17 5 In the menu set the In width and height can crop the input source and set the In H and V startto crop the input sourcefromwhereof the input source 17 6 PIP function has two...

Страница 22: ...Out1 to select main widow press Out2 to select PIP window...

Отзывы: