9
SETUP AND ADJUSTMENTS
Changing the abrasive wheel
The abrasive wheel may only be changed when the mains plug is pulled!
The abrasive wheel has to meet the technical specification.
Use only abrasive wheels rated at 3000 min-
1
or higher.
Check abrasive wheel for flaws (cracks) before installation. Make the ring test.
Ring test:
An internal defect may not be apparent by visual inspection alone.
The ring test may uncover an internal crack or void.
Loop a piece of string through the grinding wheel hole and suspend the wheel.
Tap the wheel with a piece of scrap wood.
A good wheel will "ring"; a defective wheel will "thud".
Do not use a wheel that does not “ring”.
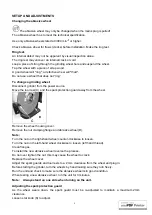
To change a grinding wheel:
Disconnect grinder from the power source.
Move the tool rest (C) and the spark protection guard away from the wheel.
Remove the wheel housing cover.
Remove the nut clamping flange and abrasive wheel (D).
Note:
Turn the nut on the right-hand wheel counter-clockwise to loosen.
Turn the nut on the left-hand wheel clockwise to loosen (left hand thread).
Clean flanges.
To install the new abrasive wheel reverse the process.
Do not over tighten the nut; this may cause the wheel to crack.
Replace the wheel cover.
Adjust the spark guards and tool rests to a 2 mm clearance from the wheel and plug in.
Before starting the grinder, turn the wheels by hand making sure they turn freely.
Run the unit and check to make sure the abrasive wheel is in good condition.
When testing a new abrasive wheel, run the unit for 3 minutes.
Note:
Always stand on one side when turning on the unit.
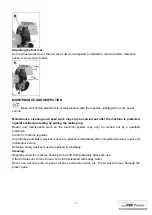
Adjusting the spark protection guard
As the wheel wears down, the spark guard must be re-adjusted to maintain a maximum 2mm
clearance.
Loosen star knob (K) to adjust.
D


