background image

C

A

R

A

C

T

É

R

IS

T

IQ

U

E

S

F5

1.

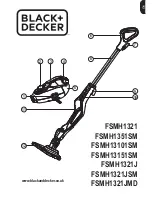
Poignée « Soft touch »

2. Bouton MARCHE/ARRÊT pour le rouleau-

brosse

3. Bouton MARCHE/ARRÊT pour l’aspirateur
4. Poignée « Soft touch » du tube de nettoyage
5. Bouton de dégagement du tube de nettoyage
6. Bague de fixation du tuyau
7.

Bouton de dégagement du tuyau

8. Tube de nettoyage
9. Trappe de dégagement inférieure du godet à

poussière

10. Collier de serrage de tuyau
11. Bouton de remise en marche (situé au dos du

suceur)

12. Phare avant
13.

Rouleau-brosse

14. Pare-chocs « Soft Touch »
15. Crochet pour cordon d’alimentation
16. Suceur plat
17. Accessoire rotatif pour meubles
18. Rangement d’accessoires
19. Tuyau d’aspiration
20. Poignée de dégagement et de transport du

godet à poussière

21. Couvercle du godet à poussière et filtre HEPA

permanent

22. Levier de dégagement inférieur
23. Godet à poussière
24. Filtre d’évacuation (permanent)
25. Pédale d’enroulement automatique du cordon
26. Grille d’évacuation 
27. Cordon d’alimentation
28. Roues

1

3

4

5

6

7

8

9

12

14

10

2

16

17

18

19

20

21

23

24

28

11

27

26

25

15

13

22

Содержание X3

Страница 1: ...OWNER S MANUAL Operating and Servicing Instructions Please read these instructions carefully before using your new vacuum Designed with you in mind...

Страница 2: ...ipt to validate start of warranty period If the vacuum cleaner should become defective within the warranty period we will repair or replace any defective parts free of charge The complete machine must...

Страница 3: ...Accessories Page 8 Vacuuming Upholstery Furniture and Curtains Page 9 After Use Page 9 Dirt Container and Filter Page 10 12 Dirt Container Removal and Cleaning Page 10 HEPA Filter Removal and Cleanin...

Страница 4: ...NSTRUCTIONS THIS VACUUM CLEANER IS INTENDED FOR HOUSEHOLD USE ONLY Do not leave appliance when plugged in Unplug from outlet when not in use and before servicing Do not use outdoors or on wet surfaces...

Страница 5: ...gers and all parts of body away from openings and moving parts Do not pick up anything that is burning or smoking such as cigarettes matches or hot ashes Do not use without dirt container and filters...

Страница 6: ...d on back of nozzle 12 Headlight 13 Brushroll 14 Soft touch furniture guard 15 Power cord hook 16 Crevice tool 17 Rotating upholstery tool 18 Accessory storage 19 Suction hose 20 Dirt container releas...

Страница 7: ...leaner and press hose into handle assembly Insert excess cord into handle of the cleaner by pushing down into lower handle CAUTION AVOID PINCHING CORD WHILE INSERTING INTO HANDLE Connect the cleaning...

Страница 8: ...on again after approximately 2 minutes by pressing the reset button 1 Switch the upright vacuum cleaner on or off by pressing the on off switch 3 For easier handling while vacuuming hook the power co...

Страница 9: ...esume vacuuming tilt it back The brushroll switches on again automatically Straighten the hose and hook the hose clip into the fastening ring to prevent the upright vacuum cleaner from toppling over d...

Страница 10: ...matic cord rewind draws in the power cord automatically NOTE Hold onto the power cord to prevent the cord from whipping during the automatic cord rewind 2 After vacuuming slide the suction hose back i...

Страница 11: ...can be cleaned with a dry dust cloth dust brush 1 Close bottom cover on the dirt cup until it snaps shut 3 Hold dirt container over trash can and push down on bottom release lever to release debris 2...

Страница 12: ...er to the dirt container lid REPLACE PLEATED FILTER 1 Replace filter inside filter cup by aligning with tabs inside of filter cup Twist to the right until filter locks in place Place filter lid on top...

Страница 13: ...filter that comes with this unit is a lifetime filter and can be washed Make sure filter is completely dry before returning to cleaner 2a 1 Replace the cleaned exhaust filter and cover with exhaust g...

Страница 14: ...move the burned out light bulb and pull it from the socket Insert the new bulb 2 3 Attach the light cover using both screws 4 WARNING TO REDUCE THE RISK OF ELECTRIC SHOCK UNPLUG CLEANER BEFORE REMOVIN...

Страница 15: ...ctivate brushes 3 Press brushroll reset button Pg 7 ANY OTHER SERVICING SHOULD BE DONE BY AN AUTHORIZED SERVICE REPRESENTATIVE CUSTOMER SERVICE 1 877 VAX USA 9 1 877 829 8729 In the event that further...

Страница 16: ...MANUEL DU PROPRI TAIRE Notice d utilisation et d entretien Veuillez lire attentivement ces instructions avant d utiliser votre aspirateur Designed with you in mind 2005 Tous droits r serv s...

Страница 17: ...d entr e en vigueur de la p riode de garantie Si l appareil tombe en panne pendant la p riode couverte par la garantie nous r parerons ou remplacerons gratuitement toute pi ce d fectueuse L appareil e...

Страница 18: ...les accessoires Page F8 Nettoyage des tissus d ameublement du mobilier et des rideaux Page F9 Apr s utilisation Page F9 Godet poussi re et filtre Page F10 F12 Enl vement et nettoyage du godet poussi r...

Страница 19: ...AVERTISSEMENT POUR R DUIRE LES RISQUES D INCENDIE DE D CHARGE LECTRIQUE ET DE BLESSURE F3 Lorsque vous utilisez un appareil m nager vous devez prendre certaines pr cautions de s curit telles que LISE...

Страница 20: ...e bloqu e maintenir celles ci exemptes de poussi re de peluche de cheveux et de tout ce qui pourrait affecter le passage de l air Garder les cheveux les v tements les doigts et toutes les parties du c...

Страница 21: ...arche situ au dos du suceur 12 Phare avant 13 Rouleau brosse 14 Pare chocs Soft Touch 15 Crochet pour cordon d alimentation 16 Suceur plat 17 Accessoire rotatif pour meubles 18 Rangement d accessoires...

Страница 22: ...s rer l exc dent de cordon dans la poign e de l aspirateur poussez le vers la partie inf rieure de la poign e ATTENTION VITEZ DE PINCER LE CORDON EN L INS RANT DANS LA POIGN E Branchez le tube de nett...

Страница 23: ...t sur le bouton de remise en marche 1 Pour mettre en marche ou arr ter l aspirateur appuyez sur l interrupteur marche arr t 3 Pour pouvoir manier plus facilement l aspirateur durant le nettoyage accro...

Страница 24: ...cales 6 6a Pour acc der aux accessoires retirez l accessoire pour meubles de l aspirateur en un mouvement de va et vient Pour retirer les accessoires saisissez les et tirez les vers le haut et sortez...

Страница 25: ...ous appuyez sur le bouton d enroulement automatique REMARQUE Tenez le cordon d alimentation pour l emp cher de cingler lors de l enroulement automatique 2 Apr s avoir pass l aspirateur glissez le tuya...

Страница 26: ...poussi re 1 Encliquetez le couvercle inf rieur du godet poussi re pour le refermer 3 Tenez le godet poussi re au dessus d une poubelle et appuyez sur le levier de d gagement inf rieur pour faire sort...

Страница 27: ...le filtre en place l int rieur du godet en l alignant sur les pattes situ es l int rieur et en haut du godet du filtre Tournez vers la droite pour encliqueter le filtre en place Placez le couvercle du...

Страница 28: ...pareil est un filtre permanent et il est lavable Assurez vous qu il est compl tement sec avant de le remonter sur l aspirateur 2a 1 Remettez en place le filtre d vacuation nettoy et recouvrez le avec...

Страница 29: ...ez le couvercle du phare l aide des deux vis 4 AVERTISSEMENT POUR R DUIRE LES RISQUES DE D CHARGES LECTRIQUES ET DE BLESSURES PROVOQU ES PAR DES PI CES EN MOUVEMENT D BRANCHEZ L ASPIRATEUR AVANT D ENL...

Страница 30: ...tuyau est obstru 2 Godet poussi re plein 3 Filtre obstru 4 Le godet poussi re n est pas install correctement 1 L ampoule est grill e 2 Les fils lectriques sont desserr s 1 Mauvais alignement du couve...

Страница 31: ...MANUAL DEL PROPIETARIO Instrucciones de Funcionamiento y Servicio Por favor lea estas instrucciones con cuidado antes de usar su aspiradora Designed with you in mind 2005 Todos los derechos reservados...

Страница 32: ...lido el per odo de garant a En caso que la aspiradora muestre alg n defecto dentro del per odo de garant a repararemos o reemplazaremos de manera gratuita cualquier parte defectuosa La m quina comple...

Страница 33: ...n accesorios P gina E8 Aspirado de tapicer a muebles y cortinas P gina E9 Despu s de usar P gina E9 Recipiente de polvo y filtro P gina E10 E12 Retiro y limpieza del recipiente de polvo P gina E10 Ret...

Страница 34: ...UCCIONES DE SEGURIDAD IMPORTANTES ESTA ASPIRADORA EST DISE ADA PARA USO DOM STICO SOLAMENTE No deje solo el aparato cuando est conectado Descon ctelo de la toma de corriente cuando no lo use y antes d...

Страница 35: ...eada mant ngalo libre de polvo pelusa pelo y cualquier cosa que pueda reducir el flujo de aire Mantenga lejos de las aperturas y partes m viles el pelo ropa suelta dedos y todas las partes del cuerpo...

Страница 36: ...lla 12 Luz frontal 13 Cepillo giratorio 14 Cubierta suave para proteger los muebles 15 Gancho del cord n el ctrico 16 Accesorio para hendiduras 17 Accesorio giratorio para tapicer a 18 Compartimiento...

Страница 37: ...guera para colocarla en el conjunto del asa Inserte el cord n sobrante en el asa de la aspiradora empuj ndolo en el asa inferior PRECAUCI N EVITE PELLIZCAR EL CORD N EL CTRICO CUANDO LO INSERTE EN EL...

Страница 38: ...volverla a encender despu s de esperar aproximadamente 2 minutos 1 Encienda o apague la aspiradora oprimiendo el bot n de encendido apagado 3 Para un mejor manejo mientras est aspirando enganche el co...

Страница 39: ...cepillo giratorio se vuelve a encender autom ticamente Enderezca la manguera y enganche la abrazadera de la manguera en el anillo de sujeci n para evitar que la aspiradora se caiga mientras se est us...

Страница 40: ...ctrico para guardar el cord n autom ticamente NOTA Sostenga el cord n durante el rebobinado autom tico para evitar que se golpee 2 Cuando termine de aspirar deslice la manguera de succi n nuevamente e...

Страница 41: ...llo para polvo 1 Cierre la tapa inferior del recipiente de polvo hasta que quede bien encajada 3 Sostenga el recipiente de polvo sobre el basurero y empuje hacia abajo la palanca de liberaci n inferio...

Страница 42: ...ltro en su recipiente aline ndolo con las leng etas que est n en la parte superior del recipiente G relo hacia la derecha hasta que el filtro quede trabado en su lugar Coloque la tapa del filtro encim...

Страница 43: ...da y puede lavarse Aseg rese que est completamente seco antes de volverlo a colocar en la aspiradora 2a 1 Reponga el filtro de descarga limpio y c bralo con el enrejado 1a REPOSICI N DEL RECIPIENTE DE...

Страница 44: ...oco 2 3 Fije la cubierta del foco con los dos tornillos 4 ADVERTENCIA PARA REDUCIR EL RIESGO DE CHOQUE EL CTRICO Y O LESIONES CAUSADAS POR LAS PARTES M VILES DESCONECTE LA ASPIRADORA ANTES DE RETIRAR...

Страница 45: ...ompletamente 1 Manguera tapada 2 El recipiente de polvo est lleno 3 Filtro tapado 4 El recipiente de polvo no est instalado correctamente 1 Foco fundido 2 Cables el ctricos sueltos 1 La tapa del recip...

Страница 46: ...around corners and into tight spaces Designed with you in mind www vaxusa com These filters are replaceable Please call 1 877 VAX USA 9 1 877 829 8729 or visit our website at www vaxusa com for addit...

Отзывы: