


Vax Careline:
AU: 1300 361 505
NZ: 0800 800 900
vax.com.au
vax.co.nz
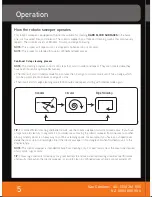
12
Maintenance
(Keep your Vax as good as new)
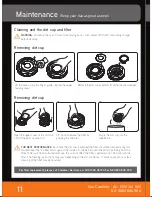
Rinse dirt cup
Cleaning nozzle
Reinstalling dirt cup
Cleaning side brushes
Hold dirt cup and fi lter under running water to rinse. DO
NOT use soap/detergent. Tap excess water
out of dirt cup and fi lter. Allow dirt cup and fi lter to
COMPLETELY DRY for at least 24 hours before
replacing it back to the robotic sweeper.
After repeated use, dirt and dust may accumulate
around the nozzle and it may reduce the working
effi ciency. To ensure the best performance, the nozzle
should be cleaned periodically.
Once dry, reinstall the fi lter and the dirt cup lid to the dirt
cup. Then reinstall the dirt cup assembly into the unit.
Return upper housing cover to robotic sweeper.
ATTENTION:
Before starting the robotic sweeper,
please ensure the dirt cup has been correctly installed.
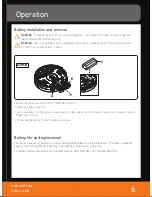
1. Turn power OFF (O=OFF), turn the robotic sweeper
up side down on a fl at surface. Hold the brush and pull
upward to remove the brush.
2. Reinstall the brushes after cleaning.
3. The side brushes can be rinsed, and if they become
mis-shaped, you can soak them in hot water to make
them return to original shape. ALLOW TO COMPLETELY
DRY FOR 24 HOURS.
NOTE
: After being used for a period of time, the brushes
need to be replaced for best performance.


