background image

4

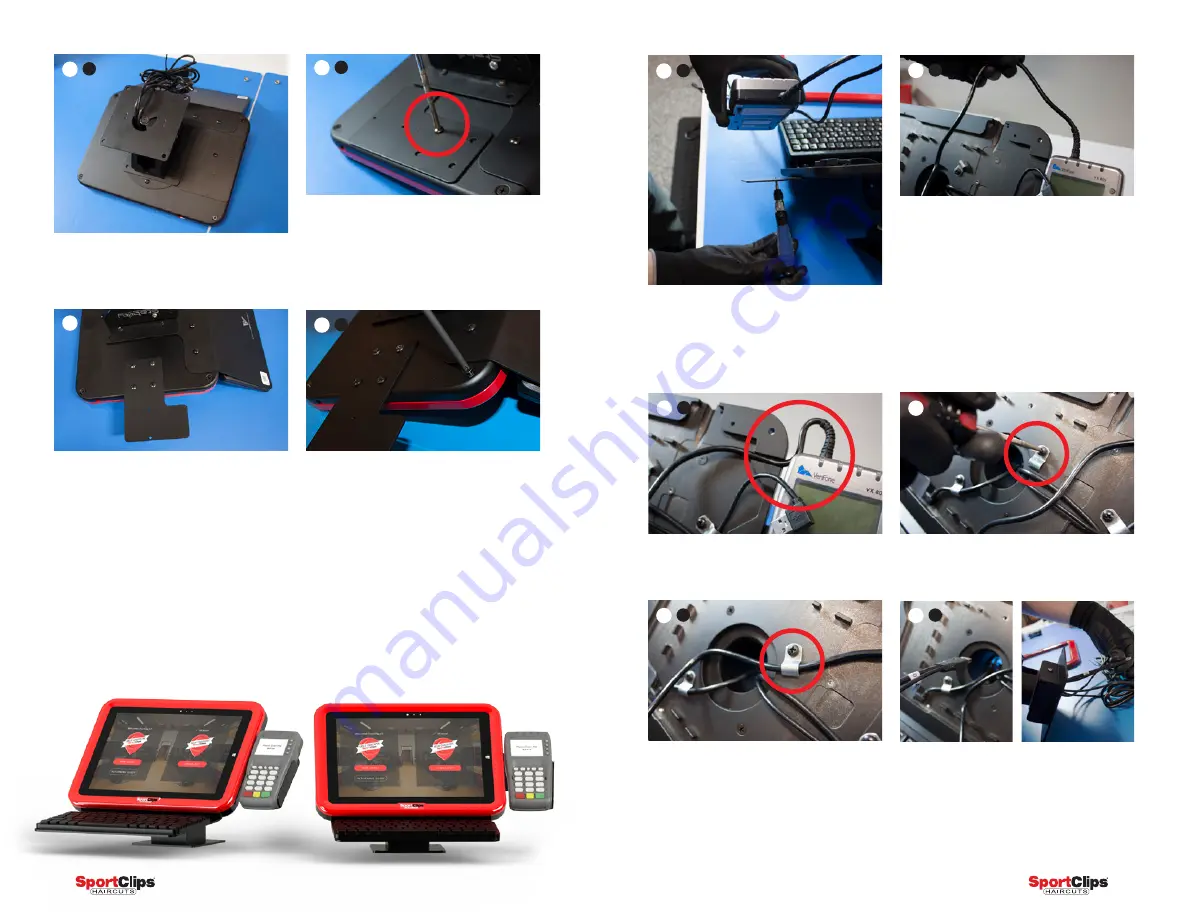
Remove the (4) faceplate screws located  

in each corner and carefully remove the 

faceplate. Once removed, place the kiosk 

assembly in the upright position.

D

Kiosk assembly: 

On a clean surface, 

carefully place the kiosk face down to 

prevent scratching (use a cloth to protect 

the red faceplate if needed).

Rotate the VX805 mount as shown and 

re-attach using (4) screws included in 

VX805 bracket set.

A

C

On the back of the kiosk, remove the one 

screw from VX805 mount as shown.

B

5

B

Mounting the VX805 PIN pad:

Using the PH0 Phillips head screwdriver, 

install the VX805 on the mount using (2) 

screws from the included mounting bag. 

These screws are small and easily lost; 

an extra is included.

A

Carefully route the VX805 cable  

through the channel as shown.  

Use caution not to over-bend the cable.

C

Carefully remove the P-Clip as shown.

A

Re-attach the P-Clip, ensuring the VX805 

cable is routed through it and laying flat 

on the surface.

B

Route the other end of the VX805 cable 

through center of the kiosk as shown.

C

Содержание Sport Clips Haircuts SC-PM-MS4P-P4SC

Страница 1: ...e latest assembly instructions scan this QR code CALL THE SCI SUPPORT CENTER 800 872 4247 OPT 9 FOR FURTHER INSTALLATION INSTRUCTIONS Assembly Instructions Kiosk Enclosure SC PM MS4P P4SC sportclipskiosk com ...

Страница 2: ...nsidered an endorsement by their respective owners Verifone and the Verifone logo are either trademarks or registered trademarks of Verifone in the United States and or other countries Microsoft Surface 3 3PRO 4 and 4PRO are registered trademarks of the Microsoft Corporation 1 1 Contents Contents of Accessories Box Parts Included 1 Kiosk Packet 1 Enclosure on Pole Mount 1 USB Hub Pack Power Supply...

Страница 3: ...are needed to install this product Electrical tape a power drill or Phillips head screwdrivers small PH0 and medium Verifone VX805 PIN pad assembly Unpack the Verifone VX805 PIN pad Remove the one rear screw Caution There is a small spring on this screw which will be required for reassembly A Locate VX805 cable C Replace the rear cover E Carefully press the VX805 cable into place D Carefully tight...

Страница 4: ...he back of the kiosk remove the one screw from VX805 mount as shown B 5 B Mounting the VX805 PIN pad Using the PH0 Phillips head screwdriver install the VX805 on the mount using 2 screws from the included mounting bag These screws are small and easily lost an extra is included A Carefully route the VX805 cable through the channel as shown Use caution not to over bend the cable C Carefully remove t...

Страница 5: ...le length to reach power connection on the tablet Loosen and adjust P Clip if needed B Locate the tablet power plug A Connect tablet power plug as shown Use small amount of electrical tape to secure the power cable to the tablet It should be a slim profile so its not visible once the faceplate is attached C Locate the USB cable D Attach the USB cable to tablet as shown E Carefully place the tablet...

Страница 6: ...et itself are flat C Note the routing of the tablet cables B Version 4 The tablet should rest against the guide pins on the side and bottom of the enclosure to proper alignment A Note the routing of the tablet cables B Version 1 3 Place the included scanner decal on the faceplate as shown E 9 Completed kiosk Note Please take all remaining bags parts to the store for kiosk installation All unused p...

Страница 7: ...ter Ethernet to USB adapter cable may be white or silver 11 Color coded Kiosk Cables Connect the color coded cables as shown IMPORTANT If you only have one kiosk Guided 1 connect the unlabeled black cable from the VX805 PIN pad into an available USB port on your POS If you have two kiosks connect the unlabeled black cable from the VX805 PIN pad into the remaining USB port on the USB hub for Kiosk ...

Страница 8: ...12 13 ...

Отзывы: