background image

EN

ENGLISH

3

CHARGING PROCEDURE

NOTE: Before using the tool, read the instruc-
tion book carefully.

1. RECHARGING BATTERIES

A] CHARGING THE BATTERY

To the Li-ion battery installed in the machine. Do not use 
another battery charger.
The Li-ion battery is protected against deep discharging. 
When the battery is empty, the machine is switched off by 
means of a protective circuit: The chuck no longer rotates.
In a warm environment or after heavy use, the battery pack 
may become too hot. Allow time for the battery to cool 
down before recharging.

B] IMPORTANT NOTES FOR CHARGING THE BATTERY

The battery in your new tool is not charged when it leaves 
the plant. Therefore it must be charged for 1 hour before 
using the first time!

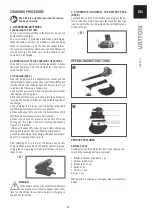
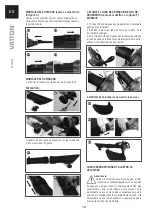
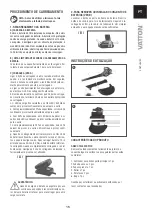
C] CHARGING (SEE A)

Plug the charger plug into a suitable mains socket, and the 
indicator light will show green. Then insert the battery pack 
into the charger, the indicator light will become red to red 
to indicate that charging is taking place.
a.Connect the power cord of the charger with a wall socket 
.The charger LED turn green
b.Slide the battery as far as it will go into the charger, by 
inserting the battery terminal into the suitable opening of 
the charger.
c.The charging LED turn red, and the battery three LEDS 
start flashing continuously from one to another.
d.When with about 30% capacity, the battery three LEDS 
start flashing continuously from one to another.
e.When with about 50% capacity, one battery LED keep 
shining and two other LEDs start flashing continuously 
from one to the other. 
f.When with about 75% capacity, two battery LEDs keep 
shining and the other LED start flashing continuously .
g.when finish charging, three battery LEDs keep shining for 
about 10 minutes and then turn off.

After charging 30 min (2.0 Ah), the battery will be fully 
charged. When fully charged, the light(a) will turn to green. 
Unplug the charger plug form the wall socket, the tool is 
ready to use.

¡WARNING!

When battery charge runs out after continuously 

use or exposure to direct sunlight or heat, allow 

time for the battery to cool down before re-charging to 
achieve the full charge.

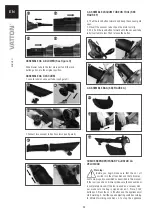
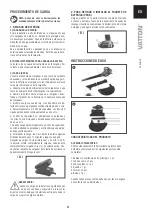
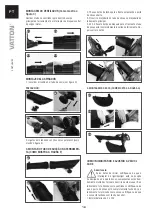
2. TO REMOVE OR INSTALL THE BATTERY PACK 

(SEE B)

Locate button on front of the battery pack. Depress the bu-
tton to release and slide it out from the tool. After recharge, 
insert back into the tool. A simple push and slight pressure 
will be sufficient. 

OPERATING INSTRUCTIONS

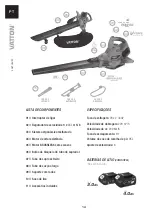
PRODUCT FEATURES  

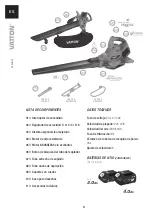
DELIVER SCOPE   

Carefully remove the garden tool from its packaging and 
check if the following parts are complete: 

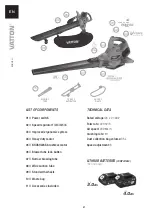
1. Blower & Vacuum main part x 1 pc
2. Vacuum tube x 2 pcs
3. Blower tube x 1 pc
4. Roller x 1 pc
5. Screw x 2 pcs
6.Bag x 1 pc

When parts are missing or damaged, please contact your 
dealer.

/ A /

/ B /

A

B

Содержание 48266

Страница 1: ...48266...

Страница 2: ...8 Wide suction tube 09 Stand with wheels 10 Waste bag 11 Accessories included TECHNICAL DATA Rated voltage 20 x 2 40V Folw rate 220 m3 h Air speed 200 Km h Crushing rate 9 1 Dust collection bag volume...

Страница 3: ...t flashing continuously from one to another d When with about 30 capacity the battery three LEDS start flashing continuously from one to another e When with about 50 capacity one battery LED keep shin...

Страница 4: ...e fully inserted into tool Then release the button 4 ASSEMBLE BAG SEE FIGURE G COMO ENCENDER PARAR Y AJUSTAR LA VELOCIDAD Warning Before you begin make sure that the on off switch is in the off positi...

Страница 5: ...non slip safety shoes helmet or hearing protection Proper equip ment will reduce personal injury 3 Make sure the switch is in the off position Carrying power tools with your finger on the trigger or p...

Страница 6: ...O NOT let comfort or familiarity with product gained from repeated use replace strict adherence to safety rules for the subject product MISUSE or failure to follow the safety rules stated in this inst...

Страница 7: ...tery pack is too hot it automatically starts a HOT battery pack delay and suspends charging until it has reached the correct temperature The charging process will then automatically begin 4 BATTERY PA...

Страница 8: ...ancho de aspiraci n 09 Soporte con ruedas 10 Saco para desechos 11 Accesorios inclu dos BATER AS DE LITIO COMPATIBLES 2 0Ah 20 V 4 0Ah 20 V No incluidas DATOS T CNICOS Tasa de voltaje 20 x 2 40V Velo...

Страница 9: ...continuamente de uno a otro e Al 50 de capacidad un LED detiene su parpadeo y los otros dos LED siguir n a parpadeando continuamente de uno a otro f Cuando tenga aproximadamente un 75 de capacidad do...

Страница 10: ...pinza del tubo de vac o en la pinza de la herramienta principal 3 3 3 4 Tire del bot n de bloqueo hacia adelante hasta que el tubo de vac o se introduzca completamente en la herra mienta A continuaci...

Страница 11: ...e descarga el ctrica 3 Seguridad personal 1 Mant ngase alerta y use el sentido com n No use mien tras est cansado o bajo la influencia de drogas alcohol o medicamentos 2 Use siempre protecci n para lo...

Страница 12: ...contacto con la piel Siga los datos de seguri dad del proveedor de materiales GUARDA ESTAS INSTRUCCIONES ADVERTENCIA NO permita que la comodidad o la familiaridad con el pro ducto obtenidas por el uso...

Страница 13: ...aliente inicia autom ti camente una pausa y suspende la carga hasta que alcanza la temperatura correcta El proceso de carga comenzar autom ticamente 4 SOBRECARGA Y PROTECCI N DE BAJO VOLTAJE Cuando la...

Страница 14: ...08 Tubo de suc o largo 09 Soporte com rodas 10 Saco de lixo 11 Acess rios inclu dos ESPECIFICA ES Taxa de voltagem 20 x 2 40V Velocidade de dobragem 220 m3 h Velocidade do ar 200 Km h Taxa de esmagame...

Страница 15: ...Ds continuam a piscar continuamente de um para o outro e Com 50 de capacidade um LED deixa de piscar e os outros dois LEDs continuam a piscar continuamente de um para o outro f Com aproximadamente 75...

Страница 16: ...a ferramenta principal 3 3 3 3 4 Puxar o bot o de bloqueio para a frente at o tubo de v cuo estar completamente inserido na ferramenta De pois soltar o bot o 4 MONTAGEM DO SACO COMO MOSTRA A FIGURA G...

Страница 17: ...a e usar o bom senso N o usar enquanto estiver cansado ou sob a influ ncia de drogas lcool ou medicamentos Um momento de desaten o utiliza o pode resultar em danos pessoais graves 2 Usar sempre protec...

Страница 18: ...es Um motor aquecido e circuito de controle podem causar inc ndio 4 EVITE O COME O N O INTENCIONAL N o transporte a ferramenta da bateria com o dedo na chave 5 Alguns materiais cont m produtos qu mico...

Страница 19: ...ver demasiado quente inicia auto maticamente o modo de suspens o de recarga at que a bateria volte a uma temperatura correta Ap s a bateria voltar a uma temperatura correta o processo de recarga inici...

Страница 20: ...a Dyser S L Pol Ind Anoia C Cooperativa 2 08635 Sant Esteve Sesrovires Barcelona Espa a B 60163441 T 937831011 F 937838487 www alfadyser com alfa alfadyser com FABRICADO EN R P C DISE O PACKAGING EN U...

Отзывы: