VarTech Systems VT190C2 Скачать руководство пользователя страница 6

6


VT190


DiamondVue/CrystalVue


User’s


Guide


150

180


GETTING STARTED 

SECTION 3 
 

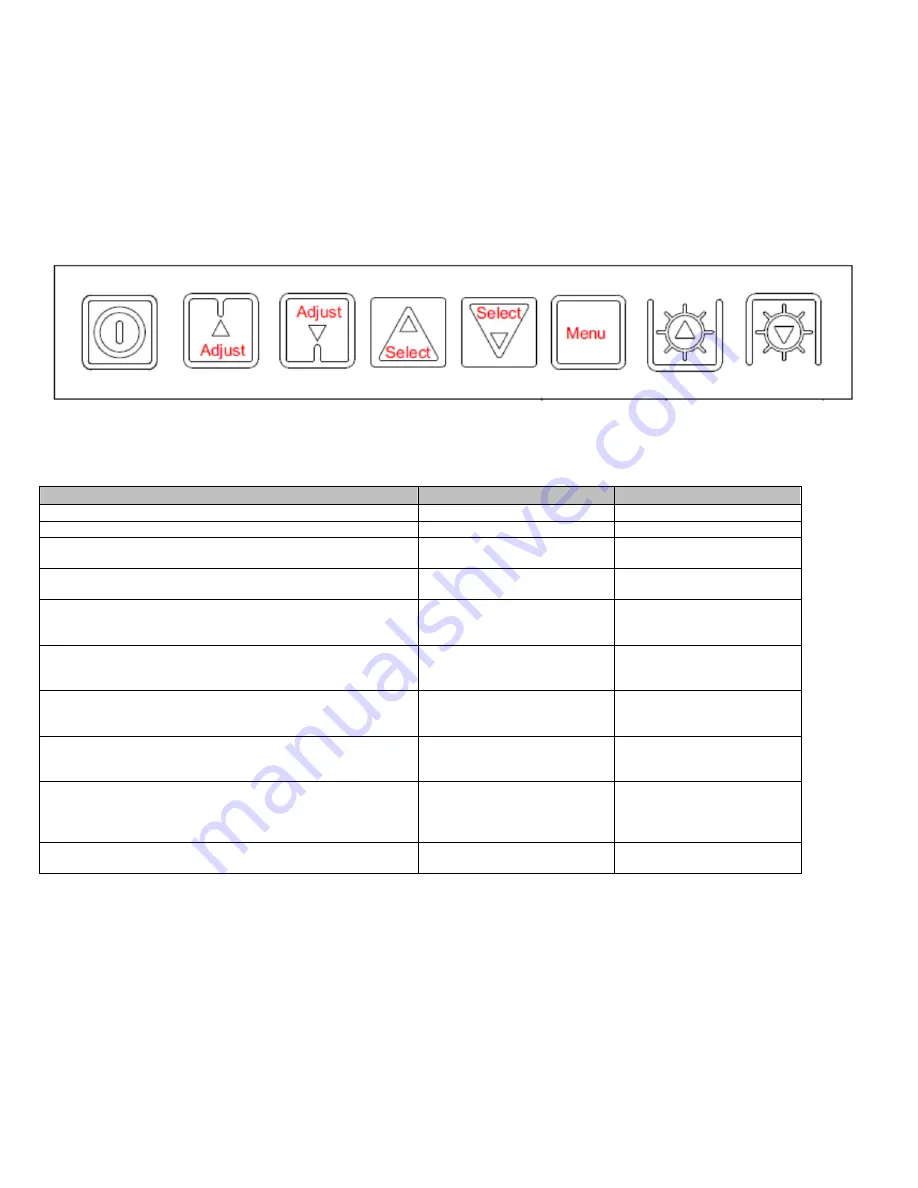
3.1 Adjusting the display  

Membrane Controls 


Controls  

Analog VR type  

Digital type  

On/Off – turns controller board power on  

VR toggle switch  

On/Off button  

Brightness – controls backlight brightness  

Rotary VR   

Brig/- buttons  

Menu – turns OSD menu On or Off (it will auto time off) (Function 
with signal input only)  

Menu button  

Menu button  

Select – Select function / Confirm (under OSD menu on state)  

SEL DN  

SEL DN  

Move up to select individual RGB color level OSD page (under OSD 
menu on state)  

SEL UP  

SEL UP  

+ – increase the setting / moves the selector to the next function 
(under OSD menu on state)  

+  

+  

- - decrease the setting / moves the selector to the previous function 
(under OSD menu on state)  

- - 

Load factory default  

Press and hold SEL DN button to 
power on the controller  

Press and hold SEL DN button 
to power on the controller  

Lock OSD menu (Function with signal input only)  

Press and hold MENU button for 
15 seconds to enable / disable 
lock of the OSD menu  

Press and hold MENU button 
for 15 seconds to enable / 
disable lock of the OSD menu  

Switch to next input source  (under OSD menu off state)  

+  

+  


Содержание VT190C2

Страница 1: ...ding Applications VarTech Systems Inc Industrial Flat Panel Displays VT190 DiamondVue CrystalVue Series 19 0 Flat Panel Series LCD Monitors VT190P2 VT190PS2 VT190R2 VT190PHB2 VT190PSHB2 VT190C2 VT190CHB2 VT190W2 VT190WS2 VT190WHB2 VT190WSHB2 VT190M2 VT190MHB2 User s Guide ...

Страница 2: ...een Introduction 10 1 2 Product Safety Precautions 3 4 2 Touch Screen Installation 10 Section 2 Section 5 Display Setup 4 5 1 Troubleshooting 11 2 1 Inspection 4 2 2 Unpacking 4 Section 6 2 3 Included Parts 4 6 1 Cleaning Maintenance 12 2 4 Connecting The Display 4 2 5 Video Input Connections 5 Section 7 Mounting Instructions 13 Section 3 7 1 Panel Mount Procedure 13 Getting Started 6 3 1 Adjustin...

Страница 3: ...cessary for cooling Ensure that the ambient air temperature will not exceed the specified maximum temperature Do not attempt to service this display yourself The rear chassis has a seal so that non qualified personnel will not expose themselves to dangerous voltages or other risks To protect from electrical shock unplug the display power supply from the wall before moving Do not expose the display...

Страница 4: ...ble serial or USB 2 After connecting the cables between the LCD monitor and the computer connect the Power Cable to the display and the customer supplied DC voltage source Check the display unit label to determine the correct DC voltage 3 Turn the DC voltage source on The display will be active 4 Turn on your computer The display should now operate showing your OS or the video that is being suppli...

Страница 5: ...es are described below The R Red G Green and B Blue input connectors for color The HS CS Separate horizontal composite sync signal from the video source The VS Separate vertical sync signal from the video source BNC Adapter Cable This table describes the signal types you can use with the connectors BNC Signal Types BNC Signal Type Description R G B HS CS VS Sync on Green Use the three video connec...

Страница 6: ...N SEL DN Move up to select individual RGB color level OSD page under OSD menu on state SEL UP SEL UP increase the setting moves the selector to the next function under OSD menu on state decrease the setting moves the selector to the previous function under OSD menu on state Load factory default Press and hold SEL DN button to power on the controller Press and hold SEL DN button to power on the con...

Страница 7: ...ess total 15 steps Aspect Size Aspect Ratio Fill Screen Fill Aspect 1 to 1 UNDER ARGB DVI mode Auto Fill Screen 1 to 1 Anamorphic UNDER VIDEO MODE Fill Screen Enable full screen expansion for lower resolution Image Fill Aspect Enable fill screen expansion for lower resolution image according to aspect ratio 1 to 1 Display the exact image resolution on the screen without image expansion Horz Positi...

Страница 8: ...pling position adjust image quality Auto Source Seek OFF ON ON Auto source select always enable OFF Disable auto source select function Auto Power OFF ON ON Enable soft power off function if absence of input signals OFF Disable soft power function Video Standard SD Auto NTSC PAL SECAM NTSC 443 Gamma 1 0 1 6 2 2 OSD H Position Move the OSD menu image horizontally V Position Move the OSD menu image ...

Страница 9: ...Red Green Blue Hot Key Hot key 1 Brightness Contrast Input Aspect Volume Hot key 2 Brightness Contrast Input Aspect Volume Reset to Factory Defaults Factory Defaults Reset Color Gain DDC Updates FUNCTION IN VIDEO MODE ONLY DISPLAY AND FUNCTION IN VGA MODE ONLY Exit the OSD menu to save the setting chosen ...

Страница 10: ...coustic wave SAW capacitive infrared IR and projective capacitive Each touch technology has advantages and disadvantages based on different user applications 4 2 Installation All Vartech Systems displays configured with a touch screen are supplied with a CDROM which includes user manuals application software and drivers for various operating systems Insert the supplied CDROM into a CDROM drive and...

Страница 11: ...gnal splitter please note that normally a signal splitter will not have any adverse effect Image appearance A faulty panel can have blank lines failed sections flickering or flashing display incorrect graphics card refresh rate resolution or interlaced mode will probably cause the image to be the wrong size to scroll flicker badly or possibly even no image Incorrect jumper settings on the controll...

Страница 12: ...ould be taken when cleaning a touch screen or polycarbonate shield that is installed over the screen Abrasive and certain chemical cleaners can easily damage the surface Never use alcoholic or ammoniac cleaners to clean the polycarbonate shield or a touch screen Note For best results cleaning a monitor with the optional antireflective tempered glass display shield a solution of denatured alcohol i...

Страница 13: ...21 VT190PSS 19 DiamondVue CrystalVue Panel Mount SS Drawing Nema 4x 22 23 VT190M2 19 DiamondVue CrystalVue Table Top Drawing 24 1 Cut and drill the panel refer to panel mount drawing Measurements are in inches 2 If access to the side of the monitor is not available following installation attach the power and video cables to the side of the monitor at this time 3 Install the monitor in the prepared...

Страница 14: ...le Left Right 89 89o typ Viewing Angle Up Down 89 89o typ Color Gamut TCO03 Compliance Brightness 300 Nits typ Contrast Ratio 1300 1 typ Response Time 8ms typ Back Lights 4 CCFL rated 50 000 Hrs Video Connectors Analog VGA DB 15 Composite BNC DVI I Four Pin Mini Pin S VIDEO Colors Supported 16 777 216 RGB 6 bit Hi FRC data Video Input Analog 0 7v p p TTL Sync Separate H V Combined SOG Input Voltag...

Страница 15: ...Left Right 89 89o typ Viewing Angle Up Down 89 89o typ Color Gamut TCO03 Compliance Brightness 1000 Nits typ Contrast Ratio 1300 1 typ Response Time 8ms typ Back Lights 2 LED Rail rated 70 000 Hrs Video Connectors Analog VGA DB 15 Composite BNC DVI I Four Pin Mini Pin S VIDEO Colors Supported 16 777 216 RGB 6 bit Hi FRC data Video Input Analog 0 7v p p TTL Sync Separate H V Combined SOG Input Volt...

Страница 16: ...16 VT190 DiamondVue CrystalVue User s Guide 150 180 ...

Страница 17: ...17 VT190 DiamondVue CrystalVue User s Guide 150 180 ...

Страница 18: ...18 VT190 DiamondVue CrystalVue User s Guide 150 180 ...

Страница 19: ...19 VT190 DiamondVue CrystalVue User s Guide 150 180 ...

Страница 20: ...20 VT190 DiamondVue CrystalVue User s Guide 150 180 ...

Страница 21: ...21 VT190 DiamondVue CrystalVue User s Guide 150 180 ...

Страница 22: ...22 VT190 DiamondVue CrystalVue User s Guide 150 180 ...

Страница 23: ...23 VT190 DiamondVue CrystalVue User s Guide 150 180 ...

Страница 24: ...24 VT190 DiamondVue CrystalVue User s Guide 150 180 ...

Страница 25: ...e User s Guide 150 180 VARTECH SYSTEMS INC HEADQUARTERS 6399 Amp Drive Clemmons NC 27012 Toll Free 800 223 8050 International Phone 001 225 298 0300 Fax 225 297 2440 E mail sales vartechsystems com www vartechsystems com 01 11 2011 ...

Отзывы: