background image


The COLTEST test mixture contains the following compounds at levels of 1 to 
5 ng/µL. 


No. Compound 

Formula 

Integer 
Weight 

Quantitation 
Mass 

1 Decane 

C

10

H

22

 142 57 

2 1-octanol 

C

8

H

18

O 130  69 

3 Undecane 

C

11

H

24

 156 71 

4 Nonanal 

C

9

H

18

O 142  67 

5 2,6-dimethylphenol 

C

8

H

10

O 122  107 

6 2-ethylhexanoic 

acid 

C

8

H

16

O

2

 144  73 

7 2,6-dimethylaniline 

C

8

H

11

N 121  106 

decanoic acid, methyl ester 

C

11

H

22

O

2

 186  74 

undecanoic acid, methyl 
ester 

C

12

H

24

O

2

 200  87 

10 Dicyclohexylamine 

C

12

H

23

N 181  138 

11 

dodecanoic acid, methyl 
ester 

C

13

H

26

O

2

 214  143 

12 Hexachlorobenzene 

C

6

Cl

6

 282 

284 

You can also effectively separate the individual components in the mixture for 
subsequent data manipulation, e.g., library searches and quantitation.  

Troubleshooting Common Chromatographic 
Problems 

The COLTEST mixture includes polar or active compounds such as 1-octanol, 
2,6-dimethylphenol, and 2,6-dimethylaniline. Also present are some non-polar or 
inactive compounds such as decane and dodecane at approximate levels of 1 
ppm in hexane. Analysis of the mixture yields information about solvent tailing, 
column efficiency, dead volume, active sites in the injector/column, etc. You can 
use the analysis to troubleshoot common chromatographic problems. The 
following table identifies many of the problems, and proposes solutions. 

Correcting Solvent Tailing or Broadening Problems 

Possible Cause 

Solution 

Poor column installation 
resulting in dead volume 
in the injector 

Reinstall the column in the injector. Make sure you have a 
good cut on the column by examining the column under 
magnification. 

Solvent flashing in hot 
injector. 

Reduce the injection speed. If possible, reduce the injector 
temperature. If you are using sandwich injection, reduce the 
solvent plug to 0.5 µL. 

Septum purge line is 
plugged 

Check that the septum purge flow is 3.5-4.5 mL/min with a 
10-psi head pressure. If necessary, adjust the valve setting. 

Injector is not purged 
properly following 
splitless injection 

For a splitless injection, the vent flow should be at least 
70 mL/min. The injector should be switched to the split mode 
30 to 90 sec after the injection.  

110 of 127


Содержание 4000 GC

Страница 1: ...Varian Inc 2700 Mitchell Drive Walnut Creek CA 94598 1675 usa Varian Inc 2004 2007 Printed in U S A 03 914998 00 Rev 4 4000 GC MS Hardware Operation Manual...

Страница 2: ...ically reproduced distributed or printed in its entirety provided this copyright and statement are attached Any modification or any other reproduction distribution or use of this document or portions...

Страница 3: ...ized Representative in the EU Print Name G A Wassink Signed Position Quality Manager Date March 23 2005 Company Name Address Varian B V Herculesweg 8 P O Box 8033 4330 EA Middelburg The Netherlands Te...

Страница 4: ......

Страница 5: ...we live up to a standard of quality that you can count on today and into the future Our Quality System has received ISO 9001 certification number FM21797 The quality systems that earned us ISO 9001 r...

Страница 6: ...Qualit tsstandard bieten auf den Sie heute und in Zukunft rechnen k n nen Unser Qualit tssystem hat die ISO 9001 Zertifikatnummer FM21797 erhalten Die Qualit tssysteme der ISO 9001 Registrierung haben...

Страница 7: ...garantir et de maintenir un niveau de qualit Lesdites proc dures ont re u l homologation ISO 9001 num ro FM21797 Les syst mes de qualit qui ont re u l homologation ISO 9001 pr sentent des avantages di...

Страница 8: ...quale il cliente pu contare oggi come nel futuro Il nostro Sistema di Qualit ha ottenuto la certificazione ISO 9001 col numero FM21797 I sistemi di qualit per i quali abbiamo ottenuto l omologazione I...

Страница 9: ...ificaci n ISO 9001 representan beneficios directos para nuestros clientes haremos llegar nuestros aparatos m s r pidamente que nunca Podemos cumplir con pedidos urgentes a n m s deprisa Atenderemos su...

Страница 10: ...e instrument or accessory Repair or replacement under warranty does not extend the original warranty period Repair or replacement under warranty claims shall be made in Varian s sole discretion either...

Страница 11: ...die urspr ngliche Garantiezeit Reparatur oder Austausch unter Garantieanspr chen soll in Varian s ausschlie lichem Ermessen entweder durch einen Serviceingenieur beim Kunden oder durch Erm chtigung de...

Страница 12: ...es d un recours est laiss l enti re discr tion de Varian soit par l envoi d un technicien de maintenance sur le site du client soit en autorisant le client retourner l accessoire ou l instrument d fec...

Страница 13: ...razioni o le sostituzioni in garanzia verranno effettuate ad esclusiva discrezione della Varian inviando sul posto un tecnico o autorizzando la resa dello strumento o dell accessorio difettoso alla Va...

Страница 14: ...prolongan el per odo de garant a original Las reparaciones o sustituciones en per odo de garant a se efectuar n a criterio exclusivo de Varian enviando un representante de servicio posventa a la inst...

Страница 15: ...oderate injury and or equipment damage and how to avoid these situations Alerts you to potentially hazardous situations that could result in serious injury and how to avoid these situations Warning Sy...

Страница 16: ...has been used for the analysis of hazardous biological radioactive or toxic samples prior to any instrument service being performed or when an instrument is being returned to the Service Center for re...

Страница 17: ...graphy The operator should be familiar with the physico chemical properties of the components of the mobile phase Keep solvents from direct contact with the polyurethane supply tubing as certain solve...

Страница 18: ...nical support and training can be provided by qualified personnel on both a contractual or as needed basis Varian Inc Analytical Instruments Sales Offices For Sales or Service assistance and to order...

Страница 19: ...uf die Vermeidung dieser Situationen hin Warnungssymbol Warnungsbeschreibung WARNUNG ELEKTRISCHER SCHLAG Gef hrliche Spannungen bestehen innerhalb des Instruments Trennen Sie das Ger t vom Netz bevor...

Страница 20: ...t f r Analysen gef hrlicher biologischer radioaktiver oder toxischer Proben benutzt worden ist Elektrische Gefahren L sen Sie das Instrument von allen Stromquellen bevor Sie Schutzpaneele entfernen da...

Страница 21: ...durchf hren ffnen Sie niemals eine unter Druck stehende L sungsmittelleitung oder ein Ventil Halten Sie zuerst die Pumpe an und lassen Sie den Druck auf Null abfallen Benutzen Sie splittersichere Res...

Страница 22: ...zung und Training bieten wir Ihnen durch qualifizierte Chemiker sowohl auf einer Kontraktbasis als auch nach Ihren Erfordernissen an Varian Analytical Instruments Verkaufsb ros F r Verkaufs oder Servi...

Страница 23: ...mment rem dier cette situation Symboles d avertissement Description ATTENTION RISQUE D ELECTROCUTION Exposition des tensions dangereuses D brancher le mat riel du secteur avant de d visser les panneau...

Страница 24: ...giques dangereux radioactifs ou toxiques avant que n en soit effectu la maintenance Risques de chocs lectriques D connecter le mat riel de toute source d alimentation avant d en d monter les panneaux...

Страница 25: ...p rations de maintenance de routine Ne jamais d connecter un conduit de solvant ou une vanne sous pression Arr ter pr alablement la pompe et laisser la pression descendre z ro Utiliser des r servoirs...

Страница 26: ...el sp cifique support technique et service de formation assur s par des chimistes qualifi s sur base contractuelle ou en fonction des besoins sp cifiques Points de vente des instruments analytiques Va...

Страница 27: ...ZIONE Descrizione del Pericolo ATTENZIONE Pericolo di folgorazioni Nello strumento sono presenti tensioni pericolose Scollegare il cavo di alimentazione prima di togliere il pannello fissato con le vi...

Страница 28: ...zzato per l analisi di campioni biologicamente pericolosi radioattivi o tossici Pericoli Elettrici Prima di togliere i pannelli di protezione scollegare lo strumento da tutte le alimentazioni elettric...

Страница 29: ...routinaria del sistema Non smontare mai una linea del solvente od una valvola quando il sistema sotto pressione Fermare prima la pompa ed aspettare che la pressione scenda a zero Usare dei contenitor...

Страница 30: ...a piu il costo delle parti A richiesta si possono avere corsi per operatori sia sotto forma di contratto che a tariffe da concordare Uffici Vendite della Divisione Strumenti Analitici della Varian Per...

Страница 31: ...grosas que pueden causar serios da os y c mo evitar esas situaciones S mbolo Descripci n ATENCI N PELIGRO DE DESCARGA EL CTRICA El instrumento utiliza voltages peligrosos Desconecte el interruptor gen...

Страница 32: ...stras peligrosas de origen biol gico radioactivo t xico antes de comenzar a realizar cualquier an lisis Peligros El ctricos Desconecte el instrumento de todos las conexiones el ctricas a la red antes...

Страница 33: ...e rutina Nunca abra una l nea una v lvula bajo presi n Apague la bomba antes y deje que la presi n baje a cero Utilice dep sitos irrompibles que sean capaces de operar a 50 60 psi Mantenga cerrada la...

Страница 34: ...a y materiales El mantenimiento y el entrenamiento se realiza por ingenieros cualificados bajo Contrato petici n Oficinas de Instrumentaci n Anal tica Varian Para cualquier consulta sobre Instrumentac...

Страница 35: ...he CI Reagent Gas Flow 20 Electronics 21 Controller 22 Power Board 23 Manifold Electronics 24 RF Generator Assembly 24 Ion Detection Board 25 Ion Amplifier 25 Electronic Flow Control 25 Power Input Su...

Страница 36: ...nging Operational Configuration 83 Changing from Internal to External Configuration 84 Changing from External to Internal Configuration 84 Changing from Internal to Hybrid Configuration 84 Changing fr...

Страница 37: ...e 109 Troubleshooting Common Chromatographic Problems 110 Correcting Solvent Tailing or Broadening Problems 110 Correcting Tailing Sample Peaks for Particularly Active Components 111 Correcting Low Re...

Страница 38: ...Analyzer Attached to Top Flange 122 Analyzer Attached to Manifold 124 Chemical Ionization 124 Vacuum 124 O Rings 125 Miscellaneous Other 125 Test Samples 126 Varian Service 127 4 of 127...

Страница 39: ...the instrument in proper working condition The fourth section describes the installation and set up of the Chemical Ionization hardware The fifth section provides troubleshooting procedures for resol...

Страница 40: ...6 of 127...

Страница 41: ...r is like an analyzer contained in a vacuum manifold surrounded by electronics components that drive the analyzer operation and acquire the resulting data Foreline Pump GC Oven Turbomolecular Pump Tra...

Страница 42: ...necessary vacuum in the manifold Various pneumatics components feed required gases into the vacuum manifold An ion gauge and thermocouple gauge measure the vacuum levels in the manifold and foreline r...

Страница 43: ...used for internal ionization and a long metal tip is used for external ionization The body of the transfer line consists of a stainless steel body fitted with a center tube a heat exchanger and a boot...

Страница 44: ...n the external source Analyzer The Analyzer consists of an Internal Ionization Assembly or External Source the Ion Trap and a Conversion Dynode Electron Multiplier Detector All components except the d...

Страница 45: ...hermionic emission The filament emission current refers to the flow of emitted electrons from the filament The filament emission current is set in the Internal EI or CI Properties tab dialog in the 40...

Страница 46: ...nizing electrons and the sample to enter The CI volume also has an opening for the CI reagent When in use the CI volume is inserted into the EI volume by a pneumatically activated plunger which is con...

Страница 47: ...03 931683 01 Heater Assembly 03 931027 03 CI Volume 03 931608 01 Spring 03 931758 01 EI Volume 03 931684 01 Screw 12 168306 00 Screw 12 168105 00 CI Volume Holder 03 931607 01 Retainer Lens Pins 03 93...

Страница 48: ...oints Hybrid Configuration The 4000 MS supports a unique mode of operation called hybrid chemical ionization In the hybrid configuration reagent ions are generated in the external source then drawn in...

Страница 49: ...proper RF voltage the ion trap electrodes create a three dimensional hyperbolic electric field This field is capable of trapping the ions in stable aperiodic orbits In the presence of helium damping g...

Страница 50: ...ions from entering the source High Voltage Strap 03 931753 01 Multiplier Base Electron Multiplier 03 931751 01 Screws 12 168304 00 Conversion Dynode 03 931691 00 Multiplier Clip Anode Feedthrough High...

Страница 51: ...bout 10 5 i e until each electron or positive ion that enters the electron multiplier generates approximately 105 electrons Vacuum System The analyzer is contained in a vacuum manifold maintained at a...

Страница 52: ...olecular pump controller and thus to the pump The electronics service switch does not turn off the vacuum pumps The turbomolecular pump controller monitors the pump s rotational speed The controller s...

Страница 53: ...pump failure The thermocouple gauge is a simple rugged vacuum gauge that is used to measure vacuum pressures in the 2 Torr 267 Pa to 1 x 10 3 Torr 1 3 x 10 1 Pa range The gauge s main purpose is to e...

Страница 54: ...ound is perfluorotributylamine PFTBA or C12F27N also known as fluorocarbon 43 FC 43 A small glass vial inside the front door of the 4000 MS holds the compound The flow of calibration gas into the mani...

Страница 55: ...oard controls spectrometer operations and acquires data generated by the system Power Board generates all power sources for the instrument controls the temperature of heated zones routes signals betwe...

Страница 56: ...cessors allows time critical operations handled by the scan processor to be separated from non time critical operations handled by the communication processor The processors each have their own local...

Страница 57: ...upplies which supply the voltages to the Controller and RF generator board s analog circuitry A 24 Vdc power supply which provides power for the solenoid valves heaters the EFC electronics compartment...

Страница 58: ...uare waves applied during non resonant CID A trapping field dipole TFD voltage is applied during the mass scanning process to offset the trapped ions from the center of the trap The TFD signal is deri...

Страница 59: ...r to voltage that can then be read by the controller board analog to digital converter This amplifier boosts the signal by a factor of 107 To maximize the bandwidth the amplifier is mounted on the sid...

Страница 60: ...oes to the electronics service switch which controls power going to the power board and the rest of the electronics The electronics service switch allows the vacuum to the maintained in the event that...

Страница 61: ...If the oil level falls below the minimum level use a funnel to gradually add more oil 88 299517 00 through the filler port until the oil level is centered between the maximum and minimum levels NOTE P...

Страница 62: ...before continuing the oil changing operation 2 Disconnect the vacuum hose from the foreline pump by removing the clamping ring 3 Pull the hose free and place the seal on a clean lint free surface for...

Страница 63: ...and hold until oil flow ceases 9 Return the pump to the horizontal and refit the plug 10 Run the pump for approximately ten seconds with the intake port open This will remove any residual oil from th...

Страница 64: ...ously in steps 1 14 do the following CAUTION Avoid breathing oil mist coming from the exhaust port during this operation 1 Pour 330 mL 0 35 US qt of fresh pump oil in through the inlet port then run t...

Страница 65: ...assembly screws A 2 Remove Upper housing B 3 Remove Spring C 4 Remove Valve D 5 Remove Cartridge E 6 Remove O ring F 7 Clean the parts with a dry cloth 8 Degrease with a water soap solution 9 Rinse w...

Страница 66: ...MS is equipped with two fans on its rear panel The function of these fans is to pull air into the instrument To check fan operation proceed as follows 1 Make sure that the main power switch and servic...

Страница 67: ...should not be used to handle parts at elevated temperatures Keep all tools clean and free of grease or other contaminants Store sources and transfer line tips in the containers provided The containers...

Страница 68: ...ar to return to the original procedure The page numbers of these procedures are also indicated in the manual It may be necessary to use the Acrobat View menu to display the Navigation toolbar if it is...

Страница 69: ...the System Control program and then shut off the turbomolecular pump foreline pump and all electronics by turning off the main power switch on the back panel 3 Disconnect the 4000 MS power cord WARNIN...

Страница 70: ...down the mass spectrometer through the Startup Shutdown tab in System Control Click the Shut Down button in the upper left corner of the screen The heaters will be turned off and the speed of the turb...

Страница 71: ...d 2 Open the GC oven door Make sure that about 30 cm 12 in of the mass spectrometer end of the capillary column is hanging freely and that the column is not caught on the column rack or cage 3 Check f...

Страница 72: ...t of force may be needed to release residual vacuum If the transfer line does not pull out reopen the vent to be sure the analyzer is at atmospheric pressure If the transfer line is still difficult to...

Страница 73: ...to remove the manifold power cable 3 Verify that the transfer line is fully retracted and locked into position to prevent damaging its tip 7 Lift the analyzer assembly up and out of the manifold and p...

Страница 74: ...in internal ionization mode Use tweezers or pliers to get the connector off if necessary 2 Loosen the two screws holding on the heat shield and slide it away from the source or remove it 3 Fully loos...

Страница 75: ...with the screws on the Source Ion Trap assembly then tighten the two screws evenly 2 Replace the heat shield and tighten the two screws securing it to the flange If the external source is in place the...

Страница 76: ...Heat Shield Position with External Ionization Shield Heater Block Alignment Heat Shield Position with Internal Ionization Source 42 of 127...

Страница 77: ...3 Check source connection pins for proper alignment and straighten as necessary 43 of 127...

Страница 78: ...pair of tweezers to move the pin into alignment Reinstalling the Analyzer Assembly Prior to installing the analyzer check for any particles inside the manifold or on the analyzer assembly If necessar...

Страница 79: ...e sure the transfer line is still retracted The analyzer assembly has four metal pins that need to align with four holes in the manifold Align these pins and slide the analyzer into the manifold Ensur...

Страница 80: ...stops remove the analyzer and check the tip on the transfer line It may be bent and need to be straightened or replaced to ensure proper operation of the transfer line Also for external mode be sure t...

Страница 81: ...he power switch on the rear panel to its ON position The foreline pump should turn on and then stop gurgling after about 10 to 20 seconds If the pump continues to gurgle then check that the analyzer a...

Страница 82: ...for the 4000 MS in internal mode are Speed 100 Current 200 300 mA Power 9 13 Watts Ion Gauge Pressure 20 Torr Foreline Line 50 mTorr If the Pump Spin Speed does not steadily increase there may be a le...

Страница 83: ...s temperature Transfer line at 280 C Manifold at 120 C Source at 220 C 4 Click on Start Bakeout Checking Ion Trap Operation To check the ion trap operation proceed as follows 1 Once bakeout is finishe...

Страница 84: ...ptoms that result from dirty components and makes recommendations about when to perform cleaning procedures Cleaning the External Source WARNING SHOCK HAZARD Dangerous high voltages are present Unplug...

Страница 85: ...dizing process creates a black coating on the surface of these aluminum parts Scratches in the coating can create a conductive path after re assembly 1 Place each part on a lint free cloth after remov...

Страница 86: ...e center shiny part of each lens with a cotton swab and isopropyl alcohol or methanol 2 Sonicate the lenses in IPA or methanol for 1 minute 3 Dry the parts in air or in an oven set to approximately 12...

Страница 87: ...lean the ion volumes you will need the following items Aluminum oxide Cotton swabs De ionized water Isopropyl Alcohol or Methanol Beakers Ultrasonicator CI Volume Holder CI Volume 1 Remove the spring...

Страница 88: ...CI ion volume into the holder and gently tighten While tightening ensure the tip of the screw remains centered in the hole in the CI ion volume NOTE Do not over tighten Over tightening may cause the C...

Страница 89: ...lens insulator screw and lens insulator 4 Turn the source over and remove the second filament Cleaning the Source Block 1 Use a cotton swab and slurry of aluminum oxide and de ionized water to clean...

Страница 90: ...super fine grade 400 grit silicon carbide sand paper until most discoloration disappears Be very careful not to touch or deform the filament during the process 3 Using a sharp razor blade or tip of ut...

Страница 91: ...he notched side down Be sure the assembly is fully seated in place 3 Place the two screws into the screw holes and tighten each screw evenly Do not over tighten 4 Turn the source assembly over and rep...

Страница 92: ...th the ion volume screw 4 Fully compress the spring Ensure the proper hole in the CI ion volume aligns with the transfer line hole 5 Hold the CI ion volume in and slowly tighten the ion volume screw u...

Страница 93: ...n should slide through the left hole in the insulator 2 Reinstall lens 2 The pin should slide through the middle hole in the insulator 3 Reinstall lens 3 The pin should slide through the right hole in...

Страница 94: ...o to Reinstalling the Analyzer Assembly on page 44 Go to Turning On the Mass Spectrometer on page 46 Cleaning the Internal Ionization Assembly Go to Turning Off the Mass Spectrometer on page 34 Go to...

Страница 95: ...e 6 Remove the filament assembly 7 Remove the gate retaining screw 8 The Center Ring is clipped around the end of the lens Push a capillary pick into the gap in the ring lift and slide the ring over t...

Страница 96: ...approximately 120 C for 30 minutes Cleaning the Internal Source Base To clean the Internal Source Base you will need the following items Aluminum oxide Cotton swabs De ionized water Isopropyl Alcohol...

Страница 97: ...r Ring over the gate so it snaps into the groove around the edge 2 Place the Gate on the Internal Source Base 3 Insert the Insulator into the screw hole 4 Place the screw into the Insulator and tighte...

Страница 98: ...Trap 1 If the source is left in place place the trap assembly on the holder provided with the source pins facing down 2 Remove the four retaining screws 3 Lift off the trap oven and place on a lint f...

Страница 99: ...ecause they will also remove the silica layer Remove Polyimide banana plugs from the end caps Use a toothbrush and liquid hand soap or dish detergent pH between 6 and 7 5 to gently scrub the trap part...

Страница 100: ...perimeter and the quartz should not move when touched The orientation of the notch in the spacer is not important 2 The two end cap electrodes are identical Place the end cap electrode on the quartz...

Страница 101: ...nd cap Be sure the spacer is seated completely flat on the end cap 4 Place the ring electrode on the quartz spacer 5 Place another quartz spacer on the ring electrode Be sure the spacer is seated comp...

Страница 102: ...side as the lower half Check the oven and quartz spacers There should not be any gaps If the quartz is a very tight fit try placing the quartz into the trap oven before putting the trap oven on the e...

Страница 103: ...ountersunk holes 2 Align the magnet structure with the three ceramic spacers insert the screws and tighten 3 Place the source into the end cap and align the two screws When the internal source is prop...

Страница 104: ...nternal Source External Source Go to Reinstalling the Source Ion Trap Assembly on page 41 Go to Reinstalling the Analyzer Assembly on page 44 Go to Turning On the Mass Spectrometer on page 46 70 of 12...

Страница 105: ...ltages are present Unplug power cord 3 Use a 3 16 and a 5 16 wrench to loosen the brass nut on the end of the transfer line 4 Remove the capillary column from the transfer line 5 Remove the brass nut...

Страница 106: ...s voltages are present Unplug power cord 2 Unplug the transfer line heater cable from connector J37 on the bulkhead Confirm that the transfer line is cool 3 Grasp the nose of the transfer line then ro...

Страница 107: ...umn The wide threaded opening of the nut should face the end of the column 13 Place a new graphite Vespel ferrule on the column with the taper facing the nut Slide the ferrule along with the nut about...

Страница 108: ...ely extend beyond the end of the measuring tool If there is no measuring tool available the end of the column should be measured to extend 8 mm beyond the internal transfer line tip opening 20 Graspin...

Страница 109: ...cable to connector J37 27 Replace the 4000 MS top cover Gently push the mass spectrometer toward the GC until the transfer line nut is visible inside the GC oven Take caution not to damage rear pneuma...

Страница 110: ...ree surface with the filament screws in the horizontal position Do not stand the ion trap on its end or ceramic dust may fall into the ion trap 2 Remove the two Phillips screws 3 Carefully lift the fi...

Страница 111: ...age 41 Go to Reinstalling the Analyzer Assembly on page 44 Go to Turning On the Mass Spectrometer on page 46 Conditioning the Filaments 1 Run Auto Tune of electron lens voltage three times 2 Run the m...

Страница 112: ...lament retention screw and place it on a lint free cloth 2 Lift off the ceramic plate and remove the filament assembly Installing the New Filament Assembly 1 Transfer the springs to the new filament a...

Страница 113: ...pectrometer on page 46 Replacing the Electron Multiplier Go to Turning Off the Mass Spectrometer on page 34 Go to Removing the Analyzer Assembly on page 37 WARNING SHOCK HAZARD Dangerous voltages are...

Страница 114: ...New Multiplier 1 Place the multiplier into the holder as shown The multiplier must be fully engaged by the clip at the bottom of the holder by pressing down and to the left as shown Failure to proper...

Страница 115: ...as line removes water and contaminants from the damping gas helium supply It has a limited life the length of which is dependent on the amount of material to which it has been exposed To replace the g...

Страница 116: ...h the 4000 MS is perfluorotributylamine PFTBA which has the chemical formula C12F27N This compound is also known as FC 43 fluorocarbon 43 NOTE There is no need to vent the vacuum system before you fil...

Страница 117: ...of the display within the OK region NOTE Other adjustments that affect ion time such as the multiplier gain filament current and background levels will influence this adjustment 9 Changing Operational...

Страница 118: ...al and Internal Sources on page 84 2 Go to Installing or Removing the Hybrid Plug on page 89 Changing from External to Hybrid Configuration 1 To switch the transfer line position from entering the Ext...

Страница 119: ...centering ring is in place Retighten the three screws The source you removed should be stored in the box provided 5 Go to Reinstalling the Source Ion Trap Assembly on page 41 Changing the Transfer li...

Страница 120: ...l transfer line tip opening after the internal tip is installed 6 Remove the measuring tool Internal Tip 7 Screw the brown Polyimide internal tip onto the transfer line and clean the column and surrou...

Страница 121: ...l external transfer line tip provided with the external source If necessary a 3 16 wrench can be used to stabilize the transfer line and a 5 16 wrench used to remove the tip External Tip 5 Loosen the...

Страница 122: ...e white retainer clip on the side of the manifold and under the foreline line Plug the cable into J37 on the bulkhead 8 Change the position of the ionization mode switch on the manifold electronics en...

Страница 123: ...ssure CI source through the unused transfer line hole in the CI Volume The supplied plug is installed in the transfer line hole in the external source by inserting the plug and turning until the plug...

Страница 124: ...90 of 127...

Страница 125: ...additional Liquid CI Inlet or LCI Inlet option allows the selection of certain liquids as sources for CI A 50 mL min restrictor is used for admitting reagent through the Liquid CI Inlet when one is in...

Страница 126: ...the selection of certain liquids as sources for CI A 200 mL min restrictor is used for admitting reagent through the Liquid CI Inlet when one is in Hybrid Configuration The operation of this option a...

Страница 127: ...of 30 psi 200 kPa Isobutane Isobutane should have a purity of 99 99 or better Use a gas cylinder with a two stage pressure regulator that has a stainless steel diaphragm and maximum inlet pressure of...

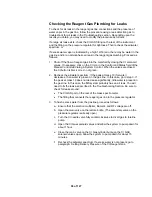
Страница 128: ...are closed the CI Gas icon to the left of the ion trap symbol is not green If the CI icon is green click on the icon so that it turns to black 4 Install a two stage pressure regulator on the reagent g...

Страница 129: ...gas cylinder is closed 10 Open the main control valve on the lecture bottle Next open the secondary valve and adjust the pressure valve to approximately 20 psi 11 Open the mass spectrometer door Verif...

Страница 130: ...water spectrum If the peak at mass 19 for water decreases then water is present in the gas line In this case go to step 3 If the peak at mass 19 does not decrease significantly little water is present...

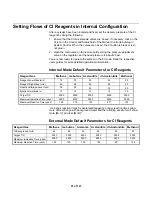
Страница 131: ...efault Parameters for CI Reagents Reagent Gas Methane Isobutane Acetonitrile d3 Acetonitrile Methanol Reagent Low Mass m z 15 35 35 35 25 Reagent High Mass m z 45 65 60 60 50 Reaction Storage Level m...

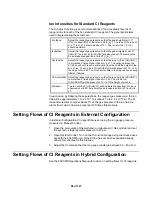
Страница 132: ...ion at m z 46 CD3CND is more than 5 times higher than at m z 44 The m z 58 ion CD3CDCND will be present at 10 15 the height of m z 46 Methanol The ion at m z 33 CH3OH H will dominate the spectrum No i...

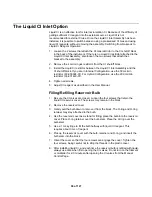
Страница 133: ...ictor 03 931440 01 4 Tighten all screws 5 Adjust CI reagent as described in the User Manual Filling Refilling Reservoir Bulb 1 Be sure the CI valves are closed Loosen the four screws that retain the l...

Страница 134: ...en the 2 screws that attach the L bracket to the liquid CI inlet block 2 Remove the liquid CI restrictor end that inserts into the back of the instrument rotate the restrictor out of the way 3 Install...

Страница 135: ...mixture is very well suited to troubleshooting injector and column problems Please see Running the COLTEST Sample on page 109 for a description on the use of this test mixture To identify the source...

Страница 136: ...lumn from the ion trap by shutting down the system and capping the transfer line with a no hole ferrule Troubleshooting Problems with Spectra The following describes the common problems a user may enc...

Страница 137: ...ap Assembly 1 Check whether you have incorrectly assembled the trap components 2 Check whether there is a problem with the electron multiplier Loss of High Mass Peaks The loss of high mass peaks may b...

Страница 138: ...pplemental waveform value is too high or too low Supplemental waveforms are not functioning properly Check the Ion Content of the Trap With the trap turned on note the TIC total ion current value If t...

Страница 139: ...hissing sound These leaks may be due to extremely loose fittings improperly seated O rings or open valves If you suspect a major leak do not turn on the electron multiplier RF voltage or filament Usin...

Страница 140: ...ir water spectrum obtained from a system with a large air leak and little water vapor is indicated by The peaks at masses 18 19 28 and 32 are broadened As a leak increases all peaks broaden and eventu...

Страница 141: ...he septum may arise from loose injector nuts or overuse of the septum Regularly change the septum as part of your routine GC preventive maintenance program To reduce the level of air bleeding into the...

Страница 142: ...n subsequent applications of leak detection gas Pneumatics manifolds Vent valve fitting Vacuum manifold flange Transfer line nut Injector nut Septum nut Fixing High Water Levels The presence of excess...

Страница 143: ...the expected results when running the COLTEST sample with a 30 m vf5ms column 0 25 mm ID 0 25 m film thickness Using the COLTEST Sample for Troubleshooting The Coltest sample provides a good mechanism...

Страница 144: ...dodecane at approximate levels of 1 ppm in hexane Analysis of the mixture yields information about solvent tailing column efficiency dead volume active sites in the injector column etc You can use the...

Страница 145: ...he Maintenance section Insufficient vaporization of the higher boiling point components Raise the injector temperature and lower the injection speed Trap temperature is too low Increase the trap tempe...

Страница 146: ...jections Lower the injection temperature Column is cracked Re cut and install the column A piece of septum is stuck in the injector insert Replace the insert and septum Correcting Extra Unexpected Pea...

Страница 147: ...sary replace the flow controller regulator Column contamination or degradation Condition or replace the column Injector leaks Replace the septum at regular intervals Check that the septum nut and capi...

Страница 148: ...114 of 127...
Страница 149: ...environment Operating a system or maintaining it in operational condition outside of the power and operating environment limits listed below could cause failures of many types The repair of such fail...

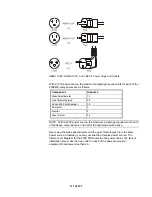
Страница 150: ...from the GC is approximately 2m 6 ft long and fitted with National Electronics Manufacturers Association NEMA 5 20P power plugs The NEMA 5 20P power plug and corresponding outlet are shown in Figure...

Страница 151: ...rinter 3 4 NOTE With a 230V power source the maximum amperage requirement of each of the above components is one half of the amperage given above Never plug the mass spectrometer and the gas chromatog...

Страница 152: ...000 MS Occasionally you may encounter line power sources of unacceptable quality such power sources may adversely affect the operation of the 4000 GC MS The 4000 GC MS is tested under EMC Standard 613...

Страница 153: ...rature humidity monitor This will ensure that your laboratory is always in conformance with temperature and humidity specifications Exhaust System It is your responsibility to provide an adequate exha...

Страница 154: ...er line 3 Slide the 4000 MS toward the GC until the transfer line is protruding into the GC oven 4 Connect vacuum tubing from the rear of the 4000 MS to the foreline pump with a clamping ring 5 Connec...

Страница 155: ...umn 4 Use the alignment tool to prevent the transfer line from turning while you loosen the brass capillary nut connecting the column to the transfer line 5 Cap the transfer line with a capillary nut...

Страница 156: ...24 91 Kit Getter Replacement 03 930100 01 Valve Needle Parker CAL GAS 03 932641 01 He EFC Assembly 03 931772 01 Tube CI IN Pneumatic Blk Needle Blk 03 930101 01 Valve Needle Parker CI GAS 03 930107 02...

Страница 157: ...3 931679 01 EI Volume 03 931680 01 Gasket Ext Source 03 931681 01 Retainer Lens Pins External Source 03 931683 01 Ring Center Trap 03 931684 01 Assy Lens 1 03 931685 01 Assy Lens 2 03 931686 01 Assy L...

Страница 158: ...210 OD 0 026 DIA 0 380L SST 21 709266 00 Spring COMP 720 OD 055 Wire 3 0L SH 587 03 931774 01 CI Gas Inlet Manifold 03 931726 01 Elbow Vacuum 4000 MS Chemical Ionization Part Number Description 03 93...

Страница 159: ...3976 00 Union 1 16 SST for PID ELCD HALL 28 247071 00 1 8 Brass Plug 03 917084 00 1 8 Capillary Column Nut 03 931783 01 He Getter Mounting Clip 88 299440 00 Vacuum Grease 03 917142 00 Viton Ferrule 03...

Страница 160: ...nal EI CI 03 930127 01 Test Std 4000 MS In External EI 2 pg L OFN 03 920305 00 Benzophenone External CI Sensitivity Sample 50 pg L 03 931130 01 Test Std 4000MS In External NCI 1 pg L DFB 03 920353 00...

Страница 161: ...Cryogenics Information about your GC column i e the manufacturer bonded phase film thickness ID and length If you are having problems with your computer and or software please be prepared to provide...

Отзывы: