


VARI-590H
2.4.1.1 Assembling procedure
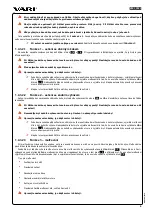
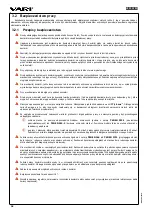
Use the following procedure for assembling the machine:
(It is advised to assemble the machine with a second person’s assistance)
1. Take all parts of the lawnmower out of box.
2. According
Pict. 2
> 1
screw the lower part
8
of handlebars to chassis of lawnmower
7
. Lift both arresting levers
12
, to
release the upper part of handlebars for folding
> 2
and push the locking lever closed to lock the handlebars in the operating
position (adjust the tension by turning the lock nut with a suitable spanner). 5. Put the recoil starter on the right of the handle
4
and fix the cable with the plastic collar
> 3
.
3. Put the metallic frame
5
inside the grass catcher
Pict.
> 4
,
raise the rear cover
10
> 5
and hitch the grass bag on rear of
mower
> 6
.
2.4.2 Putting into operation
The cutter may be delivered without the engine operating fluids
(according to various national rules)!
First read the engine user manual
carefully! This way, you may avoid possible damage.
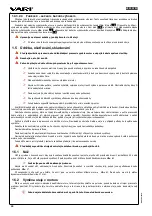
2.4.2.1 Engine starting
1. Check the engine oil level; fill the engine with prescribed type and amount of oil if necessary. Fill the tank with prescribed amount
and type of petrol.
2. When starting cool engine, turn throttle choke lever
4
to
TURTLE
position. When starting warm engine, turn throttle choke
lever to
HARE
position -
Pict.
> 1
.
3. Standing behind the unit, grasp the brake control lever
2
and hold it against the upper handle
16
-
Pict.
> 2
.
4. Grasp the starting rope handle as shown in followed figure and pull up rapidly.
. First let cold engine run for about 30 sec in
TURTLE
position and than shift the accelerator lever into
HARE
position.
5. Releasing the brake control lever
2
stops the engine and blade.
Blade is in action as soon as engine started. While the machine is working maintain the brake control lever in
working position. The engine will stop as soon as you release the brake control lever.
Do not go away from the machine!
2.4.2.2 Putting the machine in motion
To put the machine in motion use lever
1
on
Pict. 1
. Press the lever all the way to the handle
16
and the machine moves ahead
immediately. Adjust the speed of your walk to machine speed as soon as you press the lever and the machine moves.
Hold the levers with both hands while working with the machine.
Always press the clutch lever all the way down to the handlebars. If the lever is not pressed properly, it
causes damage to the clutch.
The wheel drive clutch lever does not adjust travelling speed!
Never reverse with the wheel drive clutch pressed!
2.4.2.3 Machine and engine stopping
If you wish to stop the machine, release the wheel drive clutch lever
1
. Whell drive of the machine stops, but the blade turns.
Realese the break control lever
2
to stop the engine and blade.
Always switch off the engine and wait for the cutting disk to stop before starting any activity near the machine!
Always switch the engine off before leaving the machine!
2.4.2.4 Cutting height adjustment
Apply outward pressure to disengage lever
6
on
Pict.
from rack and then move lever forward or back to adjust height –
Pict.
2.4.3 Working with the machine
2.4.3.1 Cutting width
Always adjust the cutting width to the stand density!
It is not recommended to use the maximum cutting width (see
) given by the blade length. In a terrain, the user cannot operate
the cutter straight, and precisely enough to cut the brushes in complete cutting width. We recommend to use the cutter partially (front
wheel) in the cut stand.
2.4.3.2 Methods of stand cutting
Remove any solid parts form the stand before cutting (such as stones, wires, loose construction leftovers, etc.),
as these could be thrown away or damage the machine. If these cannot be removed, avoid them.
Particular precautions must be taken while lifting or reversing with the machine!
22
Multilingual manual and its Czech translation are part of the cutter.
23
Engine starting instructions are described in detail in engine user manual.
21
R
ev
iz
e
0
5
/2
0
1
5