background image

5. Installation: 

Installation 

6

3.5” SATA to USB 3.0 & FireWire 800 External Hard Drive Enclosure w/ Fan

5.1. Hardware Installation:

Installing the hard drive:
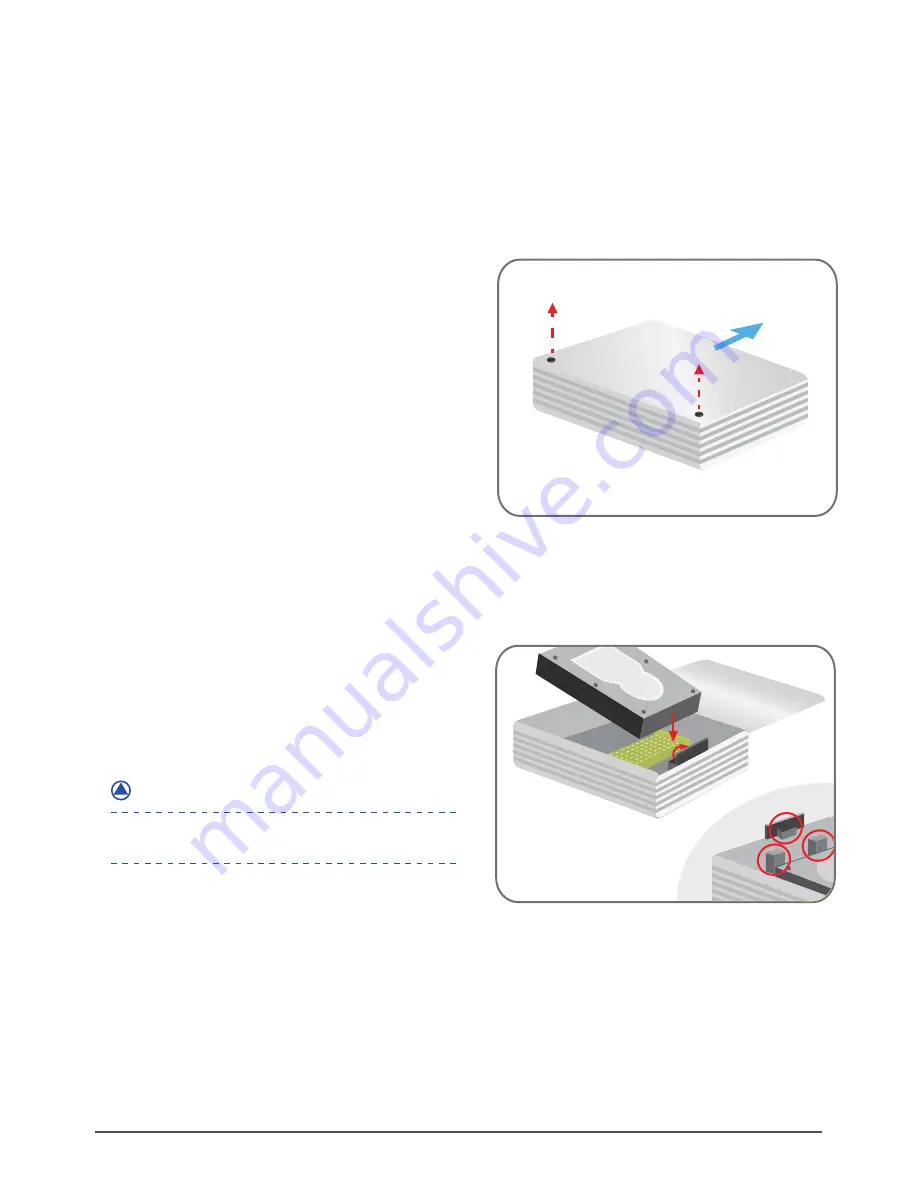
( figure 5.1-A )

( figure 5.1-B )

(1)

Carefully unscrew the two screws and 

slide the aluminum cover outward to open

(figure 5.1-A)

(2)

Flip the protection cover upward and 

carefully install the 3.5” SATA hard drive 

into the enclosure. 

(figure 5.1-B)

Optional Foam Spacer

If your hard drive model is loose with the protection 
cover, please use the foam spacers provided. 

NOTE : 

Содержание NexStar - HX

Страница 1: ......

Страница 2: ...registered trademark of Vantec Thermal Technologies All other third party brands and names are the property of their respective owners 3 5 SATA to USB 3 0 FireWire 800 External Hard Drive Enclosure w...

Страница 3: ...Specifications Features 03 3 System Requirements 04 4 Parts Layout 05 5 Installation 06 6 Disconnecting the NexStar HX 09 7 Hard Drive Formatting Guide 10 8 Warranty 14 9 Contact 14 Table of Contents...

Страница 4: ...features a hard aluminum case shell that effectively draws away the heat while an active controlled 80mm fan pushes cool air into the enclosure ensuring your hard drive is protected and cooled Integra...

Страница 5: ...age Capacity please check our website www vantecusa com External Interface USB 3 0 Backwards Compatible With USB 2 0 1 1 FireWire 800 HD Capacity Up to 3 TB Power Supply AC Adapter Material Aluminum P...

Страница 6: ...ications 2 3 For USB 3 0 speeds the system must support USB 3 0 specifications For FireWire Speeds the System Must Support FireWire Specifications 1 For USB 2 0 speeds the system must support USB 2 0...

Страница 7: ...4 Parts Layout Parts Layout 5 3 5 SATA to USB 3 0 FireWire 800 External Hard Drive Enclosure w Fan Power 80mm Fan Power FireWire 800 USB 3 0 Fan Switch...

Страница 8: ...gure 5 1 A figure 5 1 B 1 Carefully unscrew the two screws and slide the aluminum cover outward to open figure 5 1 A 2 Flip the protection cover upward and carefully install the 3 5 SATA hard drive in...

Страница 9: ...ure 5 1 C 3 Once the hard drive has been installed flip the protection cover downward to lock the hard drive in place figure 5 1 C figure 5 1 D 4 Slide the aluminum cover back on and fasten the two sc...

Страница 10: ...ease confirm your hard disk is partitioned and formatted NOTE For new hard drives you will need to initialize and partition your hard drive before it will appear in Windows Explorer or on your Mac des...

Страница 11: ...you wish to remove and click on Stop The system should prompt It is now safe to remove the USB device If not wait for any programs still using the device to finish and try again You may now safely tu...

Страница 12: ...Management and you will see your Hard Drive shown as Unallocated Disk number may vary 3 5 SATA to USB 3 0 FireWire 800 External Hard Drive Enclosure w Fan In order to use a disk volume larger than 2 T...

Страница 13: ...ed box and select New Partition Disk number may vary STEP4 The New Partition Wizard will appear Please follow the New Partition Wizard step by step instructions to complete the Hard Drive formatting p...

Страница 14: ...will be recognized as a New Volume New Volume drive letter may vary i e New Volume Z STEP6 Double click My Computer You will see New Volume appear on your PC Drive letter may vary i e New Volume Z Th...

Страница 15: ...u may adjust the size of each partition using the slide bar between the partitions in the Volume Scheme area In the Volume Information section enter the desired name for each volume partition You may...

Страница 16: ...time frame please go to www vantecusa com for information on how to receive warranty exchange or repair Cosmetic defects and missing parts are not covered under this warranty Please check the content...

Отзывы: