background image

www.fmiproducts.com

125525-01E

4

SAFETY

Continued

1.  This appliance is only for use with the type 

of gas indicated on the rating plate. This 

appliance is not convertible for use with 

other gases.

2.  Do not place propane/LP supply tank(s) 

inside any structure. Locate propane/

LP supply tank(s) outdoors (propane/LP 

units only).

3.  If you smell gas

• shut off gas supply

• do not try to light any appliance

• do not touch any electrical switch; do not 

use any phone in your building

• immediately call your gas supplier from 

a neighbor’s phone. Follow the gas sup-

plier’s instructions

• if you cannot reach your gas supplier, 

call the fire department

4.  This heater shall not be installed in a bed-

room or bathroom, unless installed as a 

vented appliance. See 

Installing Damper 

Clamp Accessory for Vented Operation

page 12. This gas log set may not be in-

stalled as a vented appliance in a bedroom 

or bathroom in the Commonwealth of Mas-

sachusetts.

5.  Before installing in a solid fuel burning fire-

place, the chimney flue and firebox must 

be cleaned of soot, creosote, ashes and 

loose paint by a qualified chimney cleaner. 

Creosote will ignite if highly heated. A dirty 

chimney  flue  may  create  and  distribute 

soot within the house. Inspect chimney 

flue for damage. If damaged, repair flue 

and firebox before operating heater.

6.  Do not burn solid-fuel in a masonry or 

UL127  factory-built  fireplace  in  which  a 

vent-free room heater is installed.

7.  If fireplace has glass doors, never operate 

this heater with glass doors closed. If you 

operate  heater  with  doors  closed,  heat 

buildup inside fireplace will cause glass to 

burst. Make sure there are no obstructions 

across openings of fireplace.

8.  To prevent the creation of soot, follow the 

instructions in 

Cleaning and Maintenance

page 30.

9.  Before using furniture polish, wax, carpet 

cleaner or similar products, turn heater off. If 

heated, the vapors from these products may 

create a white powder residue within burner 

box or on adjacent walls and furniture.

10. This heater needs fresh, outside air ven-

tilation to run properly. This heater has an 

Oxygen Depletion Sensing (ODS) safety 

shutoff system. The ODS shuts down the 

heater if enough fresh air is not available. 

See 

Air for Combustion and Ventilation

page 6. If heater keeps shutting off, see 

Troubleshooting

, page 32.

11. Do not run heater

• where flammable liquids or vapors are 

used or stored

• under dusty conditions

12. Do not use this heater to cook food or burn 

paper or other objects.

13. Do not use heater if any part has been ex-

posed to or under water. Immediately call 

a qualified service technician to inspect 

the room heater and to replace any part 

of the control system and any gas control 

which has been under water.

14. Do not operate heater if any log is broken. 

Do not operate heater if a log is chipped 

(dime-sized or larger).

15. Turn heater off and let cool before servic-

ing, installing or repairing. Make sure the 

selector switch is in the OFF position. Only 

a qualified service person should install, 

service or repair heater.

16. Make sure the selector switch is in the 

OFF position when you are away from 

home for long periods of time.

17. Remote-ready heaters must not be con-

nected to any external electrical source.

18. Operating heater above elevations of 

4,500 feet may cause pilot outage.

19. To prevent performance problems, do not 

use propane/LP fuel tank of less than 100 

lb. capacity (propane/LP units only).

20. Provide adequate clearances around air 

openings.

Содержание BG18NR

Страница 1: ...you cannot reach your gas supplier call the fire department Installation and service must be performed by a quali fied installer service agency or the gas supplier INSTALLER Leave this manual with the...

Страница 2: ...ation only in a solid fuel burning masonry or UL127 factory built fireplace or in a listed ventless firebox enclo sure It is design certified for these installations in accordance with ANSI Z21 11 2 E...

Страница 3: ...l for reference It is your guide to safe and proper operation of this fireplace WARNING Any change to this heater or its controls can be dangerous WARNING Do not use a blower insert heat exchanger ins...

Страница 4: ...o obstructions across openings of fireplace 8 To prevent the creation of soot follow the instructions in Cleaning and Maintenance page 30 9 Before using furniture polish wax carpet cleaner or similar...

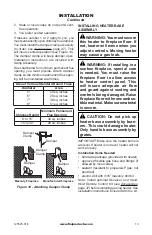
Страница 5: ...se assembly from cartons Note Do not pick up heater base assem bly by burners This could damage heater Always handle base assembly by grate 2 Remove all protective packaging applied to logs and heater...

Страница 6: ...ld air out and the warm air in During heating months home owners want their homes as airtight as possible While it is good to make your home energy efficient your home needs to breathe Fresh air must...

Страница 7: ...enings add the volume of these rooms to the total volume of the space 2 Multiply the space volume by 20 to determine the maximum Btu Hr the space can support _________ volume of space x 20 Maxi mum Bt...

Страница 8: ...ure 2 You can also remove door into adjoining room see option 3 Figure 2 Follow the National Fuel Gas Code ANSI Z223 1 NFPA 54 Air for Combustion and Ventilation for required size of ventilation grill...

Страница 9: ...oisture to the air Although this is beneficial installing heater in rooms without enough ventilation air may cause mildew to form from too much moisture See Air for Combustion and Ventila tion page 6...

Страница 10: ...he fireplace cabinet to any combustible material and wall should follow diagram in Figure 4 Example The face of a mantel bookshelf etc is made of combustible material and protrudes 3 1 2 from the wall...

Страница 11: ...s above the fireplace opening Noncombustible materials such as slate marble tile etc must be at least 1 2 thick With sheet metal you must have noncombustible material be hind it Noncombustible materia...

Страница 12: ...level you must maintain the minimum distance of 14 to combustibles see Figure 8 B If combustible materials are less than 14 to the fireplace you must install appliance at least 5 above the combustibl...

Страница 13: ...his could damage heater Only handle base assembly by grates IMPORTANT Make sure the heater burners are level If heater is not level heater will not work properly Installation Items Needed hardware pac...

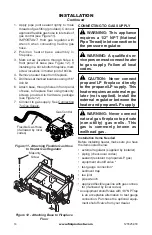
Страница 14: ...ttaching Base to Fireplace Floor Masonry Screw CONNECTING TO GAS SUPPLY WARNING This appliance requires a 1 2 NPT National Pipe Thread inlet connection to the pressure regulator WARNING A qualified se...

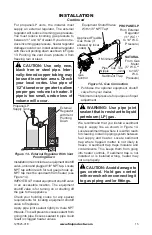
Страница 15: ...ped matter is not likely to freeze A sediment trap traps moisture and contaminants This keeps them from going into heater controls If sediment trap is not installed or is installed wrong heater may no...

Страница 16: ...in gas valve located on or near gas meter for natural gas or using compressed air 4 Check all joints of gas supply piping sys tem Apply noncorrosive leak detection fluid to all joints Bubbles forming...

Страница 17: ...e BG E 2436 series burner systems 1 Install left bracket to left side of chassis us ing 2 screws provided see Figure 18 2 Install right bracket to right front of chassis using 2 screws provided see Fi...

Страница 18: ...t Log Figure 21 Installing Log Sets Middle Right Log Middle Left Log Bottom Log Pin on Front Left Log Figure 22 Installing LBG36 SM Model Control Cover Logs Left Control Cover Log Right Control Cover...

Страница 19: ...when compared to the other logs Figure 24 Installing Log Set Base Assembly Ramp Log Figure 25 Installing Log Set Ramp Log Metal Tab 2 The log must sit flat on the black sheet metal and behind the left...

Страница 20: ...B G 2 4 R M L B G 3 0 R M Front Right Log Top Right Log FIBER LOG MODELS LBG 18 24 30 CM Note Your appliance may vary from model shown but log placement will be the same 1 Place rear log in back corn...

Страница 21: ...ing Top Left Front Log Front Top Left Log Front Top Right Log Rectangular Projection Rectangular Projection Rectangular Hole Underneath Rectangular Hole Underneath Figure 34 Installing Top Right Front...

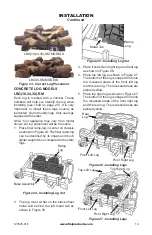
Страница 22: ...in 10 Place the left and right ember logs as shown in Figure 37 Do not place the logs on the ember bed pan they are intended to cover the sheet metal on the front of the base assembly CONCRETE LOG MO...

Страница 23: ...ember bed log 24 30 D 047 has a hole in the log that sets on the grate finger and the other end rest on the fireplace floor place log as shown in Figure 42 The right ember bed logs for 18 D 072 has a...

Страница 24: ...ear middle log 18 D 068 24 30 D 042 should fit between the ramp log and the rear burner The left and right middle logs have recessed areas for the rear middle log to sit into See Figure 45 There may b...

Страница 25: ...is placed over a shoulder screw Place the ember chunks as shown in Figure 50 on page 26 by placing the ember chunk with the number 1 on the left 2 in the center and 3 on the right These numbers are em...

Страница 26: ...replac ing see Parts page 38 Platinum Bright Ember placement Add embers to front flat burner Gently remove embers from bag Separate pieces of ember material and place on surface of flat burner just be...

Страница 27: ...ructions exactly a fire or explosion may result causing property damage per sonal injury or loss of life A This appliance has a pilot which must be lighted by hand When lighting the pi lot follow thes...

Страница 28: ...for 30 sec onds after lighting pilot After 30 seconds release control knob If control knob does not pop out when released contact a qualified service person or gas supplier for repairs Note If pilot...

Страница 29: ...our pilot may vary from pilots shown Thermocouple Thermocouple Pilot Burner FRONT BURNER FLAME PATTERN Figure 58 shows correct front burner flame pattern Figure 59 shows incorrect front burner flame p...

Страница 30: ...r to each heating season Blocked air holes will create soot We recommend that you clean the unit every three months during operation and have heater inspected yearly by a qualified service person We a...

Страница 31: ...air through the air inlet hole You may blow through a drinking straw if compressed air is not available CLEANING AND MAINTENANCE Continued LOGS If you remove logs for cleaning refer to Installing Log...

Страница 32: ...n PILOT position 4 Air in gas lines when in stalled 5 Depleted gas supply pro pane LP only 6 ODS pilot is clogged 7 Gas regulator setting is not correct REMEDY 1 Reconnect ignitor cable 2 Free ignitor...

Страница 33: ...ssed in 30 seconds 3 Wait one minute for safety interlock system to reset Repeat ignition operation 4 Fully open equipment shut off valve 5 A Contact local natural or propane LP gas company B Clean OD...

Страница 34: ...let warm up for a minute 2 Operate burners until air is removed from line Have gas line checked by local natural or propane LP gas company 3 Observe minimum installa tion clearances see pages 9 throug...

Страница 35: ...e Warning statement at top of page 2 Control valve or gas control defective 1 Foreign matter between control valve and burner 2 Gas leak See Warning statement at top of page 1 Optional Hand held remot...

Страница 36: ...ural Ignition Electronic Manifold Pressure 3 4 W C Inlet Gas Pressure in of water Max 10 5 W C Min 5 W C BG2436PR Rating Variable 25 000 36 000 Btu Hr Type Gas Propane LP Ignition Electronic Manifold...

Страница 37: ...n calling please have your model and serial numbers of your heater ready You can also visit FMI PRODUCTS LLC s technical services web site at www fmiproducts com REPLACEMENT PARTS Note Use only origin...

Страница 38: ...www fmiproducts com 125525 01E 38 PARTS REMOTE READY CONTROL MODELS BG18NR BG18PR BG2436NR BG2436PR 1 3 20 16 5 27 8 9 19 7 22 18 23 21 17 10 6 11 2 4 26 24 13 25 14 20 15...

Страница 39: ...t Ramp Burner 1 14 113242 01 Rear Ramp Burner 1 113242 02 Rear Ramp Burner 1 15 112713 01 Pilot Bracket 1 112713 03 Pilot Bracket 1 16 112715 01 Heat Shield 1 17 112782 02 Air Deflector Bracket 1 1127...

Страница 40: ...RT NO DESCRIPTION BGE18NR BGE18PR BGE2436NR BGE2436PR QTY 101480 12 Wire Harness 1 100563 01 Warning Plate 1 103877 01 Lighting Instruction Plate 1 100639 12 Caution Decal 1 101137 02 Hardware Kit 1 1...

Страница 41: ...12465 02 Front Ramp Burner 1 15 113242 01 Rear Ramp Burner 1 113242 02 Rear Ramp Burner 1 16 112713 01 Pilot Bracket 1 17 112715 01 Heat Shield 1 18 120466 02 Flex Tube 1 19 121120 01 Air Shield 1 20...

Страница 42: ...83 01 125683 01 Middle Right Log 1 4 121699 03 121699 09 121699 15 Middle Left Log 1 5 121699 01 121699 13 121699 13 Bottom Log Remote 1 6 121699 06 121699 12 121699 18 Rear Log 1 7 126080 01 126080 0...

Страница 43: ...ght Log 1 6 121699 22 Back Log 1 7 121699 23 Left Small Front Log 1 8 121699 24 Right Small Front Log 1 9 121699 25 Left Control Cover Log 1 10 121699 26 Right Control Cover Log 1 11 126080 01 Switch...

Страница 44: ...1 4 125055 16 125055 05 125055 11 Middle Left Log 1 5 125056 01 125056 02 125056 02 Ramp Log 1 6 125055 14 125055 03 125055 09 Rear Log 1 7 125055 06 125055 06 125055 06 Top Log 1 8 121079 01 121079...

Страница 45: ...06 125829 04 Log Top Right Front 1 7 125827 07 125828 07 125828 07 Log Middle 1 8 125827 08 125828 08 125828 08 Log Top Left 1 9 125827 09 125828 09 125828 09 Log Top Right 1 10 125827 10 125827 10 1...

Страница 46: ...D 073 125852 04 D 048 125852 04 D 048 Log Left Front Ember Bed 1 5 125851 05 D 072 125852 05 D 047 125852 05 D 047 Log Right Front Ember Bed 1 6 125851 06 D 066 125852 06 D 040 125852 06 D 040 Log Le...

Страница 47: ...the log heater will automatically cycle from pilot to the heat setting selected WALL MOUNT ON OFF SWITCH GWMS2 For all models Allows the gas log heater to be turned on and off with a wall switch FLOO...

Страница 48: ...product and or FMI PRODUCTS LLC who will provide original factory replacement parts Failure to use original factory replacement parts voids this warranty Travel handling transportation diagnostic mat...

Отзывы: