background image

101850

OWNER’S MANUAL

11

INSPECTING
BURNER

Check pilot flame pattern and burner flame
pattern often.

PILOT FLAME PATTERN

Figure 19 shows a correct pilot flame pat-
tern. Figure 20 shows an incorrect pilot
flame pattern. The incorrect pilot flame is
not touching the thermocouple. This will
cause the thermocouple to cool. When the
thermocouple cools, the heater will shut
down.

OPERATING
HEATER

Continued

1.

Remove front panel (see Figure 10,
page 7).

2.

Follow steps 1 through 5 under Light-
ing Instructions
, page 10.

3.

With control knob pressed in, strike
match. Hold match to pilot until pilot
lights.

4.

Keep control knob pressed in for 10
seconds after pilot is lit. After 10 sec-
onds, release control knob.

5.

Replace front panel.

Thermocouple

Figure 20 - Incorrect Pilot Flame Pattern

Figure 19 - Correct Pilot Flame Pattern

Thermocouple

GRH/OV 008

BAD PILOT/LP

If pilot flame pattern is incorrect, as shown
in Figure 20

• turn heater off (see To Turn Off Gas

to Appliance, page 10)

• see  Troubleshooting, pages 12

through 14

GRH/OV 007

GOOD PILOT/LP

Pilot Burner

Pilot Burner

MANUAL LIGHTING
PROCEDURE

BURNER FLAME PATTERN

Figure 21 shows a correct burner flame
pattern. Figure 22 shows an incorrect burner
flame pattern.

Figure 21 - Correct Burner Flame Pattern
(Model VP10 Shown)

Figure 22 - Incorrect Burner Flame Pattern
(Model VP10 Shown)

If burner flame pattern is incorrect, as shown
in Figure 22

• turn heater off (see To Turn Off Gas

to Appliance, page 10)

• see  Troubleshooting, pages 12

through 14

CLEANING AND
MAINTENANCE

ODS/PILOT AND BURNER
ORIFICE

• Use a vacuum cleaner, pressurized

air, or small, soft bristled brush to
clean.

CABINET

Air Passageways

• Use a vacuum cleaner or pressurized

air to clean.

Exterior

• Use a soft cloth dampened with a

mild soap and water mixture. Wipe
the cabinet to remove dust.

 WARNING: Turn off heater

and let cool before cleaning.

 CAUTION: You must keep

control areas, burner, and circu-
lating air passageways of heater
clean. Inspect these areas of
heater before each use. Have
heater inspected yearly by a quali-
fied service person. Heater may
need more frequent cleaning due
to excessive lint from carpeting,
bedding material, etc.

Содержание VP5C

Страница 1: ...gas supplier from a neighbor s phone Follow the gas supplier s instructions If you cannot reach your gas supplier call the fire department Installation and service must be performed by a qualified installer service agency or the gas supplier WARNING This is an unvented gas fired heater It uses air oxygen from the room in which it is installed Provisions for adequate combustion must be provided Ref...

Страница 2: ...del VP10 shall not be in stalled in a bathroom 5 Never install the heater in a recreational vehicle where curtains furniture clothing or other flammable objects are less than 36 inches from the front top or sides of the heater as a fireplace insert in high traffic areas in windy or drafty areas 6 Always run heater with control knob at LOW or HIGH locked positions VP10 or ON position VP5C Never set...

Страница 3: ...installed in a confined space unless provisions are pro vided for adequate combustion and ventilation air Read the fol lowing instructions to insure proper fresh air for this and other fuel burning appliances in your home Today s homes are built more energy effi cient than ever New materials increased insulation and new construction methods help reduce heat loss in homes Home own ers weather strip...

Страница 4: ...TION Continued Confined and Unconfined Space TheNationalFuelGasCode ANSIZ2123 1 1992 Section 5 3 defines a confined space as a space whose volume is less than 50 cubicfeetper1 000Btuperhour 4 8m3per kw of the aggregate input rating of all appliances installed in that space and an unconfined space as a space whose volume is not less than 50 cubic feet per 1 000 Btu per hour 4 8 m3 per kw of the agg...

Страница 5: ...or into adjoining room see op tion 3 Figure 2 Follow the National Fuel Gas Code NFPA 54 ANSI Z223 1 Section 5 3 Air for Combustion and Ventilation for required size of ventilation grills or ducts W A R N I N G R e w o r k worksheet adding the space of the adjoining unconfined space The combined spaces must have enough fresh air to supply all appliances in both spaces Figure 2 Ventilation Air from ...

Страница 6: ... designed to be mounted on a wall WARNING Maintain the mini mumclearancesshowninFigure 4 Ifyoucan providegreaterclear ancesfromfloor ceiling andjoin ing wall WARNING Never install the heater in a bathroom VP10 only in a recreational vehicle where curtains furniture clothing or other flammable objects are less than 36 inches from the front top or sides of the heater as a fireplace insert in high tr...

Страница 7: ...in or Thick Wall thick wall shown Solid Wall 1 16 Space INSTALLING TO WALL Continued Placing Heater On Mounting Screws 1 Locate two keyhole slots on back panel of heater see Figure 9 2 Place large openings of slots over screwheads Slide heater down until screws are in small portion of slots Figure 11 Installing Bottom Mounting Screw Figure 9 Location Of Keyhole Slots On Back Panel Of Heater Keyhol...

Страница 8: ... trap where it is within reach for cleaning Locate sedi ment trap where trapped matter is not likely to freeze A sediment trap traps moisture and contaminants This keeps them from going into heater controls If sediment trap is not installed or is installed wrong heater may not run properly Installation must include a manual shutoff valve ground joint union and plugged 1 8 NPT tap Locate NPT tap wi...

Страница 9: ...propane LP supply tank valve 3 Make sure control knob of heater is in the OFF position 4 Check all joints from manual shutoff valve to control valve see Figure 15 Apply mixture of liquid soap and wa ter to gas joints Bubbles forming show a leak 5 Correct all leaks at once 6 Light heater see Operating Heater pages 9 through 11 Check all other internal joints for leaks 7 Turn off heater see To Turn ...

Страница 10: ...to gas supply If so the control knob may need to be pressed in for 30 sec onds This will allow air to bleed from the gas system If control knob does not pop up when released contact a qualified service person or gas supplier for repairs 6 With control knob pressed in push down and release ignitor button This will light pilot The pilot is attached to the front of burner If needed keep pressing igni...

Страница 11: ...e page 10 see Troubleshooting pages 12 through 14 GRH OV 007 GOOD PILOT LP Pilot Burner Pilot Burner MANUAL LIGHTING PROCEDURE BURNER FLAME PATTERN Figure 21 shows a correct burner flame pattern Figure22showsanincorrectburner flame pattern Figure 21 Correct Burner Flame Pattern Model VP10 Shown Figure22 IncorrectBurnerFlamePattern Model VP10 Shown Ifburnerflamepatternisincorrect asshown in Figure ...

Страница 12: ... pilot is clogged 7 Gas regulator setting is not correct REMEDY 1 Replace ignitor 2 Replace ignitor 3 Reconnect ignitor cable 4 Free ignitor cable if pinched by any metal or tubing Keep ignitor cable dry 5 Tighten nut holding piezo ignitor to heater cabinet Nut is located inside heater cabinet at top 6 Replace ignitor cable 7 Replace piezo ignitor 1 Turn on gas supply or open manual shutoff valve ...

Страница 13: ...t smoke or odor during initial opera tion Heater produces a clicking ticking noise just after burner is lit or shut off 1 Clean burner orifice s see Cleaning and Maintenance page 11 or replace burner orifice s 2 Replace burner orifice s 3 Contact local propane LPgas company 1 Contact local propane LPgas company 2 Clean burner orifice s see Cleaning and Maintenance page 11 or replace burner orifice...

Страница 14: ...ir is available 2 Low line pressure 3 ODS pilot is partially clogged REMEDY 1 Ventilate room Stop using odor caus ing products while heater is running 2 Refill supply tank 3 Locate and correct all leaks see Check ing Gas Connections page 9 1 Open window and or door for ventila tion 2 Contact local propane LPgas company 3 Clean ODS pilot see Cleaning and Maintenance page 11 OBSERVED PROBLEM Heater ...

Страница 15: ...ed under warranty ACCESSORY Purchase this heater accessory from your local dealer If they cannot supply this ac cessory call DESA International s Parts Department at 1 800 972 7879 for infor mation You can also write to the address listed on the back page of this manual MANUAL SHUTOFF VALVE GA5010 Manual shutoff valve with 1 8 NPT tap SERVICE PUBLICATIONS Youcanpurchaseaservicemanualfromthe addres...

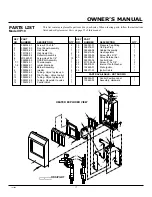
Страница 16: ... 01 Internal Tooth Washer 1 23 102445 01 Piezo Ignitor 1 24 098271 03 Ignitor Cable 1 099395 08 Control Position Label 1 100642 02 Assembly Hardware 1 KEY PART NO NUMBER DESCRIPTION QTY 1 098304 01 Screw 10 x 3 8 2 2 099467 03 Front Panel Assembly 1 3 099318 03 Grill Guard 1 4 101108 01 Grill Guard Clip 2 5 099469 01 Reflector Assembly 1 6 M15823 37 Screw Hex 8 x 1 4 9 7 099059 03 ODS Pilot Assemb...

Страница 17: ... 098271 03 Ignitor Cable 1 099395 07 Control Position Label 1 100642 02 Assembly Hardware 1 KEY PART NO NUMBER DESCRIPTION QTY 1 098304 01 Screw 10 x 3 8 2 2 099467 03 Front Panel Assembly 1 3 099318 03 Grill Guard 1 4 101108 01 Grill Guard Clip 2 5 099469 02 Reflector Assembly 1 6 M15823 37 Screw Hex 8 x 1 4 10 7 099059 03 ODS Pilot Assembly 1 7 1 098514 01 Thermocouple 1 7 2 098594 01 Ignitor El...

Страница 18: ...___________________________________ _______________________________________________________________________________________________ _______________________________________________________________________________________________ _______________________________________________________________________________________________ ____________________________________________________________________________...

Страница 19: ...____________________ _______________________________________________________________________________________________ _______________________________________________________________________________________________ _______________________________________________________________________________________________ ___________________________________________________________________________________________...

Страница 20: ... apply to parts that are not in original condition because of normal wear and tear or parts that fail or become damaged as a result of misuse accidents lack of proper maintenance or defects caused by improper installation Travel diagnostic cost labor transportation and any and all such other costs related to repairing a defective heater will be the responsibility of the owner TO THE FULL EXTENT AL...

Отзывы: