background image

11

103351

OWNER’S MANUAL

CHECKING GAS
CONNECTIONS

Pressure Testing Gas Supply
Piping System

Test Pressures In Excess Of 1/2 PSIG
(3.5 kPa)

1.

Disconnect appliance with its appliance
main gas valve (control valve) and equip-
ment shutoff valve from gas supply pip-
ing system. Pressures in excess of 1/2 psig
will damage heater regulator.

2.

Cap off open end of gas pipe where
equipment shutoff valve was con-
nected.

3.

Pressurize supply piping system by ei-
ther using compressed air or opening
propane/LP supply tank valve.

4.

Check all joints of gas supply piping
system. Apply mixture of liquid soap
and water to gas joints. Bubbles form-
ing show a leak.

5.

Correct all leaks at once.

6.

Reconnect heater and equipment
shutoff valve to gas supply. Check re-
connected fittings for leaks.

Test Pressures Equal To or Less Than 1/2
PSIG (3.5 kPa)

1.

Close equipment shutoff valve (see Fig-
ure 14).

 CAUTION: Make sure exter-

nal regulator has been installed
between propane/LP supply and
heater. See guidelines under 

Con-

necting to Gas Supply, page 10.

 WARNING: Test all gas pip-

ing and connections for leaks
after installing or servicing. Cor-
rect all leaks at once.

 WARNING: Never use an open

flame to check for a leak. Apply a
mixture of liquid soap and water
to all joints. Bubbles forming show
a leak. Correct all leaks at once.

Continued

INSTALLATION

Continued

Figure 14 - Equipment Shutoff Valve

ON

POSITI

O

POS

Equipment
Shutoff
Valve

Open

Closed

Propane/LP
Supply Tank

Equipment
Shutoff
Valve

Control Valve Location

Figure 15 - Checking Gas Joints

2.

Pressurize supply piping system by ei-
ther using compressed air or opening
propane/LP supply tank valve.

3.

Check all joints from propane/LP sup-
ply tank to equipment shutoff valve (see
Figure 15). Apply mixture of liquid
soap and water to gas joints. Bubbles
forming show a leak.

4.

Correct all leaks at once.

Pressure Testing Heater Gas
Connections

1.

Open equipment shutoff valve (see Fig-
ure 14).

2.

Open propane/LP supply tank valve.

3.

Make sure control knob of heater is in
the OFF position.

4.

Check all joints from equipment shutoff
valve to control valve (see Figure 15).
Apply mixture of liquid soap and water to
gas joints. Bubbles forming show a leak.

5.

Correct all leaks at once.

6.

Light heater (see Operating Heater
Pages 11 through 13). Check the rest
of the internal joints for leaks.

7.

Turn off heater (see To Turn Off Gas to
Appliance
, page 13).

8.

Replace front panel.

OPERATING
HEATER

FOR YOUR SAFETY

READ BEFORE

LIGHTING

A. This appliance has a pilot which must

be lighted by hand. When lighting the
pilot, follow these instructions exactly.

B. BEFORE LIGHTING smell all

around the appliance area for gas. Be
sure to smell next to the floor because
some gas is heavier than air and will
settle on the floor.

WHAT TO DO IF YOU SMELL GAS
• Do not try to light any appliance.
• Do not touch any electric switch; do

not use any phone in your building.

• Immediately call your gas supplier

from a neighbor’s phone. Follow
the gas supplier’s instructions.

• If you cannot reach your gas sup-

plier, call the fire department.

C. Use only your hand to push in or turn

the gas control knob. Never use tools.
If the knob will not push in or turn
by hand, don’t try to repair it, call a
qualified service technician or gas
supplier. Force or attempted repair
may result in a fire or explosion.

D. Do not use this appliance if any part

has been under water. Immediately
call a qualified service technician to
inspect the appliance and to replace
any part of the control system and
any gas control which has been un-
der water.

 WARNING: If you do not fol-

low these instructions exactly, a
fire or explosion may result caus-
ing property damage, personal
injury or loss of life.

Содержание VP1600E

Страница 1: ...ed manufactured mobile home where not prohibited by local codes This appliance is only for use with the type of gas indicated on the rating plate This appliance is not convertible for use with other gases Aftermarket Completion of sale not for purpose of resale from the manufacturer WARNING If the information in this manual is not followed exactly a fire or explosion may result caus ing property d...

Страница 2: ...locked positions Never set control knob between locked positions Poor combustion and higher levels of carbon monoxide may result 6 This heater needs fresh outside air ven tilation to run properly This heater has an Oxygen Depletion Sensing ODS safety shutoff system The ODS shuts down the heater if not enough fresh air isavailable See AirforCombustionand Ventilation pages 4 through 6 7 If heater sh...

Страница 3: ...otective packaging ap plied to heater for shipment 3 Check heater for any shipping damage If heater is damaged promptly inform dealer where you bought heater LOCAL CODES Install and use heater with care Follow all localcodes Intheabsenceoflocalcodes use the latest edition of National Fuel Gas Code ANS Z223 1 also known as NFPA 54 Available from American National Standards Institute Inc 1430 Broadw...

Страница 4: ...ting of one perm 6 x 10 11 kg per pa sec m2 or less with open ings gasketed or sealed and b weather stripping has been added on openable windows and doors and c caulking or sealants are applied to areas such as joints around window and door frames be tween sole plates and floors be tween wall ceiling joints be tween wall panels at penetra tions for plumbing electrical and gas lines and at other op...

Страница 5: ...and vents to the outdoors 4 Compare the maximum Btu Hr the space can support with the actual amount of Btu Hr used _________________ Btu Hr maximum the space can support _________________ Btu Hr actual amount of Btu Hr used Example 51 200 Btu Hr maximum the space can support 58 000 Btu Hr actual amount of Btu Hr used The space in the above example is a confined space because the actual Btu Hr used...

Страница 6: ... Space To Crawl Space To Attic AIR FOR COMBUSTION AND VENTILATION Continued Or Remove Door into Adjoining Room Option 3 Ventilation Grills Into Adjoining Room Option 2 12 12 Ventilation Grills into Adjoining Room Option 1 VENTILATION AIR Ventilation Air From Inside Building Thisfreshairwouldcomefromanadjoining unconfined space When ventilating to an adjoining unconfined space you must pro vide two...

Страница 7: ...ing stand from your dealer See Accessories page 22 WARNING Never install the heater in a bedroom or bathroom in a recreational vehicle where curtains furniture clothing or other flammable objects are less than 36 inches from the front top or sides of the heater as a fireplace insert in high traffic areas in windy or drafty areas CAUTION If you install the heater in a home garage heaterpilotandburn...

Страница 8: ... screw locations on wall see Fig ure 7 Note Only mark last hole on each end of mounting bracket Insert mounting screws through these holes only 3 Remove tape and mounting bracket from wall Model VP2600E Model VP1600E 16 18 3 4 Min 9 1 4 Min Adjoining Wall Only Insert Mounting Screws Through Last Hole On Each End Floor Figure 7 Mounting Bracket Clearances WARNING ICON G 001 WARNING Maintain mini mu...

Страница 9: ...rill holes at marked locations using 9 64 drill bit 2 Place mounting bracket onto wall Line up last hole on each end of bracket with holes drilled in wall 3 Insert mounting screws through bracket and into wall studs 4 Tighten screws until mounting bracket is firmly fastened to wall studs Attaching To Wall Anchor Method For attaching mounting bracket to hollow walls wall areas between studs or soli...

Страница 10: ... of pres sure will occur Propane LP Supply Tank Figure 12 External Regulator With Vent Pointing Down Vent Pointing Down External Regulator CAUTION Never connect heater directly to the propane LP supply This heater requires an external regulator not sup plied Install the external regu latorbetweentheheaterandpro pane LP supply CAUTION Usepipejointseal ant that is resistant to liquid pe troleum LP g...

Страница 11: ...xture of liquid soap and water to gas joints Bubbles forming show a leak 4 Correct all leaks at once Pressure Testing Heater Gas Connections 1 Open equipment shutoff valve see Fig ure 14 2 Open propane LP supply tank valve 3 Make sure control knob of heater is in the OFF position 4 Check all joints from equipment shutoff valve to control valve see Figure 15 Applymixtureofliquidsoapandwaterto gas j...

Страница 12: ...r 30 seconds This will allow air to bleed from the gas system If control knob does not pop up when released contact a quali fied service person or gas sup plier for repairs 6 With control knob pressed in push down and release ignitor button This will light pilot The pilot is at tached to the front of burner If needed keep pressing ignitor but ton until pilot lights If pilot does not light turn con...

Страница 13: ...AND MAINTENANCE WARNING Turn off heater and let cool before cleaning CAUTION Youmustkeepcon trol areas burner and circulating air passageways of heater clean Inspect these areas of heater be fore each use Have heater in spected yearly by a qualified ser vice person Heater may need more frequent cleaning due to ex cessive lint from carpeting bed ding material pet hair etc ODS PILOT AND BURNER ORIFI...

Страница 14: ...MEDY 1 Replace ignitor 2 Replace ignitor 3 Reconnect ignitor cable 4 Free ignitor cable if pinched by any metal or tubing Keep ignitor cable dry 5 Replace ignitor cable 6 Replace control valve piezo is part of control valve 7 Tighten nut holding piezo ignitor Nut is located inside heater cabinet at top 1 Turn on gas supply or open equipment shutoff valve 2 Turn to PILOT IGN position Fully press in...

Страница 15: ...r 3 Replace gas regulator 1 Replace burner 2 Contact local propane LP gas company 3 Turn control knob until it locks at de sired setting 1 Problem will stop after a few hours of operation 1 This is common with most heaters If noise is excessive contact qualified ser vice person 1 Turn heater off when using furniture polish wax carpet cleaners or simi lar products POSSIBLE CAUSE 1 Control knob not ...

Страница 16: ...DS pilot is partially clogged 1 Gas leak SeeWarning statement at top of page 2 Control valve defective 1 Foreign matter between control valve and burner 2 Gas leak SeeWarning statement at top of page 1 Not enough combustion ventilation air OBSERVED PROBLEM Heater produces unwanted odors Heater shuts off in use ODS operates Gas odor even when control knob is in OFF position Gas odor during combusti...

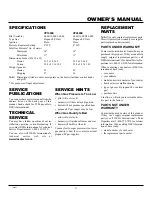
Страница 17: ...Gas Propane LP Only Propane LP Only Ignition Piezo Piezo Pressure Regulator Setting 8 W C 8 W C Inlet Gas Pressure in of water Maximum 14 14 Minimum 11 11 Dimensions Inches H x W x D Heater 23 5 x 18 5 x 8 23 5 x 25 9 x 8 Carton 25 8 x 21 3 x 10 1 25 8 x 28 7 x 10 1 Weight pounds Heater 22 30 Shipping 27 36 Note Dimensions listed are outer most points on the heater includes control knobs and grill...

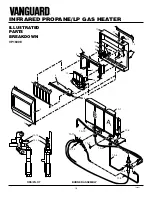
Страница 18: ...NFRARED PROPANE LP GAS HEATER ILLUSTRATED PARTS BREAKDOWN VP1600E 13 14 BURNER ASSEMBLY 13 1 13 2 13 3 13 10 13 6 13 4 13 5 13 8 13 9 13 7 13 12 13 11 ODS PILOT 1 2 3 11 6 4 8 5 6 7 16 12 17 13 9 10 15 14 18 13 13 ...

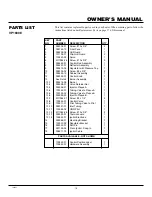
Страница 19: ...24 01 Control Knob 1 13 See Detail Burner Assembly 1 13 1 099218 06 Burner 1 13 2 098508 01 Valve Retainer Nut 1 13 3 099056 01 Injector Plaque A 1 13 4 103352 01 Tubing Valve to Plaque A 1 13 5 103352 02 Tubing Valve to Plaque B 1 13 6 099056 25 Injector Plaque B 1 13 7 M11084 37 Screw 8 x 1 4 2 13 8 103844 01 Control Valve 1 13 9 102911 01 Pilot Tubing Valve to Pilot 1 13 10 099051 01 Inlet Tubi...

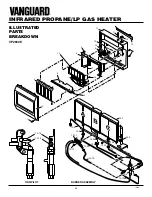
Страница 20: ...ROPANE LP GAS HEATER ILLUSTRATED PARTS BREAKDOWN VP2600E 13 15 13 14 ODS PILOT BURNER ASSEMBLY 13 1 13 2 13 6 13 3 13 9 13 4 13 5 13 6 13 7 13 8 13 10 13 10 13 12 13 13 13 11 1 2 3 11 6 4 8 5 6 7 12 17 13 9 10 14 15 17 16 ...

Страница 21: ... Burner Assembly 1 13 1 099218 07 Burner 1 13 2 098508 01 Valve Retainer Nut 1 13 3 099056 01 Injector Plaque B 1 13 4 103353 01 Tubing Valve to Plaque A 1 13 5 103353 02 Tubing Valve to Plaque B 1 13 6 099056 25 Injectors Plaques A and C 2 13 7 103353 03 Tubing Valve to Plaque C 1 13 8 100747 01 Control Valve 1 13 9 099051 02 Inlet Tubing 1 13 10 099044 01 Pilot Tubing Valve to Pilot 1 13 11 1035...

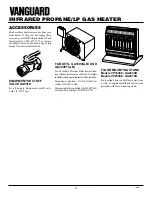
Страница 22: ... all models Provides better heat distribu tion Makes heater more efficient Complete installationandoperatinginstructionsincluded Manually controlled GA3100 A B In cludes ON OFF switch Thermostatically controlled GA3200T A B Includes three settings ON OFF AUTO EQUIPMENT SHUTOFF VALVE GA5010 For all models Equipment shutoff valve with 1 8 NPT tap FLOOR MOUNTING STAND Models VP1600E GA4000B Models VP...

Страница 23: ...____________________ _______________________________________________________________________________________________ _______________________________________________________________________________________________ _______________________________________________________________________________________________ ___________________________________________________________________________________________...

Страница 24: ...tallation Travel diagnostic cost labor transportation and any and all such other costs related to repairing a defective heater will be the responsibility of the owner TO THE FULL EXTENT ALLOWED BY THE LAW OF THE JURISDICTION THAT GOVERNS THE SALE OF THE PRODUCT THIS EXPRESS WARRANTY EXCLUDES ANY AND ALL OTHER EXPRESSED WARRANTIES AND LIMITS THE DURATION OF ANY AND ALL IMPLIED WARRANTIES INCLUDING ...

Отзывы: