background image

www.vanco1.com

 800-626-6445

14

SAFETY AND NOTICE
The HDMX4K44 has been tested for conformance to safety regulations and requirements, and has been 
certified for international use. However, like all electronic equipment, the HDMX4K44 should be used with 
care. Please read and follow the safety instructions to protect yourself from possible injury and to minimize the 
risk of damage to the unit.

•  Follow all instructions and warnings marked on this unit.
•  Do not attempt to service this unit yourself, except where explained in this manual.
•  Provide proper ventilation and air circulation and do not use near water.
•  Keep objects that might damage the device and assure that the placement of this unit is on a stable surface.
•  Use only the power adapter and power cords and connection cables designed for this unit.
•  Do not use liquid or aerosol cleaners to clean this unit. 
•  Always unplug the power to the device before cleaning.

TROUBLE-SHOOTING

1.  Best results are usually achieved when the source and display resolutions are the same. If resolutions 

differ, the extenders will try to adjust the signal to match the resolution of the HDTV with the lowest 
resolution. This will result in a picture with a lower resolution on the other HDTV sets.

2.  If you do not get audio and video, access the “setup” menu on the TV to adjust the audio and video 

settings. If the HDMI control circuit cannot establish a handshake, then there usually will be no audio or 
video in addition to a blue or black screen with a statement similar to “this protocol not supported” or 
“weak signal”.

3.  If the above mentioned messages display, reset the receiver by disconnecting the power supply. You can 

also disconnect all of the HDMI and power cables, wait 15 minutes for any voltages to decay and then 
reconnect all of the cables.

4.  If you are still encountering issues, attempt the “hot-plug” concept. With all of the HDMI cables 

disconnected, turn on the source and plug in the HDMI cable into it’s output, then power up the Vanco 
unit and plug the HDMI cable into it’s input, finally turn on the display and plug the HDMI cable from 
the receiver into it. This activates all of the devices in corresponding order and results in a signal being 
plugged into a device that is on and will attempt to connect the signal.

5.  Most of the major source and display manufacturers employ a proprietary control channel to communicate 

between devices from the same manufacturer (CEC). Sometimes this can interfere with the HDMI control 
circuit or the authentication of the signal. Call the manufacturer if you experience this issue. Sometimes 
a player, an audio/video receiver, or a cable/satellite box may not have the latest software update, usually 
this can be downloaded from the manufacturer’s website.

6.  If you have problems with the IR control circuit, make sure that the IR RX pigtail is plugged into extender 

receiver and pointed at the display, and the IR TX pigtail is attached to the extender sender and pointed at 
the source.

Содержание HDMX4K44

Страница 1: ...HDMI 4x4 4K Matrix Selector Switch with HDR Vanco Part Number HDMX4K44 Technical Support www vanco1 com techsupport vanco1 com 800 626 6445 ...

Страница 2: ...cularly at the plugs 9 Use unit only with accessories specified by the manufacturer 10 Refer all servicing to qualified personnel CAUTION HDMI is a very complex technology requiring continuous authentication of the signal and the same video resolution and audio settings on all electronic equipment in the system When there are multiple sources and displays the video resolution and audio setting on ...

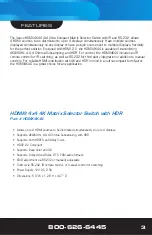
Страница 3: ...ll as RS 232 for third party integration in addition to manual controls For reliable HDMI distribution with 4K and HDR in mind in an ultra compact form factor the HDMX4K44 is a great choice for any application HDMI 4x4 4K Matrix Selector Switch with HDR Part HDMX4K44 Allows up to 4 HDMI sources to be distributed simultaneously to up to 4 displays Supports 4K 60Hz 4 4 4 Chroma Subsampling with HDR ...

Страница 4: ...80i 1080p 60 2160p 60 Input Ports 4 HDMI 1 RS 232 Output Ports 4 HDMI HDMI Connector Type A 19 pin female Receiver Control Ports IR IN IR OUT ESD Protection Human body Model 8kV Air gap discharge 4kV Contact discharge Power Supply 12V 2 5A DC US EU standards CE FCC UL certified Dimensions 5 9 W x 1 26 H x 4 37 D 150mm W x 32 2mm H x 111mm D Weight 585g Chassis Material Metal Silkscreen Color Black...

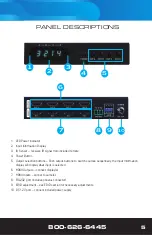
Страница 5: ...lection buttons Push output buttons to switch sources sequentially the Input Information display will display what input is selected 6 HDMI Outputs connect display s 7 HDMI Inputs connect source s 8 RS 232 port includes phoenix connector 9 EDID adjustment see EDID section for necessary adjustments 10 DC 12V port connect included power supply 1 2 3 4 5 6 7 8 9 10 ...

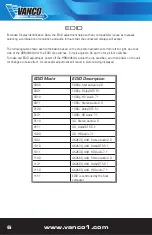
Страница 6: ...stment power off the HDMX4K44 adjust the dip switches and then power on the unit for changes to take effect A successful adjustment will result in picture being displayed EDID Mode EDID Description 0000 1080p Stereo Audio 2 0 0001 1080p Dolby DTS 5 1 0010 1080p HD Audio 7 1 0011 1080i Stereo Audio 2 0 0100 1080i Dolby DTS 5 1 0101 1080i HD Audio 7 1 0110 3D Stereo Audio 2 0 0111 3D Dolby DTS 5 1 1...

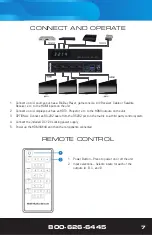
Страница 7: ...uch as an HDTV Projector etc to the HDMI outputs on the unit 3 OPTIONAL Connect an RS 232 cable from the RS232 port on the matrix to a third party control system 4 Connect the included DC 12V Locking power supply 5 Power up the HDMX4K44 and then the components connected REMOTE CONTROL 1 Power Button Press to power on or off the unit 2 Input selections Selects inputs for each of the outputs A B C a...

Страница 8: ...ware for the HDMX4K44 can be found on the product webpage on www vanco1 com and requires the included DB9 RS 232 connection to connect from a PC or computer to the matrix 1 Connect a PC or Computer to the Matrix via the included RS 232 cable 2 Power up the matrix 3 Save software on the desktop 4 Run software by double clicking 4x4 HDMI matrix Controller exe The following user interface will come u...

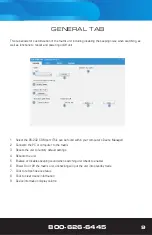
Страница 9: ...his can be found within your computer s Device Manager 2 Connects the PC or computer to the matrix 3 Resets the unit to factory default settings 4 Reboots the unit 5 Enables or disables beeping sound when switching unit check to enable 6 Power On or Off the matrix unit unchecking will put the unit into standby mode 7 Click to refresh device status 8 Click to clear device information 9 Device infor...

Страница 10: ...EDID file to load EDID TAB 1 Manually selecting EDID Select from a default list to apply to any input then click on Set to set EDID 2 Copy EDID from Output to Input Select the EDID of the display to copy to any input then click on Set to apply changes 3 Open EDID Load a saved EDID file and apply to any input then click on Set to apply changes ...

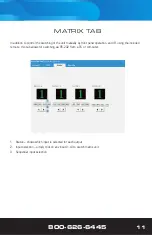
Страница 11: ...ont panel operation and IR using the included remote this tab allows for switching via RS 232 from a PC or computer MATRIX TAB 1 Status shows which input is selected for each output 2 Input selection simply click on any input 1 4 to switch matrix unit 3 Sequential input selection ...

Страница 12: ...e firmware update file onto a PC or computer UPGRADE TAB 1 Click Open and select the firmware update file 2 This shows the file path to the firmware update file ensure this is the correct file ends in fw selecting an incorrect file could cause issues 3 Displays progress of the firmware upgrade 4 Upgrade button click to start firmware upgrade process after the correct file has been selected 5 Any i...

Страница 13: ...d than unshielded UTP cables A solid UTP Cat5e 6 cable shows longer transmission range than stranded STP Cat 6 cable For long extension applications use solid UTP STP category cables 4 EIA TIA 568 B termination T568B for Cat5e 6 cables is recommended for better performance 5 To reduce the interference among the unshielded twisted pairs of wires in Cat5e 6 cables one can use shielded STP cables to ...

Страница 14: ...dshake then there usually will be no audio or video in addition to a blue or black screen with a statement similar to this protocol not supported or weak signal 3 If the above mentioned messages display reset the receiver by disconnecting the power supply You can also disconnect all of the HDMI and power cables wait 15 minutes for any voltages to decay and then reconnect all of the cables 4 If you...

Страница 15: ...ifications inadequate maintenance and care or use in any manner for which the product was not originally intended Items integrated into Vanco products that are made by other manufacturers notably computer hard drives and liquid crystal display panels are limited to the term of the warranty offered by the respective manufacturers Such specific warranties are available upon request to Vanco A surge ...

Страница 16: ...Vanco International 506 Kingsland Drive Batavia Illinois 60510 call 800 626 6445 fax 630 879 9189 visit www vanco1 com ...

Отзывы: