www.vanco1.com
800.626.6445
8
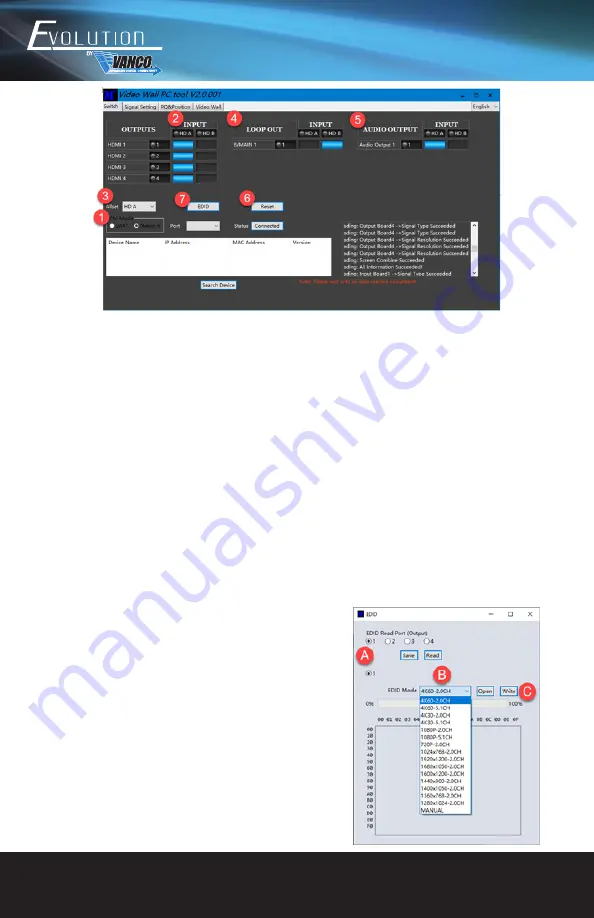
Switch Page – Used to switch between both HDMI inputs
1.
Select UART (with RS232 cable) or Network (with Cat5e/6 cable) to connect device (baud rate is 57600
bps)
•
If using UART/RS232 for control, select the COM PORT that is being used to connect and communicate
to your computer, then click on DISCONNECT to CONNECT for communication
•
If using Network/IP for control, click on SEARCH DEVICE to ensure your device is found and can connect
to the network, then click on DISCONNECT to CONNECT for communication
2.
Select input (“HD A” or “HD B”) for each individual HDMI output, allows to switch between sources
3.
AllSet function: Allows either source to be sent to all displays
4.
LOOP OUT: Select input source for B/MAIN output port. This is to be used for daisy-chaining additional
EVSP24VW units to create a larger video wall application
5.
AUDIO OUTPUT: Select which source the digital and analog audio outputs will breakout audio from, to
connect to an amplifier or audio distribution system
6.
Reset: Click to return to factory default settings
7.
EDID Control: If any issues with video and audio on the display(s) connected, EDID can be adjusted to
resolve these issues, simply click on the “EDID” button, and the following prompt window will display:
a. Select the HDMI output to read and/or change the EDID of
that output
b. Select the EDID setting from the dropdown box that best
matches the display connected to that output
c. Click on “Write” to each HDMI input
NOTE: Once an EDID is set, it can be saved by clicking “Save” in
step A. Furthermore, a saved EDID setting can be recalled by
clicking on “Open” in step C, and writing to either HDMI input.


