background image

Instructions for the assembly and disassembly of the hood | Chat 20.01 

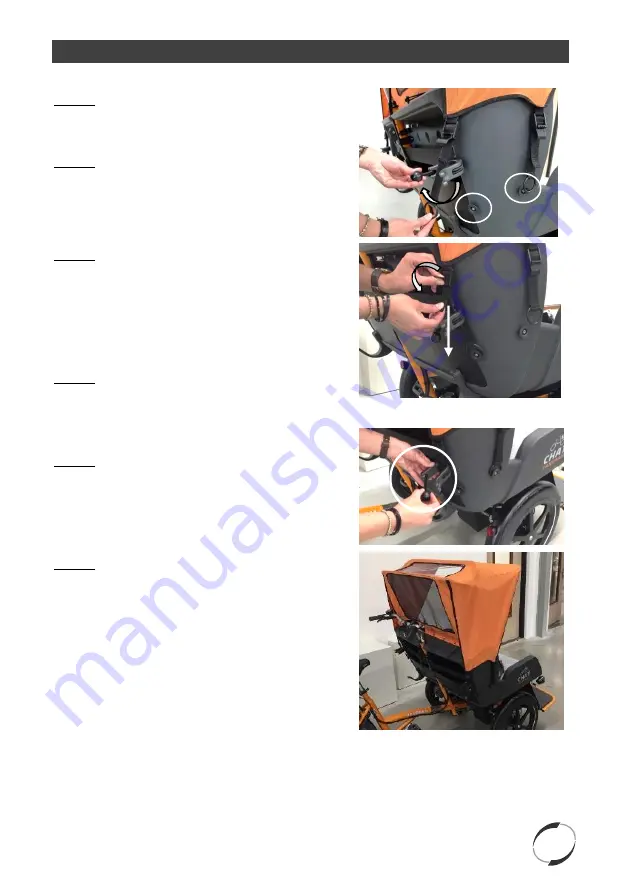
Securing the hood to the bench 


Step 1: 

Remove the elastic cord from the hooks. 
 

Step 2: 

Open the buckles and hook the rings around the 
round knobs. 


Step 3: 

You should first apply tension to the rear straps of 
the hood to ensure proper fit. Before applying 
tension to the strap, the buckle has to be opened. 
Close the buckle when the strap is under tension.


Step 4: 

Repeat this process on the remaining two side 
straps.


Step 5: 

Reattach the elastic cord to the hooks. 


Step 6: 

The hood is properly assembled if it resembles the 
image on the right.


Содержание Chat

Страница 1: ...Instructions for the assembly and disassembly of the hood Version 20 01 Van Raam Guldenweg 23 7051 HT Varsseveld The Netherlands...

Страница 2: ...l Assembly of the hood Securing the hood to the beach Disassembly of the hood Contact details manufacturer Van Raam Guldenweg 23 7051 HT Varsseveld The Netherlands Phone 31 0 315 257370 E mail info va...

Страница 3: ...e to secure the tube highest hood position For the lowest position of the hood use the highest hole and secure the tube with the securing pin Step 3 Close the brace of the securing pin Pay Attention t...

Страница 4: ...l window facing yourself Attach the hood to the construction using the snap buttons Step 7 Lift the frame and pull the hood over it Step 8 Attach the front of the hood by using the snap buttons Step 9...

Страница 5: ...e round knobs Step 3 You should first apply tension to the rear straps of the hood to ensure proper fit Before applying tension to the strap the buckle has to be opened Close the buckle when the strap...

Страница 6: ...1 Open the buckle and release the tension of all four straps and unhook the rings Step 2 Open the zippers on both sides of the hood Step 3 Detach the snap buttons from the hood and the bench Step 4 Fo...

Страница 7: ...ded in the correct direction Step 7 Pull the elastic cords over the tightly rolled hood Attach the end of the cords in the loop Step 8 Make sure the elastic cord is attached correctly Pay Attention to...

Страница 8: ...x them with the elastic cords Step 12 Remove the securing pin by opening the brace and pulling the pin out of the hole Make sure to hold the bended tube to prevent the tube from sliding down Pay Atten...

Отзывы: