background image

5000/10000 FLYWHEEL GRINDER

RADIUS CUTTER OPERATION (OPTIONAL) 

Before grinding the flywheel or cutting a radius on a recessed flywheel, make certain 

the flywheel is accurately centered. A dial indicator may be used.  It is not necessary to 

use coolant when using the radius cutter 

1. On  certain  applications  on  a  recessed  or  stepped  flywheel  such  as  International,

Mack,  etc.,  it  is  necessary  to  remove  the  slight  radius  left  by  the  grinding  wheel.

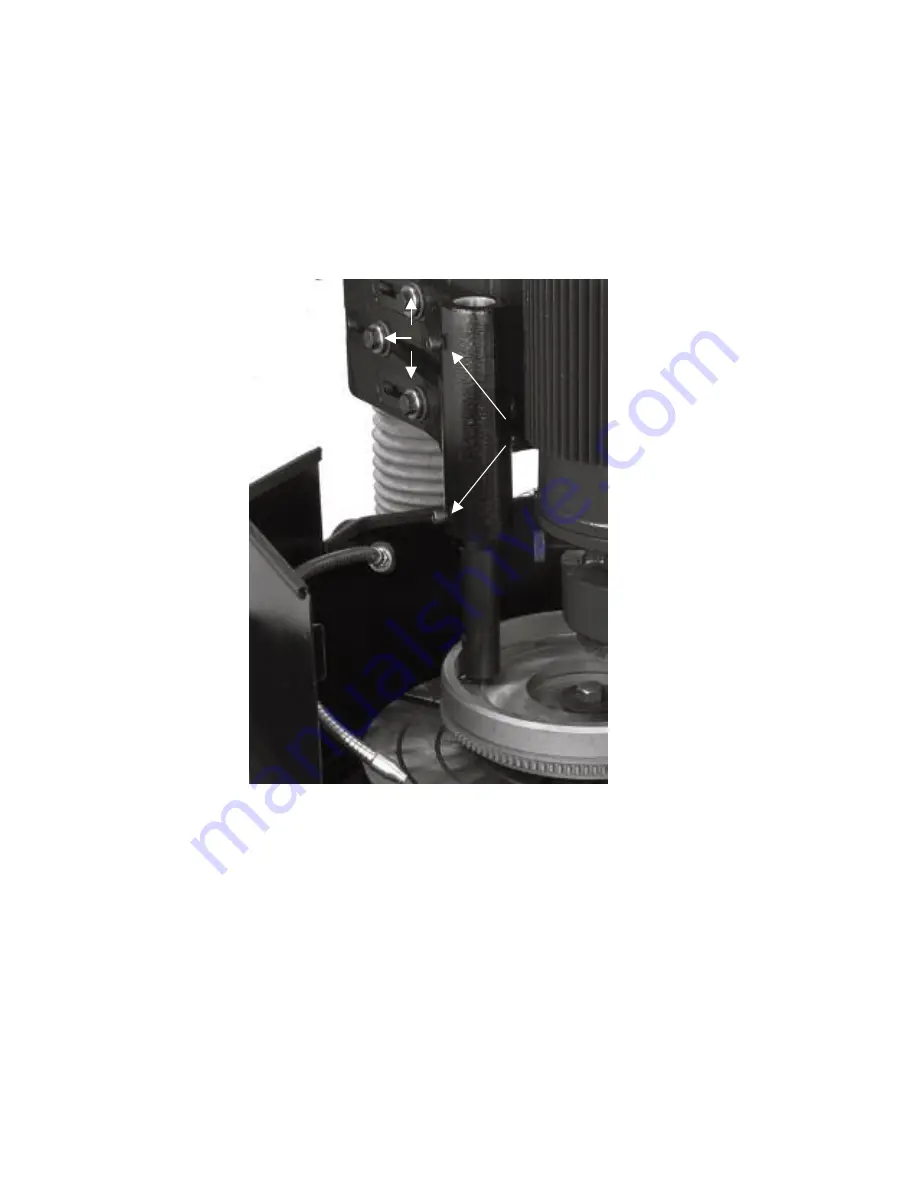
This can be accomplished using the optional Radius Cutter (Figure 26). 

A

B

2. First, adjust the radius cutter assembly so the cutting tip of the tool bit is positioned

over the center of the table.  This can be done by loosening the 3 hex bolts that

attach the radius cutter to the machine  (Figure 26A) and sliding the assembly to the

front or back and retighten.

3. The tool bar may be positioned to the correct depth by loosening the 2 cap screws 

(Figure  26B)  and  sliding  the  bar  up  or  down  and  retighten.    When  properly 

positioned, the  grinding  wheel  will  be  about  1/2”  above  the  highest  point  of  the

flywheel when the tool bit is in contact with the radius to be removed.  Do not over 

extend the tool bar. 

4. Loosen  the  column  lock  handle.    Swing  the  grinding  head  to  the  left  side  of  the

flywheel,  so  the  tip  of  the  tool  bit  is  at its  outermost  location.    Gradually  feed  the

grinding head down until the radius is removed. 

Van Norman

30.

888-855-1789

Содержание FG10000

Страница 1: ...nder Instruction Manual and Parts List Van Norman 500 57th St Marion IA 52302 888 855 1789 319 377 9101 FAX Copyright 2005 All Rights Reserved Equipment specifications options and accessories subject...

Страница 2: ......

Страница 3: ...R GOODS OR ARISING OUT OF BREACH OF ANY EXPRESS OR IMPLIED WARRANTY BREACH OF CONTRACT NEGLIGENCE OR OTHERWISE EXCEPT ONLY IN THE CASE OF PERSONAL INJURY Because of Van Norman s constant program of pr...

Страница 4: ......

Страница 5: ...s Inc is not responsible for damage incurred during transit you will be provided assistance in preparation and filing of any necessary claims CAREFULLY READ THIS MANUAL BEFORE ATTEMPTING TO SETUP OR O...

Страница 6: ...EAD THE SAFETY AND OPERATING INSTRUCTIONS THOROUGHLY BEFORE OPERATING THE MACHINE In order to obtain maximum life and efficiency from your machine follow all the instructions in the operating manuals...

Страница 7: ...ea is well lighted and ventilated Provide for adequate workspace around the machine 5 Guards Keep all machine guards in place at all times when machine is in use 6 Do Not Overreach Maintain a balanced...

Страница 8: ...794 8688 42 380V 50 Hz 3 Ph 20 14 794 8688 43 460V 60 Hz 3 Ph 20 14 FG5000 w PowerHead AutoGrind 794 8688 50 208 230V 60 Hz 3 Ph 30 12 794 8688 51 208 230V 60 Hz 1 Ph 60 8 794 8688 52 380V 50 Hz 3 Ph...

Страница 9: ...Table 34 5 876 mm Space Required 35 x 38 889 x 965 mm Shipping Weight FG5000 1500 lbs 675kg FG5000PCA 1550 lbs 698kg SPECIFICATIONS FG10 000 Table Diameter18 450mm Grinding Capacity 24 600mm Grinding...

Страница 10: ...ge Adaptor 5 875 149 2 mm 14 794 8124 71 Wheel Spacer 1 5 38 1mm 15 794 8011 28 Grinding Wheel 4 101 6 mm Flaring Cup 16 794 8011 12 Grinding Wheel 6 152 4 mm Flaring Cup 17 794 8011 30 Grinding Wheel...

Страница 11: ...5000 10000 FLYWHEEL GRINDER STANDARD EQUIPMENT FG5000 FG10 000 Van Norman 7 888 855 1789...

Страница 12: ...Mounting Adaptor 6 794 8011 73 Mounting Adaptor 1 75 to 75 7 794 8011 12 Grinding Wheel 6 Flaring Cup 8 794 8011 30 Grinding Wheel 6 Flaring Cup 9 794 8011 28 Grinding Wheel 4 Flaring Cup 10 794 8687...

Страница 13: ...8013 22 Convex Point 6 000 0485 18 SSS 250 20 x 250 not shown 7 794 8055 99 SHCS 375 16 x 3 25 Long 8 794 8627 82 Dial Indicator Magnetic Base 9 000 1020 16 250 28 Jam Nut not shown 794 8627 83 Indica...

Страница 14: ...5 794 8084 07 SSS 312 18 x 500 6 000 1150 53 Washer 562 x 1 375 3 7 794 8011 99 Spacer Power Column Washer 3 8 794 8621 28 Mounting Plate 794 8107 90 Small Bore VW Centering Cone Set 1 794 8010 69 VW...

Страница 15: ...8010 16 Center Plate 6 794 8010 19 Parallel Block Assembly 4 804 8010 23 Flat Washer 4 not shown 7 794 8010 30 Hold Down Bolt Assembly 8 794 8010 32 Clutch Adapter 9 5 9 794 8010 34 Clutch Adapter 8 7...

Страница 16: ...5 794 8010 84 Centering Cone 4 5 114 3 mm 6 794 8010 86 Centering Cone 5 127 0 mm 7 794 8011 89 Wheel Spacer 1 25 4 mm 8 794 8011 90 Wheel Spacer 2 50 8 mm 9 000 0170 94 SHCS 375 16 x 2 25 10 000 017...

Страница 17: ...2 751 ID 794 8632 26 Adaptor Disc 2 825 ID 794 8632 25 Adaptor Disc 2 925 ID 794 8632 18 Adaptor Disc 2 965 ID 794 8632 24 Adaptor Disc 2 980 ID 794 8632 28 Adaptor Disc 2 057 Pilot Dia 794 8632 09 A...

Страница 18: ...8688 57 5 16 Collet 7 93mm 6 794 8688 58 3 8 Collet 9 53mm 7 794 8688 59 7 16 Collet 11 10mm 8 794 8688 62 5mm Collet 9 794 8688 63 6mm Collet 10 794 8688 47 Removal Stand 11 794 8688 48 Storage Case...

Страница 19: ...entering Adapter Set 1 794 8657 37 Ford Cat 205 2 040 51 8 mm 2 794 8657 38 Mack 305 2 435 61 8 mm 3 794 8657 39 Ford Truck 2 495 63 4 mm 4 794 8657 40 Cum GMC 306 2 830 71 9 mm 5 794 8657 41 Ford 307...

Страница 20: ...ared Cup pressure plate surfaces automatic Gray trans pump bodies and covers 794 8011 30 6 Diameter Best general purpose wheel for FG1057 Flared Cup cast iron and medium steel Ruby Requires very littl...

Страница 21: ...5000 10000 FLYWHEEL GRINDER MACHINE DESCRIPTION Van Norman 17 888 855 1789...

Страница 22: ...ine feed handknob raise the grinding head motor off the wood shipping block and discard Unlock the grinding head column lock handle Figure 1 and swing the grinding head motor so it is centered over th...

Страница 23: ...4 Remove rust preventative from machine using an approved commercial solvent 5 Unpack tool board and install the 2 wooden pegs on the bottom of the back side of the tool board This sets the tool boar...

Страница 24: ...to the reservoir through the filler hole Figure 8 and replace cap screw Make certain the small O ring is in place on the underside of cap screw Figure 7 Figure 8 2 Remove the plastic oil container at...

Страница 25: ...abilized Figure 10C 3 A depth gage is provided with the machine for checking the oil level through the hole in the table Figure 10A The overall length of the gage pin should be set to equal the thickn...

Страница 26: ...f the top Slide coolant tank back into machine Direct coolant drain hose to the inside of the tank After machine is wired turn on coolant pump and set flow by turning valve located outside the sheet m...

Страница 27: ...ctrical box mounted on the side of the machine Refer to the diagram for a three phase hookup Figure 14 and a single phase hookup Figure 15 Please note that single phase machines require a 4 wire hooku...

Страница 28: ...r but not the other contact Van Norman technical assistance 3 On 1 Phase Single Phase machines if rotation is not correct contact Van Norman for assistance OPERATION 1 Remove the coolant shroud door a...

Страница 29: ...n during grinding at a rate sufficient to keep sharp clean particles exposed on the grinding edge If the grinding rate decreases noticeably as evident by a decrease in the shower of sparks it will be...

Страница 30: ...ing is shown in Figure 19 Detailed instructions are outlined below The accuracy of the ground flywheel will depend to a large extent on the accuracy and condition of the surface that the flywheel is m...

Страница 31: ...ghtening centering cone bolt If exact centering is necessary such as on some recessed flywheels a dial indicator may be used 5 Position grinding wheel over friction surface to be ground and lock grind...

Страница 32: ...the power column up down switch as a safety feature the power column will not function if the grinder motor is running 2 Start table grinder head motor and coolant flow 3 Rotate the fine feed handkno...

Страница 33: ...ing off the work piece quickly Smoother finishes are obtained by backing off the workpiece then coming back down with a very light feed pressure 6 RECESSED FLYWHEELS When grinding recessed flywheels t...

Страница 34: ...bit is positioned over the center of the table This can be done by loosening the 3 hex bolts that attach the radius cutter to the machine Figure 26A and sliding the assembly to the front or back and r...

Страница 35: ...moving the large flat head cap screw from the table A depth gauge is provide with the machine for checking the oil level through this hole in the table The overall length of the gauge pin protruding f...

Страница 36: ...p Omala 680 Sun Oil Corp Sunep 1150 Texaco Inc Honor Cyl Oil 680 American Lub Inc AGMA 8 Gear Oil Chevron NL Gear Comp 680 1 INTIAL OIL CHANGE The oil in a new speed reducer should be changed at 250 h...

Страница 37: ...rom rust and grit GRINDING HEAD ADJUSTMENTS All grinding should be done with the rear edge of the grinding wheel Insufficient rearward tilt as evident by sparks from both the front and rear of the whe...

Страница 38: ...tment Figure 31 Adjustment may be made as follows a Loosen four 3 8 16 nuts 9 16 Hex approximately 1 2 to 3 4 turn b Loosen adjusting screw on same side of machine as corresponds to the low side of th...

Страница 39: ...ger ones 794 8016 19 5 HEAD LOCK HANDLE POSITION ADJUSTMENT The locked position of the head lock handle is adjustable Figure 33 To raise or lower the handle position follow the procedure below a Loose...

Страница 40: ...following this procedure a Remove access door at the rear of the machine b Lower column until the rectangular bars are in the most accessible location c Loosen jam nuts on the bolts located at the end...

Страница 41: ...5000 10000 FLYWHEEL GRINDER ASSEMBLY DRAWING Van Norman 37 888 855 1789...

Страница 42: ...5000 10000 FLYWHEEL GRINDER ASSEMBLY DRAWING Van Norman 38 888 855 1789...

Страница 43: ...5000 10000 FLYWHEEL GRINDER ASSEMBLY DRAWING Van Norman 39 888 855 1789...

Страница 44: ...5000 10000 FLYWHEEL GRINDER ASSEMBLY DRAWING Van Norman 40 888 855 1789...

Страница 45: ...57 Motor 10 HP 208 230 460 3Ph 1 19 000 1035 19 Hex Nut 3 8 16 4 20 800 8030 61 Lock Washer 4 21 794 8649 38 SHCS 3 8 24 x 1 25 2 22 794 8011 79 Adjusting Plate 1 23 794 8011 80 Pivot Pin 1 24 794 80...

Страница 46: ...8687 47 Stud 10 32 x 5 75 4 55 000 0485 18 SSS 1 4 20 x 250 2 56 794 8687 43 Shaft Extension 1 57 794 8687 39 Motor Coupling Plate 1 58 000 1154 60 Washer 4 59 794 8687 48 Stud 10 32 x 1 50 4 60 794 8...

Страница 47: ...1 100 794 8016 82 Handle 1 101 000 0485 65 Pivot Screw 2 102 000 1063 21 Hex Nut 5 16 24 1 103 000 1020 16 Hex Nut 1 4 28 2 104 794 8011 70 Star Dresser Assembly 1 105 794 8687 68 Retaining Flange FG1...

Страница 48: ...9 794 8033 64 Concave Washer 2 140 794 8012 91 O Ring 1 141 794 8651 05 Bearing Cap 1 142 794 8622 34 Seal 1 143 794 8651 15 Spacer 4 144 794 8651 07 Table Drive Gearbox 1 145 794 8651 13 Coupler 1 14...

Страница 49: ...2 59 Leadscrew Nut Power Column 1 182 000 0166 08 SHCS 1 4 20 x 1 00 184 000 1208 50 Limit Switch 1 185 Supplied with Switch 2 186 000 1180 10 Lock Washer 1 4 2 187 794 8012 24 Lower Support FG5 000 1...

Страница 50: ...000 4200 77 Clamp 1 212 794 8071 18 Hose 1 213 800 8031 25 Nut 62 11 1 214 794 8015 62 Star Washer 1 215 794 8012 40 Handwheel 1 216 794 8012 44 Spacer 1 217 800 8663 77 Washer 2 218 794 8688 09 Dial...

Страница 51: ...2 794 8690 03 794 8690 04 Item Part Description PN2 794 8688 16 SWITCH PANEL ES1 794 8623 14 EMERGENCY STOP SWITCH TA2 794 8622 82 TABLE STOP RED TA1 794 8622 81 TABLE START GREEN GR2 794 8622 82 GRIN...

Страница 52: ...8688 42 794 8688 43 Item Part Description PN2 794 8688 16 SWITCH PANEL ES1 794 8623 14 EMERGENCY STOP SWITCH TA2 794 8622 82 TABLE STOP RED TA1 794 8622 81 TABLE START GREEN GR2 794 8622 82 GRINDER ST...

Страница 53: ...H PANEL ES1 794 8623 14 EMERGENCY STOP SWITCH TA2 794 8622 82 TABLE STOP RED TA1 794 8622 81 TABLE START GREEN GR2 794 8622 82 GRINDER STOP RED GR1 794 8622 81 GRINDER START GREEN CN1 7948625 13 POWER...

Страница 54: ...4 8132 69 FUSE F3 794 8132 69 794 8132 69 794 8132 69 FUSE FX1 794 142 117 794 142 117 794 142 117 FUSE TF1 794 8676 78 794 8623 17 794 8623 17 TRANSFORMER TB1 794 8622 44 794 8622 44 794 8622 44 TERM...

Страница 55: ...5000 10000 FLYWHEEL GRINDER CONTROL BOX ASSEMBLY MACHINE MODEL NUMBERS 794 8690 00 794 8690 02 794 8690 04 Van Norman 51 888 855 1789...

Страница 56: ...R RELAY MD1 794 8691 45 MOTOR OVERLOAD MR2 794 8691 58 MOTOR RELAY MD2 794 8622 44 MOTOR OVERLOAD TB1 794 8687 79 TERMINAL BARRIER SR1 794 8144 03 STRAIN RELIEF SR2 800 8014 69 STRAIN RELIEF SR3 800 8...

Страница 57: ...5000 10000 FLYWHEEL GRINDER CONTROL BOX ASSEMBLY MACHINE MODEL NUMBERS 794 8690 01 Van Norman 53 888 855 1789...

Страница 58: ...94 8659 98 FUSE F3 794 8659 98 FUSE FX1 794 9119 78 FUSE TF1 794 8677 74 TRANSFORMER FB4 794 8142 66 FUSE HOLDER F4 794 8119 78 FUSE TB1 794 8626 01 TERMINAL BARRIER SR1 794 8687 79 STRAIN RELIEF SR2...

Страница 59: ...5000 10000 FLYWHEEL GRINDER CONTROL BOX ASSEMBLY MACHINE MODEL NUMBERS 794 8690 03 Van Norman 55 888 855 1789...

Страница 60: ...794 8691 57 794 8691 57 794 8691 59 MOTOR OVERLOAD TB1 794 8626 01 794 8626 01 794 8626 01 794 8626 01 TERMINAL BARRIER CR1 794 8625 15 794 8625 15 794 8625 15 794 8625 15 RELAY CR2 794 8625 15 794 8...

Страница 61: ...5000 10000 FLYWHEEL GRINDER CONTROL BOX ASSEMBLY MACHINE MODEL NUMBERS 794 8688 22 794 8688 36 794 8688 40 794 8688 43 Van Norman 57 888 855 1789...

Страница 62: ...3 RELAY SOCKET RS2 794 8687 73 RELAY SOCKET TB1 794 8626 01 TERMINAL BARRIER CR1 794 8625 15 RELAY CR2 794 8625 15 RELAY FB3 794 8142 66 FUSE HOLDER FB4 794 8142 66 FUSE HOLDER SR1 794 8687 79 STRAIN...

Страница 63: ...5000 10000 FLYWHEEL GRINDER CONTROL BOX ASSEMBLY MACHINE MODEL NUMBERS 794 8688 41 Van Norman 59 888 855 1789...

Страница 64: ...8691 59 MOTOR OVERLOAD TB1 794 8626 01 794 8626 01 TERMINAL BARRIER CR1 794 8625 15 794 8625 15 RELAY CR2 794 8625 15 794 8625 15 REALY CR3 794 8625 15 794 8625 15 REALY SR1 794 8687 79 794 8687 79 ST...

Страница 65: ...5000 10000 FLYWHEEL GRINDER CONTROL BOX ASSEMBLY MACHINE MODEL NUMBERS 794 8688 35 794 8688 42 Van Norman 61 888 855 1789...

Страница 66: ...794 8687 73 794 8687 73 794 8687 73 794 8687 73 RELAY SOCKET TB1 794 8626 01 794 8626 01 794 8626 01 794 8626 01 TERMINAL BARRIER CR1 794 8625 15 794 8625 15 794 8625 15 794 8625 15 RELAY CR2 794 8625...

Страница 67: ...5000 10000 FLYWHEEL GRINDER CONTROL BOX ASSEMBLY MACHINE MODEL NUMBERS 794 8688 06 794 8688 38 794 8688 50 794 8688 53 Van Norman 63 888 855 1789...

Страница 68: ...4 8687 73 RELAY SOCKET RS5 794 8687 73 RELAY SOCKET TB1 794 8626 01 TERMINAL BARRIER CR1 794 8625 15 RELAY CR2 794 8625 15 RELAY CR4 794 8625 15 RELAY CR5 794 8625 15 RELAY CS1 794 8687 74 CURRENT SEN...

Страница 69: ...5000 10000 FLYWHEEL GRINDER CONTROL BOX ASSEMBLY MACHINE MODEL NUMBERS 794 8688 51 Van Norman 65 888 855 1789...

Страница 70: ...SOCKET RS5 794 8687 73 794 8687 73 RELAY SOCKET TB1 794 8626 01 794 8626 01 TERMINAL BARRIER CR1 794 8625 15 794 8625 15 RELAY CR2 794 8625 15 794 8625 15 RELAY CR4 794 8625 15 794 8625 15 RELAY CR5 7...

Страница 71: ...5000 10000 FLYWHEEL GRINDER CONTROL BOX ASSEMBLY MACHINE MODEL NUMBERS 794 8688 37 794 8688 52 Van Norman 67 888 855 1789...

Страница 72: ...5000 10000 FLYWHEEL GRINDER WIRING DIAGRAM MACHINE MODEL NUMBERS 794 8690 00 794 8690 02 794 8690 04 Van Norman 68 888 855 1789...

Страница 73: ...5000 10000 FLYWHEEL GRINDER WIRING DIAGRAM MACHINE MODEL NUMBERS 794 8690 01 Van Norman 69 888 855 1789...

Страница 74: ...5000 10000 FLYWHEEL GRINDER WIRING DIAGRAM MACHINE MODEL NUMBERS 794 8690 03 Van Norman 70 888 855 1789...

Страница 75: ...5000 10000 FLYWHEEL GRINDER WIRING DIAGRAM MACHINE MODEL NUMBERS 794 8688 41 Van Norman 71 888 855 1789...

Страница 76: ...5000 10000 FLYWHEEL GRINDER WIRING DIAGRAM MACHINE MODEL NUMBERS 794 8688 35 794 8688 42 Van Norman 72 888 855 1789...

Страница 77: ...5000 10000 FLYWHEEL GRINDER WIRING DIAGRAM MACHINE MODEL NUMBERS 794 8688 22 794 8688 36 794 8688 40 794 8688 43 Van Norman 73 888 855 1789...

Страница 78: ...5000 10000 FLYWHEEL GRINDER WIRING DIAGRAM MACHINE MODEL NUMBERS 794 8688 06 794 8688 38 794 8688 50 794 8688 53 Van Norman 74 888 855 1789...

Страница 79: ...5000 10000 FLYWHEEL GRINDER WIRING DIAGRAM MACHINE MODEL NUMBERS 794 8688 51 Van Norman 75 888 855 1789...

Страница 80: ...5000 10000 FLYWHEEL GRINDER CONTROL BOX ASSEMBLY MACHINE MODEL NUMBERS 794 8688 37 794 8688 52 Van Norman 76 888 855 1789...

Страница 81: ......

Страница 82: ...Van Norman A Division of Kwik Way Products Inc 500 57th St Marion IA 52302 USA 888 855 1789 319 377 9421 319 377 9101 FAX www van norman com service kwik way com...

Отзывы: