


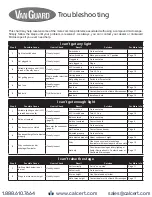


Setup
9
Assembly
(cont.)
8
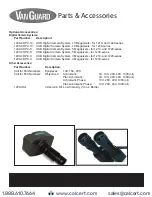
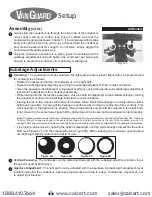
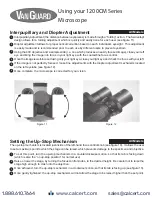
Gently slide the condenser up through the silver ring of the condenser
mount until it will go no further (see figure 5). Make sure that the
condenser is oriented as shown in figure 5. If the condenser will not slide
freely through the silver ring (and you’ve checked that the condenser
set screw is backed out far enough), do not force, simply wiggle the
condenser while lightly pushing up.
Once the condenser assembly is in place, lower the substage via the
substage adjustment knob and tighten the condenser set screw just
enough to prevent the condenser from spinning or sliding out.
10
All Models
Figure 5
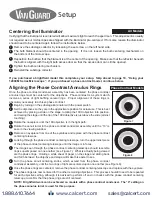
Centering
: The condenser must be centered in the light path to ensure proper light control. A simple method
for centering is as follows:
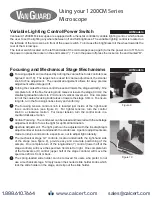
• Rotate the nosepiece until the 10X objective is in the light path.
• Raise the substage assembly fully by turning the substage adjustment knob counter-clockwise.
• Open the aperature iris diaphragm to the largest setting by using the aperature iris diaphragm adjustment
lever which extends from the condenser assembly.
•
While looking into the microscope eyepieces, close the field iris diaphragm to the smallest setting by turning
the uppermost section of the substage illuminator counter-clockwise.
•
Closing the iris in this manner will reduce the field so that a small white hexagon is visible within a black
field (see Figure 6A). Focusing of the hexagon is performed by turning the coarse/fine focus controls. This
white hexagon is the light which is passing through the field iris and should be centered in the black field.
If not, move it to the center (see Figure 6B) by tightening and/or loosening the condenser centering knobs.
Note
: On phase contrast models condenser centering is done with set screws (screwdriver not included) instead of knobs. Locations
for two of the set screws are shown in the photo above (figure 5), and two more are on the rear of the condenser mount. It is
easiest to back the set screws all the way out and tighten each one slightly while checking often that the condenser is still centered.
•
Fine tuning can be done by opening the field iris diaphragm until the white hexagon almost fills the entire
field (see Figure 6C), and then readjusting (see Figure 6D). After centering the condenser open the field
iris diaphragm slightly wider than the field of view.
Vertical Focusing
: The condenser can be raised and lowered with the substage adjustment knob to focus
the light for optimal illumination.
Aperture Adjustment
: The light path can be adjusted with the aperature iris diaphragm adjustment lever
located just below the condenser. Aperture adjustments are made to induce contrast into a specimen, not
to adjust light intensity.
1
2
3
Figure 6A
Figure 6B
Figure 6C
Figure 6D
Substage Adjustments
1
www.calcert.com
1.888.610.7664
0
5
10
15
20
25
30


