background image

23

Appendix A-Remote Control Operation

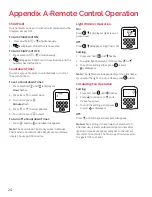
'HVLJQDWHG/RZ)LJK)LUH

7RJRWRORZȴUHGRXEOHFOLFN

Ȋ/2ȋ

LVGLVSOD\HG

Note:

)ODPHJRHVWRKLJKȴUHȴUVW

EHIRUHJRLQJWRORZȴUH

7RJRWRKLJKȴUHGRXEOHFOLFN

Ȋ+Ζȋ

LVGLVSOD\HG

&KRRVLQJ%XWWRQRU%XWWRQΖJQLWLRQ

2QWKHUHPRWHFRQWUROKDQGVHW\RXFDQFKRRVHD
EXWWRQRUEXWWRQLJQLWLRQ<RXFDQDOVRFKRRVHWR
DFWLYDWHRUGHDFWLYDWHVRPHRIWKHIXQFWLRQV%\GHIDXOW
WKHKDQGVHWLVVHWWRDEXWWRQLJQLWLRQ

To change from 1-button to 2-button ignition, remove 
the batteries, wait 10 seconds, reinsert batteries, and 

LPPHGLDWHO\ZKHQWKHGLVSOD\ȵDVKHVSUHVVDQGKROG

the 

EXWWRQIRUVHFRQGV

ON

 is displayed and 

1

 is 

ȵDVKLQJ:KHQFKDQJHLVFRPSOHWH

1

 changes to 

2

To change from 2-button to 1-button ignition, proceed 

WKHVDPHDVDERYH

ON

 is displayed and 

2

LVȵDVKLQJ

When change is complete, 

2

 changes to 

1

'HDFWLYDWLQJRU$FWLYDWLQJ)XQFWLRQV

These functions are active by default, but can be 
deactivated at any time:

• 

&KLOG3URRI

• Program Mode
• Thermostatic Mode
• Eco Mode
• 

&LUFXODWLQJ)DQ2SHUDWLRQ

• 

&RXQWGRZQ7LPHU

AM

AM

7RGHDFWLYDWHIXQFWLRQV

 ΖQVWDOOEDWWHULHV$OOLFRQVDUHGLVSOD\HGDQGȵDVKLQJ

 :KLOHWKHLFRQVDUHȵDVKLQJSUHVVWKHUHOHYDQWIXQF

-

WLRQEXWWRQDQGKROGIRUVHFRQGV

 7KHIXQFWLRQLFRQZLOOȵDVKXQWLOGHDFWLYDWLRQLVFRP

-

SOHWH'HDFWLYDWLRQLVFRPSOHWHZKHQWKHIXQFWLRQ
LFRQDQGWZRKRUL]RQWDOEDUV

DUHGLVSOD\HG

Note:

 If a deactivated button is pressed, there is no 

IXQFWLRQDQGWKHWZRKRUL]RQWDOEDUVDUHGLVSOD\HG

7RDFWLYDWHIXQFWLRQV

 ΖQVWDOOEDWWHULHV$OOLFRQVDUHGLVSOD\HGDQGȵDVKLQJ

 :KLOHWKHLFRQVDUHȵDVKLQJSUHVVWKHUHOHYDQWIXQF

-

WLRQEXWWRQDQGKROGIRUVHFRQGV

 7KHIXQFWLRQLFRQZLOOFRQWLQXHWRȵDVKXQWLODFWLYD

-

WLRQLVFRPSOHWHDQGWKHQWXUQVROLG$FWLYDWLRQLV
FRPSOHWHZKHQWKHIXQFWLRQLFRQLVGLVSOD\HG

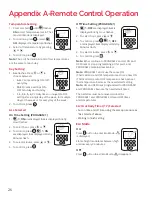
6HWWLQJ&HOVLXVRU)DKUHQKHLW

7RFKDQJHEHWZHHQr&DQGr)SUHVV

and hold   + 

VLPXOWDQHRXVO\

Note :

r& KRXUFORFN


r) KRXUFORFN

6HWWLQJWKH7LPH

Press   + 

VLPXOWDQHRXVO\


'D\

ȵDVKHV

Press   +   to select a number 
to correspond with the day of the 

ZHHN

• 

 0RQGD\

• 

 7XHVGD\

• 

 :HGQHVGD\

• 

 7KXUVGD\

• 

 )ULGD\

• 

 6DWXUGD\

• 

 6XQGD\

Press   + 

VLPXOWDQHRXVO\

+RXU

ȵDVKHV

To select hour press   or 

Press   + 

VLPXOWDQHRXVO\

0LQXWHV

ȵDVK

To select minutes press   or 

 7RFRQȴUPSUHVV

 + 

VLPXOWDQHRXVO\RUZDLW

PM

PM

AM

Содержание LX 2100PKN

Страница 1: ... a neighbor s phone Follow the gas supplier s instructions If you cannot reach your gas supplier call the fire department Installation and service must be performed by a qualified installer service agency or the gas supplier Hot glass will cause burns Do not touch glass until cooled Never allow children to touch glass A barrier designed to reduce the risk of burns from the hot viewing glass is pro...

Страница 2: ...prohibited by local codes This appliance is only for use with the type of gas indicated on the rating plate This appliance is not convertible for use with other gases unless a certified kit is used INSTALLER Leave this manual with the appliance CONSUMER Retain this manual for future reference Massachusetts The piping and final gas connection must be performed by a licensed plumber or gas fitter in...

Страница 3: ... __________________________________________ Options ________________________________________ ________________________________________________ ________________________________________________ Please ask your installer for these details if they are not already provided or see page 7 Welcome to Valor Contents Safety and your fireplace 4 Child safety and your fireplace 6 Getting started 7 First time o...

Страница 4: ...of the fireplace can get very hot when the fireplace heats Although safe they may reach temperatures in excess of 200º F depending on elevation of the shelf Do not place anything on it Some materials or items although safe may discolor shrink warp crack or peel due to the heat produced by the fireplace Avoid placing candles paintings photos and other combustible objects sensitive to heat or furnit...

Страница 5: ...echnician to inspect the appliance and to replace any part of the control system and any gas control that has been under water Intended use This appliance is designed and approved as a supplemental heater to be used while attended The use of an alternate primary heat source is advisable This unit is not for use with solid fuel Maintenance Keep the unit s control compartment burner and circulating ...

Страница 6: ...pervised when they are in the same room as the appliance Toddlers young children and others may be sus ceptible to accidental contact burns A physical barrier is recommended if there are at risk individuals in the house To restrict access to a fireplace or stove install an adjustable safety gate to keep toddlers young children and other at risk individuals out of the room and away from hot surface...

Страница 7: ...ent any gas flow unless manually lighting the pilot See the full Fireplace and Lighting Information card attached to the fireplace or as reproduced in Appendix A of the Installation Manual Locating fireplace and lighting information The Fireplace and Lighting Information card is located on a card under the firebox below the end window on end opposite the wall To access the card remove the front an...

Страница 8: ...ponents of your installed fireplace with the protective barriers installed Your individual fireplace may appear differently depending on your installed options Here are the control components of your installed fireplace with the barrier screens and one sill removed Your individual fireplace may appear differently depending on your installed options LX1 pier LX2 3 sided LX2 corner L R LX1 pier LX2 ...

Страница 9: ... fireplace OFF including pilot Press and hold button on remote or ON OFF button on wall switch If the flames or pilot are on they will go out and you will hear the valve motor wind down You will hear a clunk and a beep indicating that the valve has received the signal from the remote control In the unlikely event that you cannot turn off your fireplace with the remote control handset use the wall s...

Страница 10: ...rn child proofing OFF 1 Press and hold the and buttons simultaneously 2 disappears from the handset screen and the handset is returned to full functionality Preventing inadvertent ignition You can use one of the following two methods to ensure that your fireplace will not turn on unexpectedly Under the front sill shut off the local gas supply to the control valve See Locating Info Card on page 7 fo...

Страница 11: ... on the remote wall switch no tools required and withdraw the battery holder straight out from the wall it is attached to the plate Replacing batteries WARNING Do not attempt to access the batteries while the fireplace is hot Let the fireplace cool first before touching it Caution Do not use a screwdriver or other metallic object to remove the batteries from the battery holder or the handset This ...

Страница 12: ...not to scratch the glass when cleaning See Cleaning your fireplace on page 13 Inspect the operation of the flame safety sys tem Pilot or Flame rectification device Inspect and ensure the lighting of the main burner occurs within 4 seconds of the main gas valve opening Visual inspection should match that outlined in the appliance instruc tion manual Inspect primary air openings for blockage See Che...

Страница 13: ...Locate the window retainer hooks Retainer hook locations 2 per side 4 Hook the window handle to one of the spring loaded window levers 5 Pull the window retainer hooks out and up from the railing at the top of the side windows 6 Pull the top of the window out and up into the gap between the firebox and outside of the fireplace Note the sills have been removed from this image for clarity but you do...

Страница 14: ...e bottle container Our dealers have experienced good results from the products listed below We cannot however guaran tee results of these products Brasso Polish Plus by KelKem Cook Top Clean Creme by Elco White Off by Rutland Turtle Wax Do not clean the glass while it is hot Always securely replace the windows and the barrier screen before lighting see next page If broken glass panes may only be re...

Страница 15: ...nst the end window Out Bottom railing Log position Log position is important in your Valor fireplace because it can optimize the beauty of the flame and the combustion efficiency of your fireplace If logs are moved during glass cleaning or other fireplace maintenance refer to your fireplace Installation Manual for specific instructions on how to position them for optimal operation If you are not com...

Страница 16: ... performance of the fireplace Damage components Cause overheating resulting in dangerous conditions Damage caused by incorrect window installation is not covered by the Valor Warranty WARNING For safety purposes make sure the barrier screen is re installed on the fireplace front after maintenance 6 Pull one retainer hook over the angled rail at the top of the window and hook it down completely Rep...

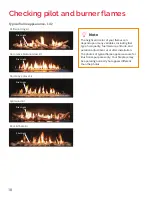
Страница 17: ... other flammable vapors and liquids Inspect the vent terminal outdoors regularly to ensure that it is not obstructed by snow trees bushes leaves or other objects We recommend at least an annual inspection Checking pilot and burner flames Driftwood log kit Pilot flame Thermocouple probe must be in flame Birch log kit Pilot light Pilot light Decorative Murano Glass kit Pilot light Rock and Shale kit...

Страница 18: ...ot Light Pilot Light Rock Shale kit Pilot Light Note The height and color of your flames can depend upon many variables including fuel type fuel quality fuel mixture altitude and aeration adjustment at or after installation The photos of typical flame appearance are for illustrative purposes only Your fireplace may be operating normally but appear different than the photos ...

Страница 19: ...es in your remote control handset but the batteries in the battery holder beside the wall switch See page 11 for instructions on how to replace the batteries Why do I hear popping or snapping noises As your fireplace heats and cools with normal use its metal parts will expand and contract which may cause some noise This is pefectly normal Why do I hear whirring noises As you start or adjust your f...

Страница 20: ...our fireplace serviced before initial use and at least once every year by a qualified service technician Contact our dealer quoting the model and serial numbers if possible These numbers can be found on the fireplace information card attached to the fireplace see page 7 Why does my pilot light go out when I leave the house for extended periods of time Your fireplace has a built in safety shutoff If...

Страница 21: ...onform to all applicable codes including national and local gas appliance installation codes and building and ȴre codes d The owner must comply with all operating instructions e The Company is not responsible for the labor costs to remove defective parts or re install repaired or replacement parts f The initial owner of the unit will be responsible for any shipping charges for replacement parts as...

Страница 22: ...ight Fan if included Program Mode Temperature Time Auxiliary Feature not used Countdown Timer Battery Status Eco F or C 7R 7XUQ 2Q LUH 2QH XWWRQ OLJKWLQJ GHIDXOW 7ZR XWWRQ OLJKWLQJ simultaneously 3UHVV DQG KROG IRU VHFRQGV XQWLO VKRUW EHHSV DQG D EOLQNLQJ VHULHV RI OLQHV FRQȴUPV WKH VWDUW VHTXHQFH KDV EHJXQ 5HOHDVH EXWWRQ 0DLQ JDV ȵRZV RQFH SLORW LJQLWLRQ LV FRQȴUPHG DQGVHW DXWRPDWLFDOO JRHV LQWR ...

Страница 23: ...XODWLQJ DQ 2SHUDWLRQ RXQWGRZQ 7LPHU AM AM 7R GHDFWLYDWH IXQFWLRQV ΖQVWDOO EDWWHULHV OO LFRQV DUH GLVSOD HG DQG ȵDVKLQJ KLOH WKH LFRQV DUH ȵDVKLQJ SUHVV WKH UHOHYDQW IXQF WLRQ EXWWRQ DQG KROG IRU VHFRQGV 7KH IXQFWLRQ LFRQ ZLOO ȵDVK XQWLO GHDFWLYDWLRQ LV FRP SOHWH HDFWLYDWLRQ LV FRPSOHWH ZKHQ WKH IXQFWLRQ LFRQ DQG WZR KRUL RQWDO EDUV DUH GLVSOD HG Note If a deactivated button is pressed there is no ...

Страница 24: ...UPRVWDWLF DQG FR PRGHV 0D LPXP FRXQWGRZQ WLPH LV KRXUV DQG PLQXWHV LJKW LPPHU 2SHUDWLRQ On Press LV GLVSOD HG LJKW LV RQ DW SUHVHW OHYHO 2II Press GLVDSSHDUV LJKW WXUQV R Setting Press and hold until ȵDVKHV To adjust light between 20 100 press or 7R FRQȴUP VHWWLQJ HLWKHU SUHVV RU ZDLW LV GLVSOD HG Note 7KH OLJKW ZRUNV LQGHSHQGHQWO RI WKH SLORW ȵDPH ΖI RX ZDQW WKH OLJKW RQ EXW QR ȵDPH SUHVV EXWWRQ ...

Страница 25: ...ill display 33 0DQXDO 0RGH 7KH RQ R VWDWXV RI WKH ȴUHSODFH DV ZHOO DV ȵDPH KHLJKW DUH PDQXDOO FRQWUROOHG E WKH XVHU PM ON OFF PM PM 7KHUPRVWDWLF 0RGH On Press LV GLVSOD HG 3UHVHW WHPSHUDWXUH GLVSOD V EULHȵ IROORZHG E WKH URRP WHPSHUDWXUH 6HWWLQJ HVLUHG 7HPSHUDWXUH Press and hold until is dis played and set temperature ȵDVKHV To adjust set temperature press or 7R FRQȴUP SUHVV RU ZDLW 2II Press Pres...

Страница 26: ...PH 6HWWLQJ 352 5 0 1 OFF DUH GLVSOD HG ALL is GLVSOD HG EULHȵ RXU ȵDVKHV To select hour press or 7R FRQȴUP SUHVV 1 OFF DUH GLVSOD HG ALL GLVSOD HG EULHȵ 0LQXWHV ȵDVK To select minutes press or 7R FRQȴUP SUHVV Note LWKHU FRQWLQXH WR 352 5 0 DQG VHW 21 DQG 2 WLPHV RU VWRS SURJUDPPLQJ DW WKLV SRLQW DQG 352 5 0 UHPDLQV GHDFWLYDWHG Note 352 5 0 DQG XVH WKH VDPH 21 7KHUPRVWDWLF DQG 2 WHPSHUDWXUHV 2QFH D...

Страница 27: ...XWHV CAUTION R QRW XVH D VFUHZGULYHU RU RWKHU metallic object to remove the batteries from the EDWWHU KROGHU RU WKH KDQGVHW 7KLV FRXOG FDXVH D VKRUW FLUFXLW RZ DWWHU 5HFHLYHU With low battery power in the battery holder the V VWHP VKXWV R WKH ȴUH FRPSOHWHO 7KLV ZLOO QRW KDSSHQ LI WKH SRZHU LV FRPSOHWHO LQWHUUXSWHG 6HYHQ D 6KXW 2II 7KH V VWHP VKXWV R WKH ȴUH FRPSOHWHO LI WKHUH LV QR FKDQJH LQ ȵDPH ...

Страница 28: ...XSSO OLQH 1R VSDUN Reversed polarity in thermocouple wiring ΖQFRUUHFW SLORW RULȴFH LI YDOYH KDV EHHQ FRQYHUWHG IURP 3 WR 1 RU YLFH YHUVD F09 F09 4 sec Fire is not responding 1R HOHFWURQLF FRQWURO RI ȴUH RZQ DUURZ EXWWRQ was not pressed during pairing Receiver and handset are not synced F40 Low battery symbol Permanent DWWHU LFRQ ȵDVKHV RQ handset display Low battery in handset 4 sec Fire is not re...

Отзывы: